
Awakening: The Goblin Kingdom
The Awakening: The Goblin Kingdom Walkthough provides a complete text guide through the entire game from start to finish. There are screenshots of nearly all hidden object areas and completed puzzles. How to solve the puzzles are clearly detailed throughout the guide. Continue Sophia's request to find her human family as she travels through the Goblin Kingdom.
Overview:
In the third
installment of the Awakening series by developer Boom Zap, you arrive
in Goblin Kingdom to continue you the search for your people.
Hints: These are unlimited but must refill.
Journal: This provides an ongoing story as you progress through the game as well as your current objectives.
Hidden Object Areas: Only items in your inventory will be circled. Items in yellow required you do something else first - these will be marked in the guide
Chapter 1: Mountain Outpost
Griffin Landing
Cistern
Generator Room
Dark Tower
Chapter 3: The Fungal Forest
Rope Bridge
Village Square
Tangled Hedge Maze
The Docks
Train Station
Border Crossing
Train Station
Hints: These are unlimited but must refill.
Journal: This provides an ongoing story as you progress through the game as well as your current objectives.
Hidden Object Areas: Only items in your inventory will be circled. Items in yellow required you do something else first - these will be marked in the guide
Chapter 1: Mountain Outpost
Griffin Landing
- speak to the Owl
- check your journal to read the letter from the Fairy Queen
- look at your Pocket Dragon - he's hungry
- find the Mossflowers
- feed the Mossflowers to the Pocket Dragon - he will become your companion
- continue up
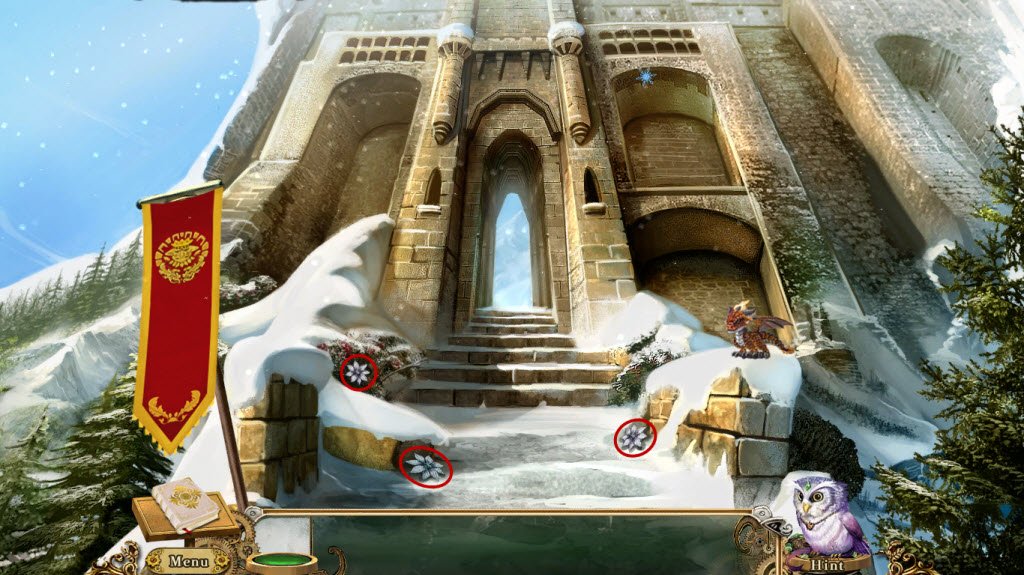
- speak to the Goblin Guard
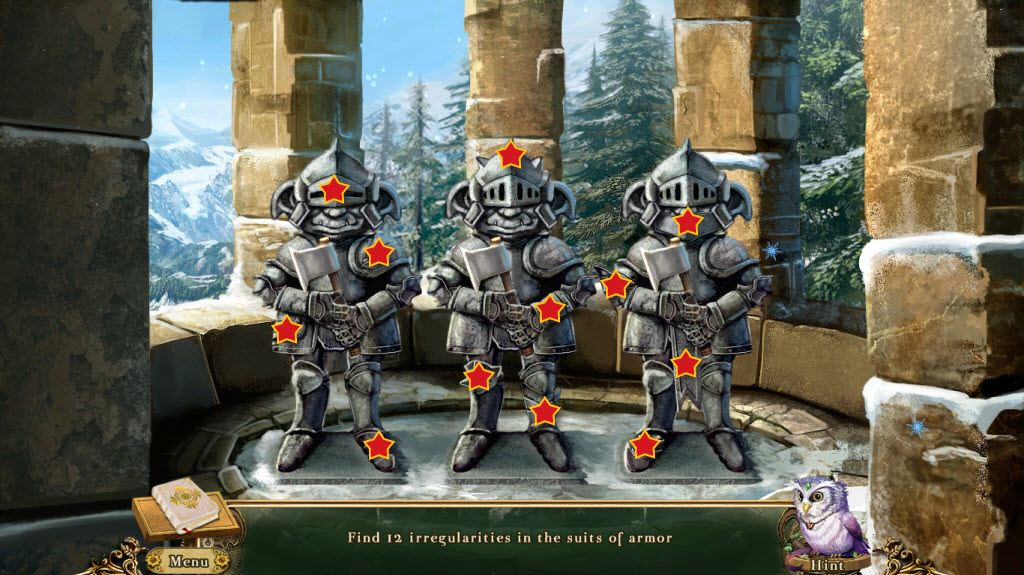
- examine the goblin statues - find 12 irregularities in the suits of armor
- take the Goblin Axe
- examine the strongbox
- pick up the Bolgin Coin
- examine the telescope - use the Bolgin Coin to operate it
- find the goblin landmarks indicated on the bottom
- take the eight Prism Spheres
- examine the strongbox again
- use the Goblin Axe to cut through the rope
- Strongbox Puzzle
- place the Prism Spheres on the lid
- drag a sphere back to see what is underneath
- drag the correct sphere - matching color - into the right spot
- example: banana = yellow
- see screenshot for solution
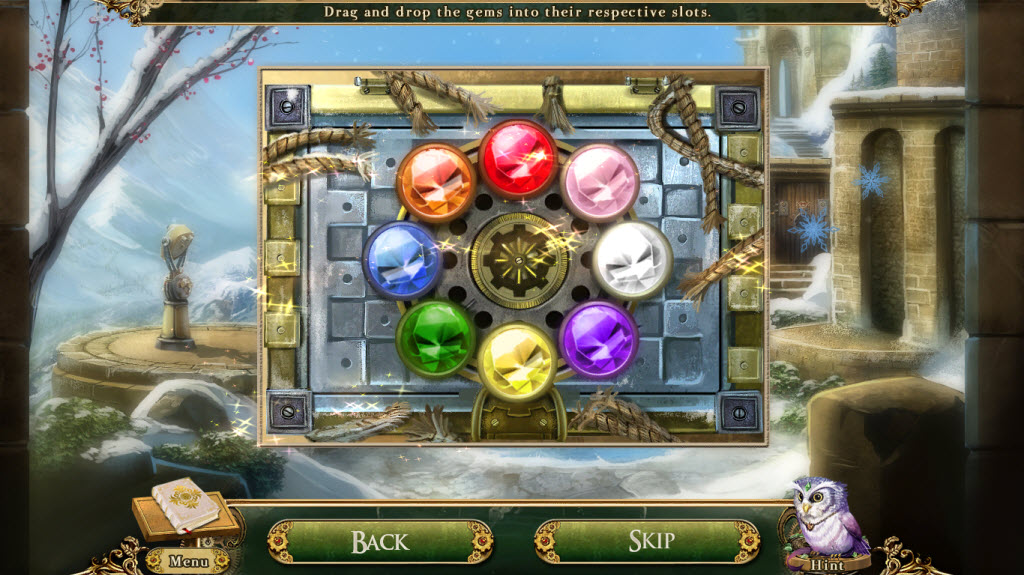
- take the Bolgin Coin 1 of 6
- take the Pickaxe
- examine the Goblin Crest - it will be jotted down into your journal
- examine the icy patch
- use your Dragon to breath fire three times on the ice
- Icy Patch Puzzle
- rotate the rings and swap the blocks to complete a picture
- see screenshot for solution
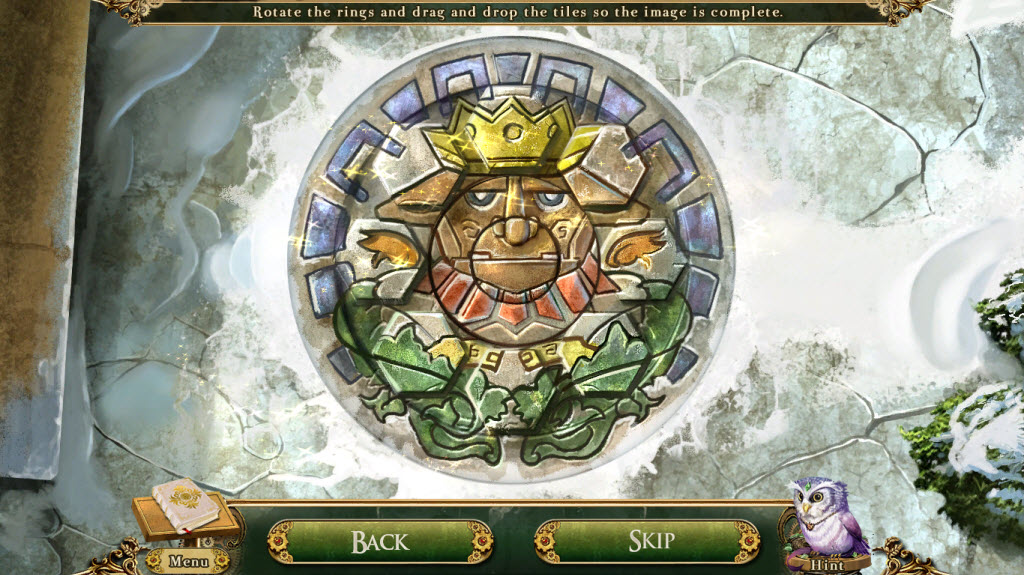
- take the Goblin Shield
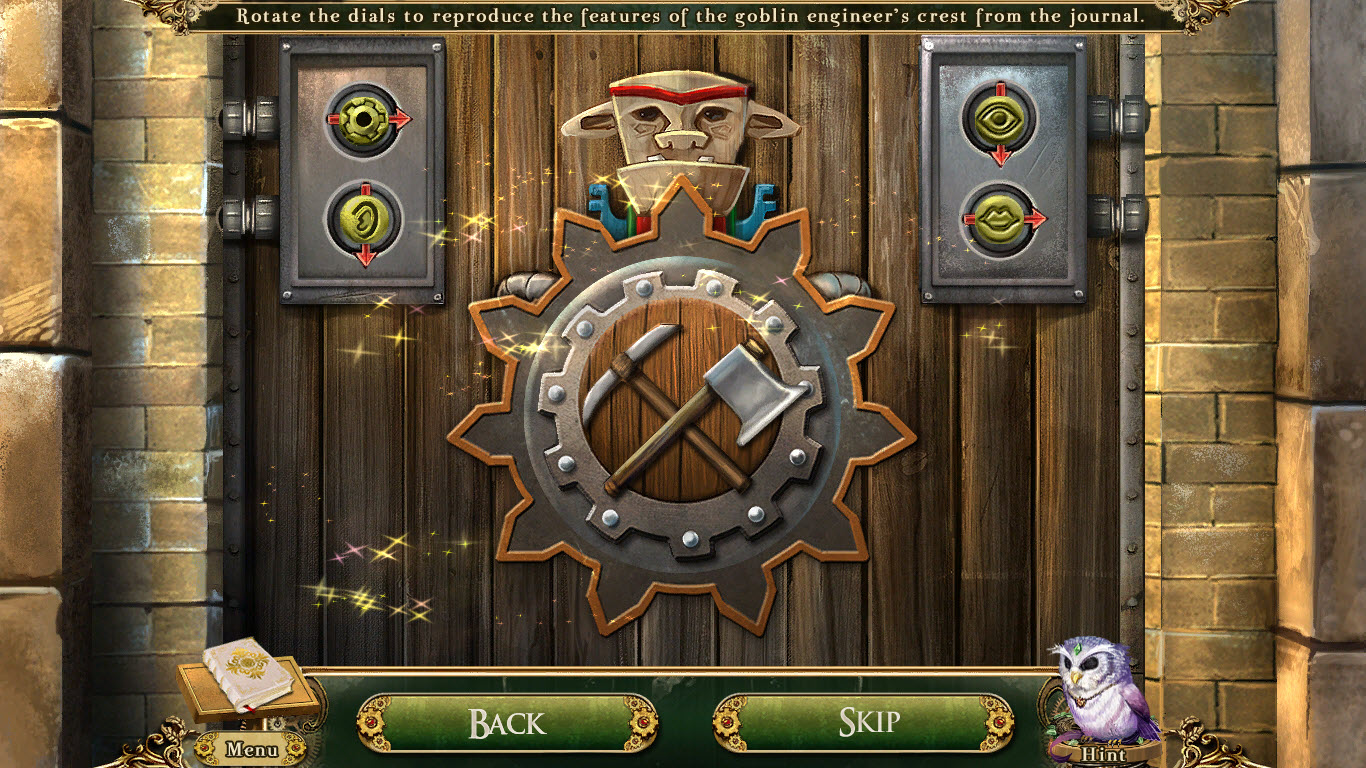
- examine the goblin gate
- Goblin Gate Puzzle
- place the Goblin Shield on the door
- place the Goblin Axe and Pickaxe into the door
- use the gold buttons on the left and right to recreate the goblin sketch in your journal
- see screenshot for solution
- enter the arched walkway
- read the flyer
- check out the goblin kingdom view!
- continue up
- talk to the Goblin Engineer
- pick up Firewood 1 of 5
- pick up Firewood 2 of 5
- examine the generator
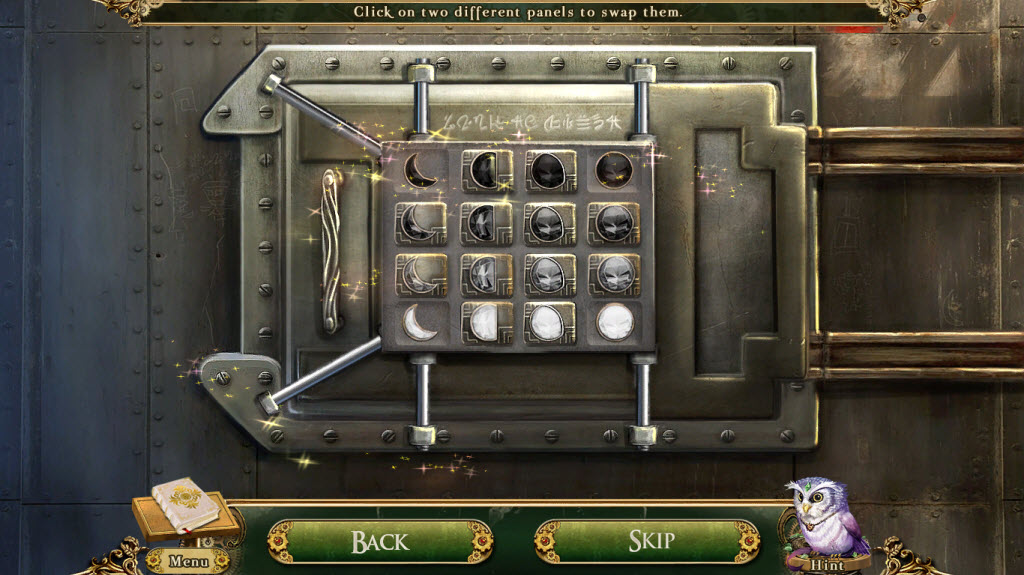
- Engine Box Puzzle
- read the scratchings at the top
- "dark to like, wane to wax, arrange the moons with these facts"
- click the moons to swap them
- see screenshot for the solution
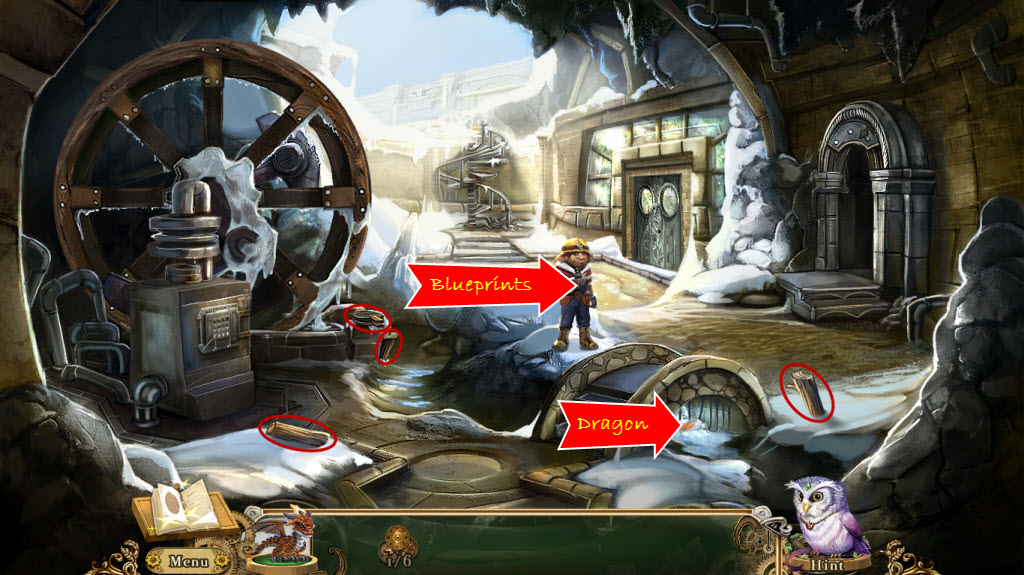
- pick up the Goblin Sealant (Goblin Work Tools 1 of 4) and the Goblin Blueprints
- examine the frozen obstruction - take the Bellows and Firewood 3 of 5
- look under the bridge - use your Dragon to breath fire twice on the ice
- take the Goblin Screwdriver (Goblin Work Tool 2 of 4)
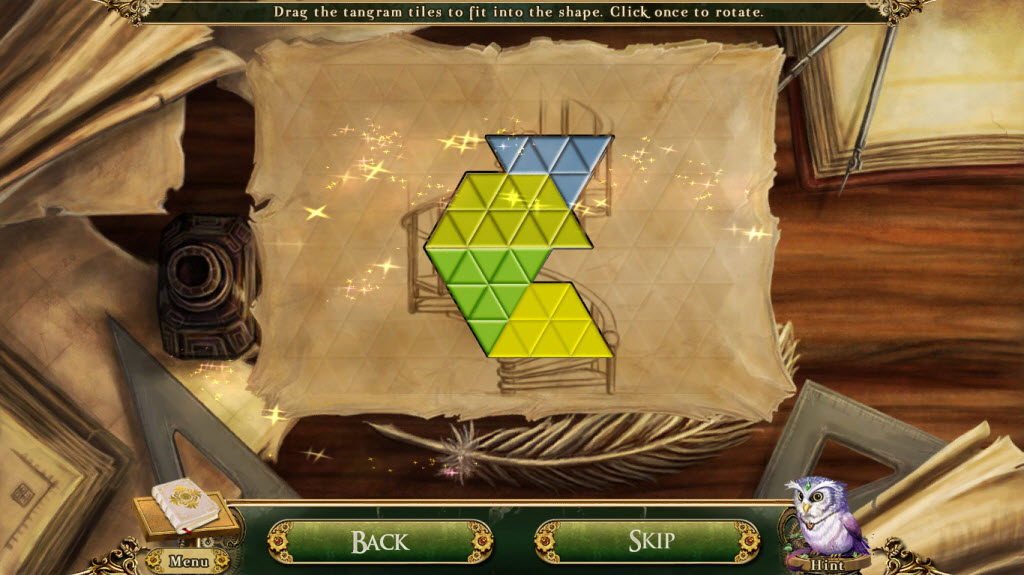
- give the Goblin Blueprints to the Goblin Engineer
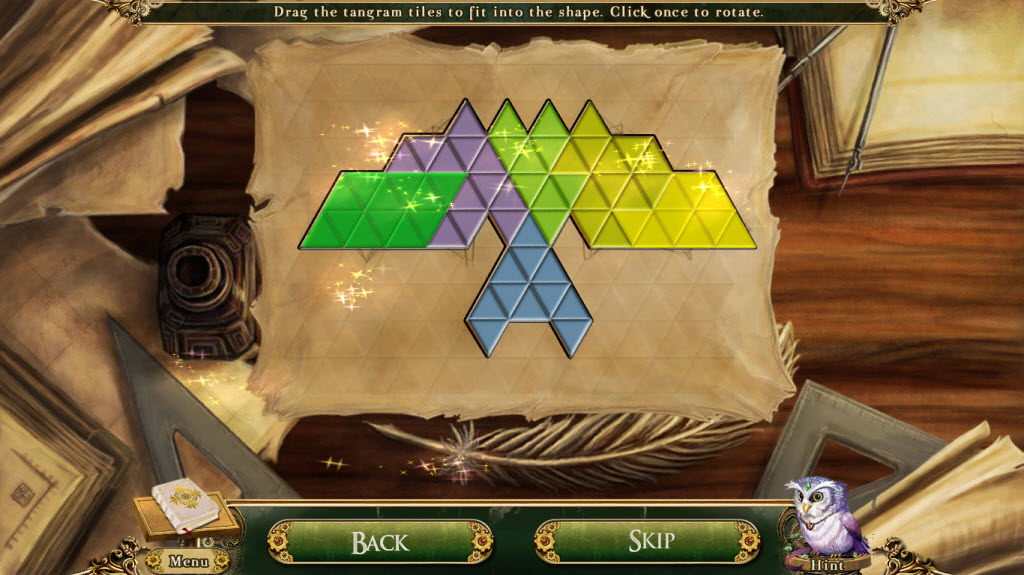
- Blueprint Puzzle
- this is a tangram puzzle
- rotate the pieces so they fit without the outline to create a picture
- see screenshot for solution
- go upstairs
Cistern
- talk to the Goblin Engineer
- pick up the Goblin Hammer (Goblin Work Tool 3 of 4)
- pick up Firewood 4 of 5
- pick up Firewood 5 of 5
- examine the totem - a sketch will be added to your journal
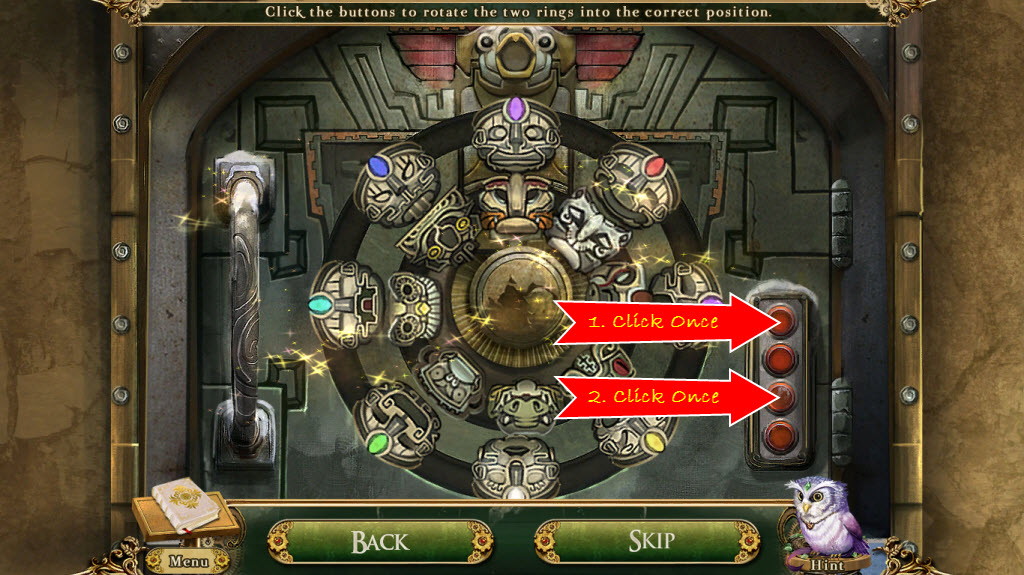
- examine the furnace
- Furnace Puzzle
- use the red buttons on the right to rotate the rings
- recreate the totem
- solution: click the top button once and click the second button from the bottom once
- see screenshot
- use the Bellows on the soot four times
- take the Bolgin Coin 2 of 6 and the Gate Handle
- place the Firewood in the furnace
- go down
- examine the greenhouse door
- use the Handle on the door
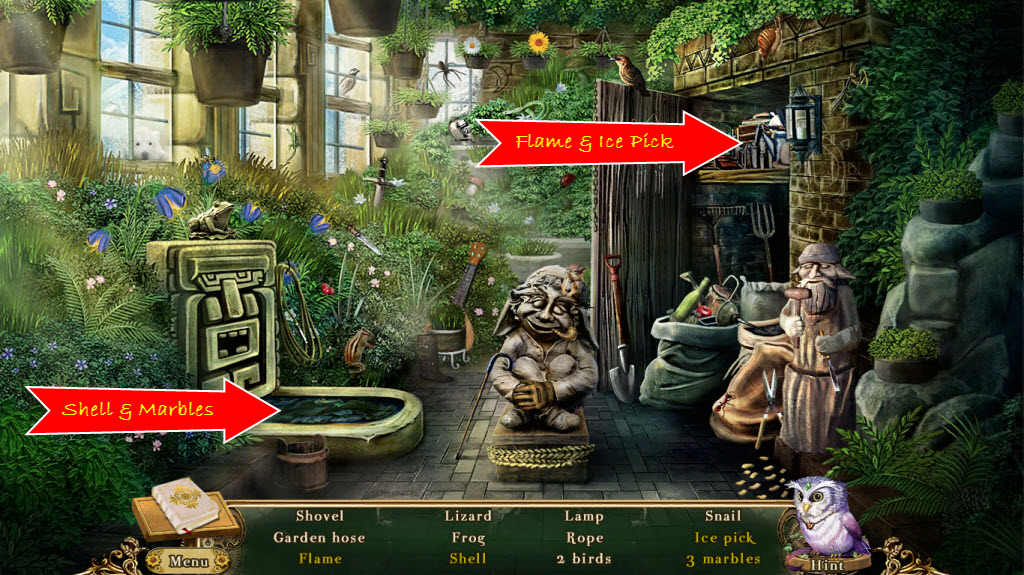
- enter the greenhouse
- hidden object area
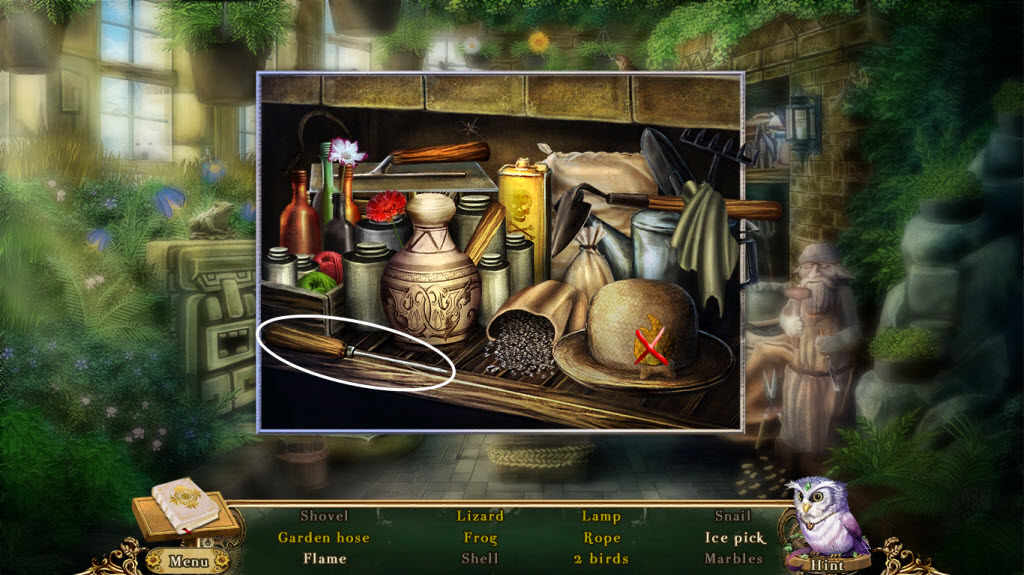
- Flame - look in top shelf of shed
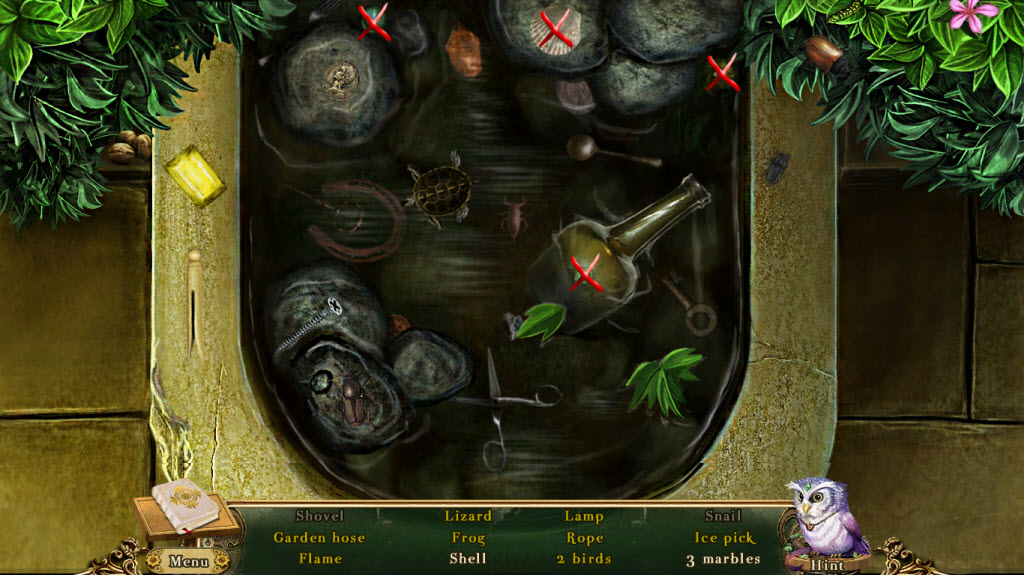
- Shell - look in fountain/water
- Three Marbles - look in fountain/water
- Ice Pick - look in top shelf of shed
- take the Ice Pick
Generator Room
- examine the frozen obstruction
- use the Ice Pick on the ice
- take the Wheelbarrow Wheel
- go upstairs
- examine the pile of rubble in the corner
- place the Wheelbarrow Wheel on the wheelbarrow
- click the three pieces of Stone
- push the wheelbarrow
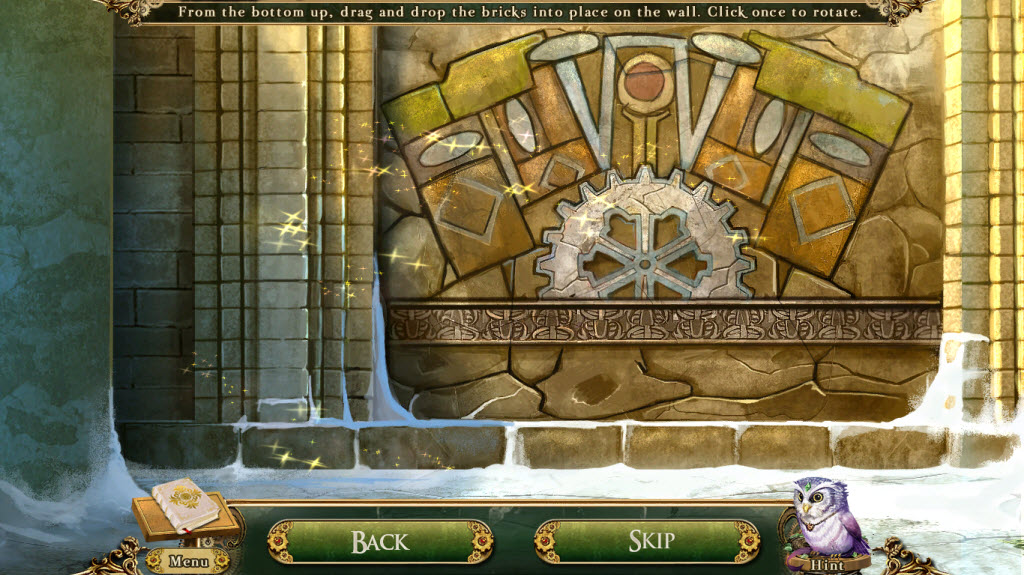
- Stone Wall Puzzle
- arrange the stones like a jigsaw puzzle to patch the hole in the wall
- left click to rotate the pieces
- you must build from the bottom up (the shaded portion)
- see screenshot for solution
- examine the furnace
- use your Dragon to light the firewood
- Furnace Puzzle
- turn the corresponding valve when a meters arrow is in the green only
- examine the toolbox
- Toolbox Puzzle
- pick up only the parts that correspond with the picture
- see screenshots for solutions
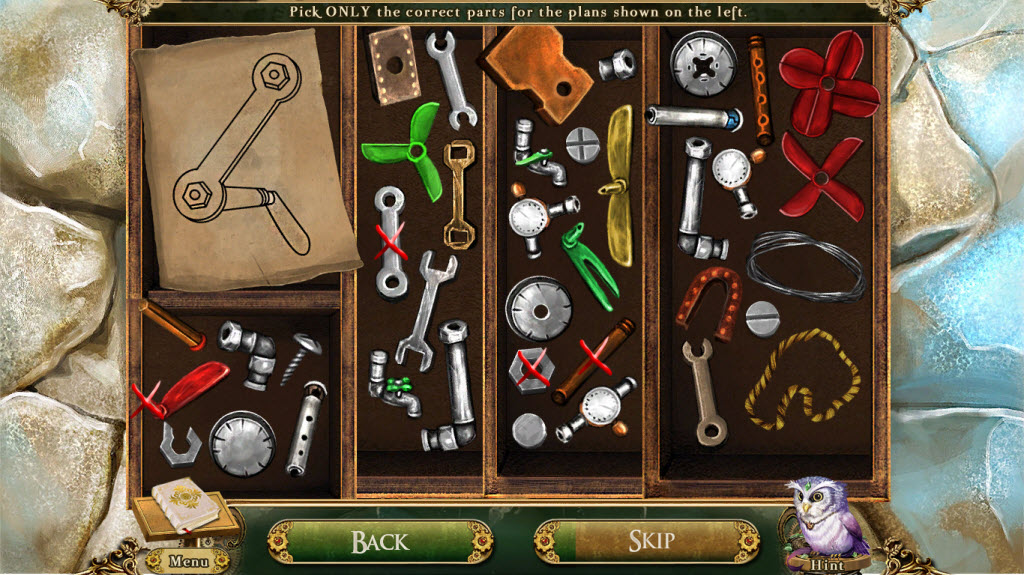
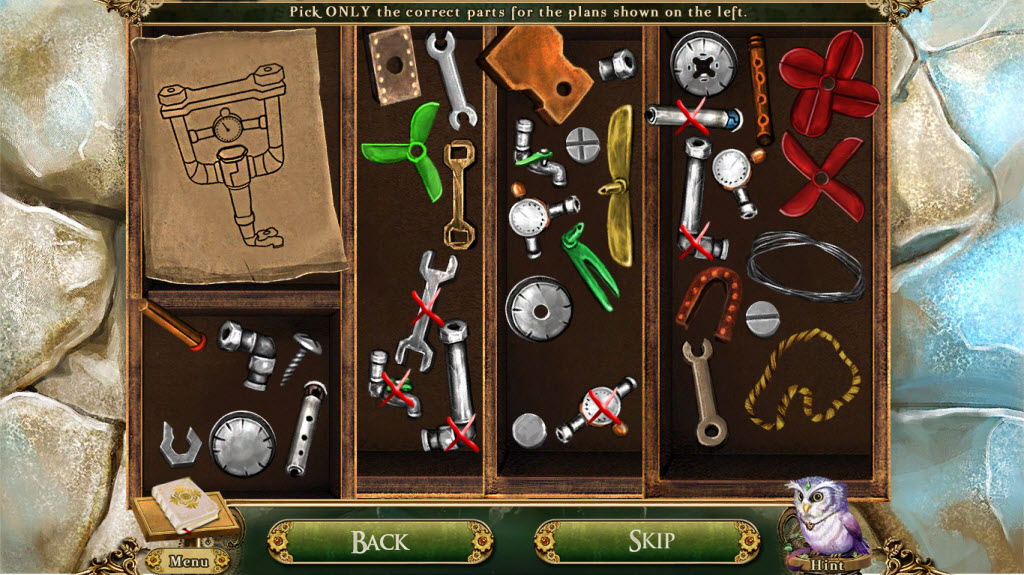
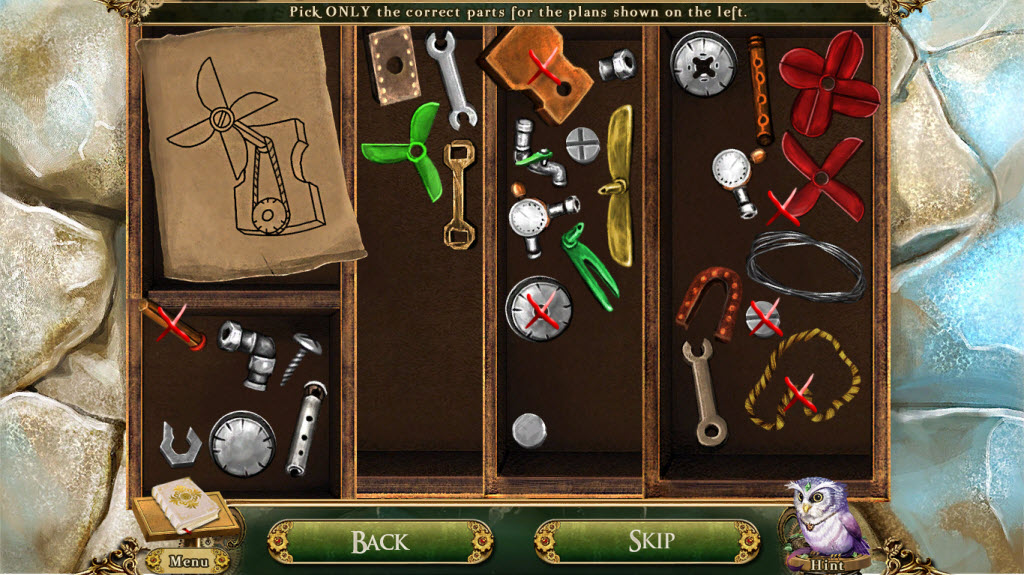
- get Goblin Wrench (Goblin Work Took 4 of 4)
- go down
- talk to the Goblin Engineer
- examine the engine box
- use the Goblin Work Tools on the engine box
- Engine Box Puzzle
- use the appropriate tools on what needs fixed
- sealant = four holes
- screwdriver = four loose screws
- wrench = four loose bolts
- hammer = four bent pipes
- use the elevator
- examine the control panel
- take the Bolgin Coin 3 of 6
- push the red button
- exit the elevator
- take Charcoal 1 of 8
- take Charcoal 2 of 8
- take Steam Pipe 1 of 5
- take Steam Pipe 2 of 5
- examine the bridge controls
- take the Typewriter Key 1 of 3
- enter the ticket station
- who is that?!
- quickly exit
- talk to the Mysterious Peddler
- play the matching game
- receive a Pocket Watch
- go back inside the ticket station
- pick up the Steam Pipe 3 of 5
- examine the ticket dispenser
- take Typewriter Key 2 of 3
- look at the map - it information will be placed in your journal
- pick up Charcoal 3 of 8
- pick up Charcoal 4 of 8

- examine the clerks desk on the right
- read the newspaper clipping - it will be added to your journal
- open the drawer
- pick up the Magnifying Glass and Elevator Button
- examine the message capsule machine at the back
- Message Capsule Machine Puzzle
- arrange the colored circles so they match their respective bars on the top/bottom/sides
- use the arrows in the middle to swap them
- puzzles will vary per player/per game
- take the Message Capsule
- examine the typewriter
- take Bolgin Coin 4 of 6
- go down twice
- replace the bottom Elevator Button
- push the bottom button
- exit the elevator
- find the torches and use your Dragon to light them
- pick up Steam Pipe 4 of 5
- pick up Steam Pipe 5 of 5
- pick up Charcoal 5 of 8
- pick up Charcoal 6 of 8
- examine the gem sorting table on the right
- take the Typewriter Key 3 of 3
- use the Magnifying Glass to examine the gems
- Gem Puzzle
- this is a basic match three or more puzzle
- swap gems to create rows of three or more to clear the board
- receive Gemstone Collection
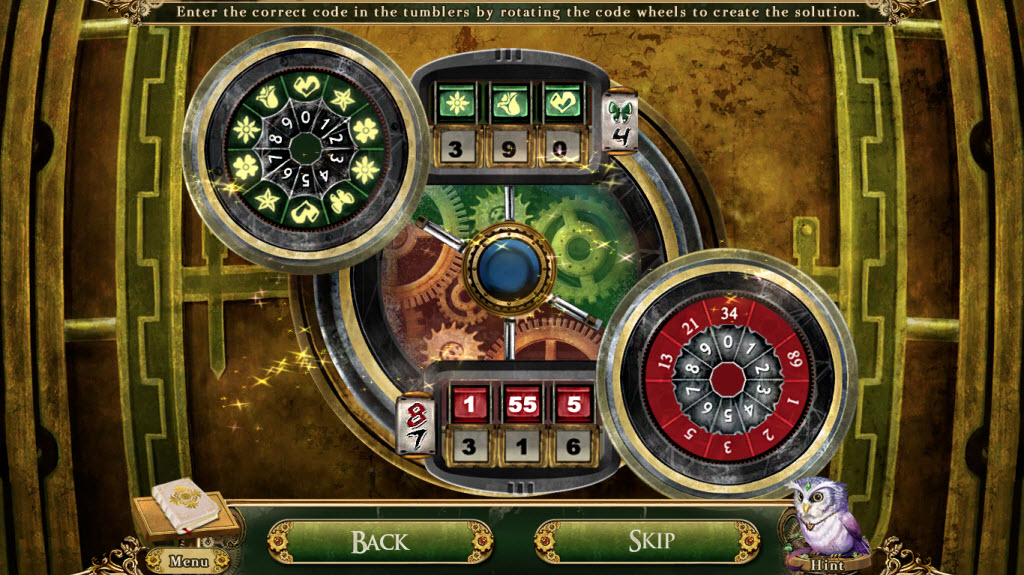
- examine the storage room door
- Storage Room Door Puzzle
- green wheel: rotate the outer wheel so the butterfly is over the number four
- rotate the symbols above each number to match the one on the green dial
- red wheel: rotate the outer wheel on the red ring so the blank space between the five and thirteen is over the number seven
- rotate the numbers above the numbers on the bar to match the corresponding ones on the red wheel
- see screenshot for solution
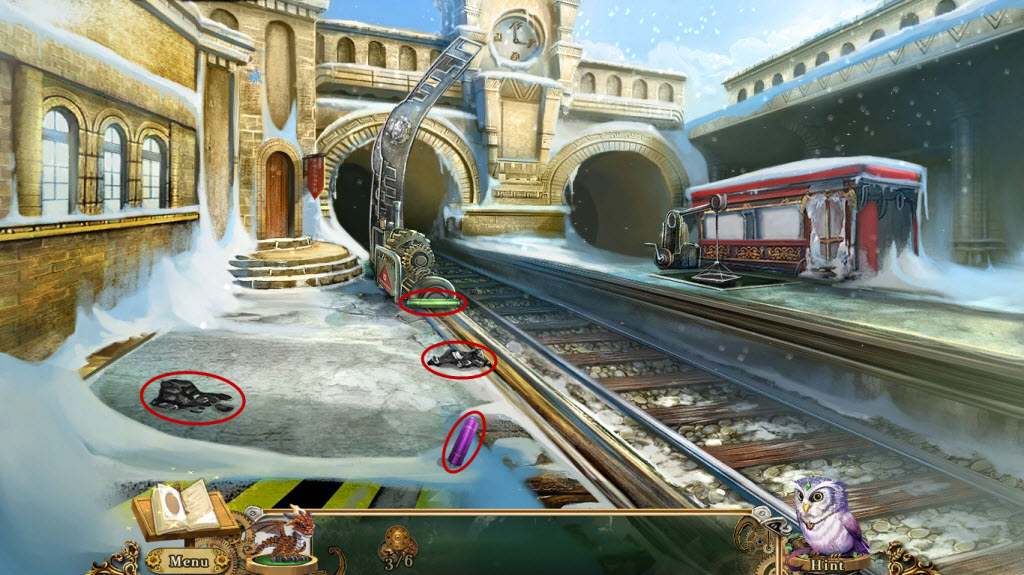
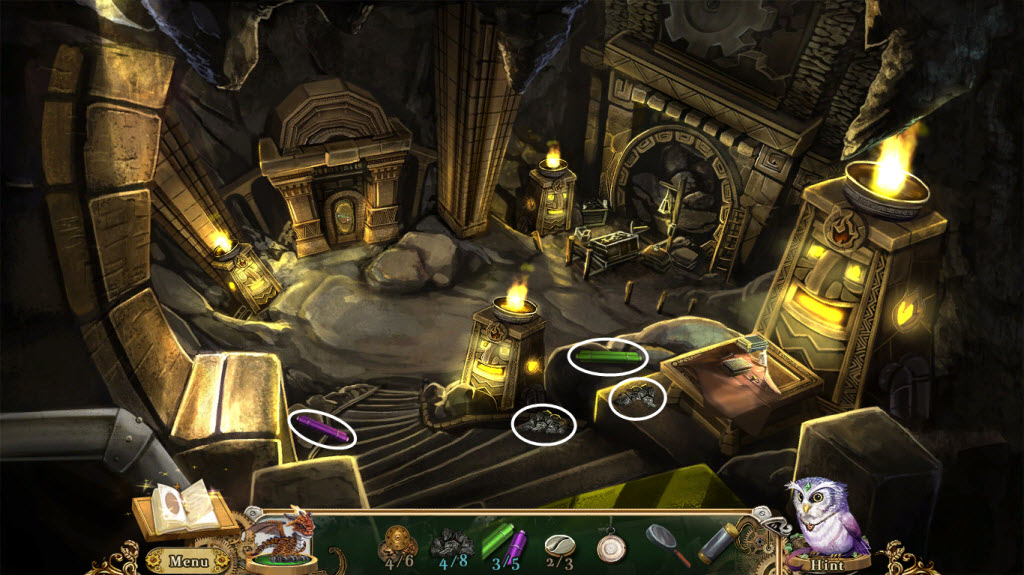
- take Fuel Oil and Charcoal 7 of 8
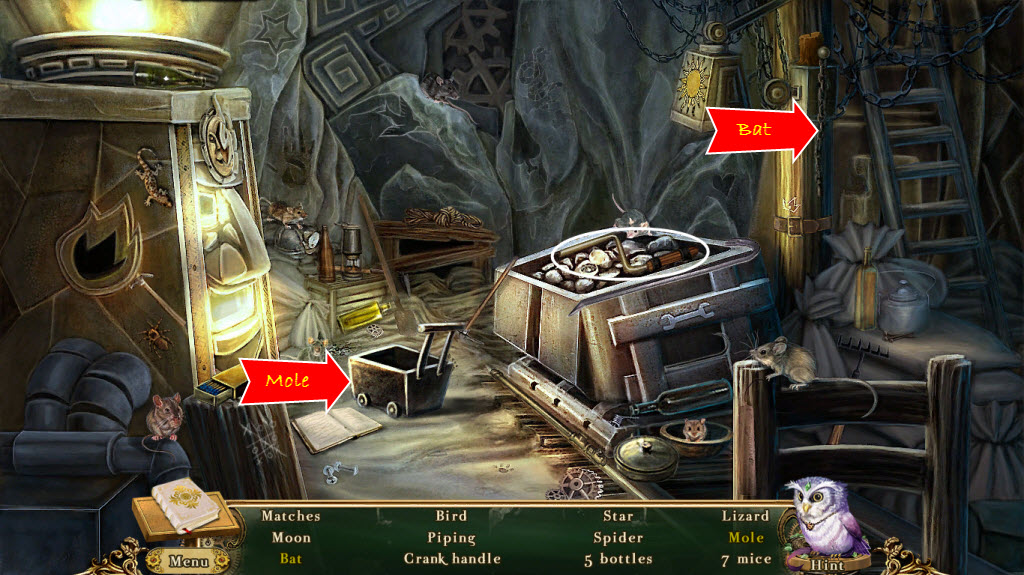
- examine the collapsed mine tunnel
- hidden object area
- Bat - pull the chain by the lantern
- Mole - move the mine cart
- take the Crank Handle
- return to the train station
- examine the bridge controls
- replace the Steam Pipes
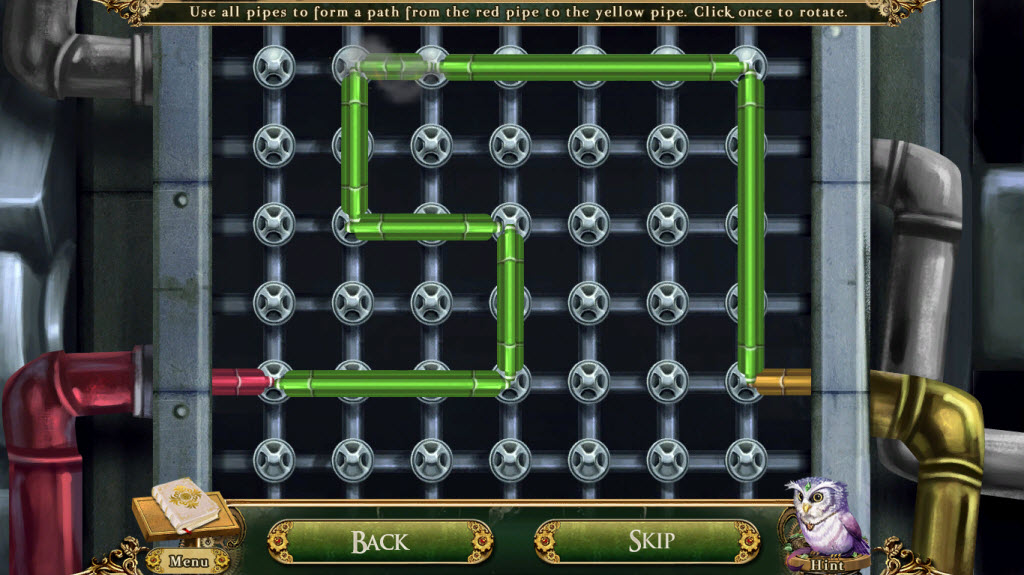
- Steam Pipe Puzzle
- arrange all the pipes so they form a continuous line between the red and yellow pipe
- there are various solutions to these puzzles
- see screenshot for solution to second puzzle (I was unable to get a screenshot of the first puzzle)
- examine the cargo crane on the right side of the tracks
- use the Crank Handle on the side and turn it
- examine the carriage door
- take the Charcoal 8 of 8 off the steps
- return to the mines
- take the Bolgin Coin 5 of 6 out of the charcoal brazier
- place the Charcoal in the brazier
- use the Fuel Oil on the Charcoal
- use your Dragon to light the charcoal
- return to the train station
- examine the cargo crane and raise it up
- enter the carriage
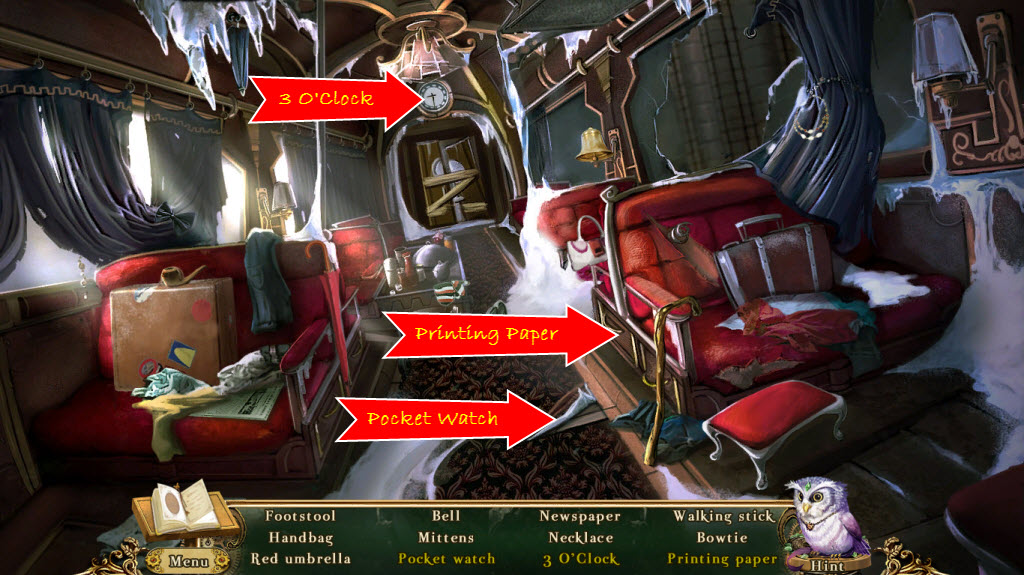
- hidden object area
- Pocket Watch - pull back the ripped carpet
- Three O'Clock - change the clock to 3:00
- Printing Paper - open the compartment door under the seat
- take the Printing Paper
- return to the ticket station
- examine the clerks desk
- use the Gem Stone Collection on the box
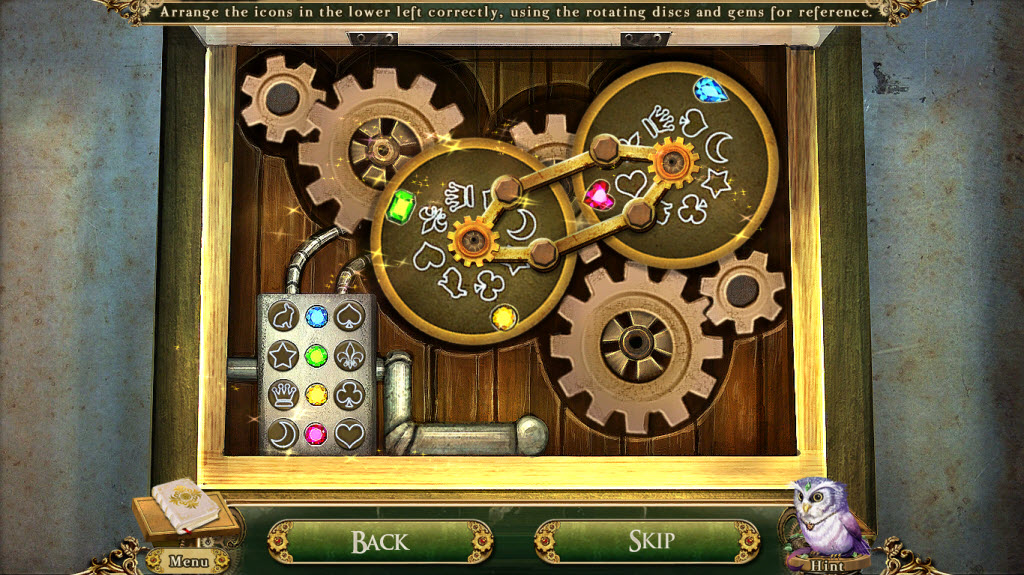
- Gem Stone Puzzle
- place the symbols next to the gems in the lower left in the correct order
- use the discs for reference - click to rotate
- hint: place all the symbols referenced by a gem on one side
- hint: line up a gem on the inside (between the brackets) and look at the symbol directly across on the other disc
- see screenshot for solution
- take Bolgin Coin 6 of 6
- go down
- give the Bolgin Coins to the Mysterious Peddler and buy the Typewriter Ribbon
- go back into the ticket station
- examine the typewriter
- replace the Typewriter Keys
- replace the Ink Ribbon and Printing Paper
- look in your journal and make a note of the station code
- use the typewriter to type the station code
- hit the arrow key
- receive the Printed Station Code
- examine the clerks desk
- place the empty capsule in the holder
- place the Printed Station Code into the capsule
- take the Completed Message Capsule
- examine the ticket machine
- place the Completed Message Capsule into the machine
- take your Train Ticket
- return to the train station
- talk to the Goblin Conductor
- give the Train Ticket to Goblin Conductor
- continue up
- speak to the Castle Guard on the left
- enter the palace
- speak to King Grimble
Dark Tower
- examine the round table
- take the Cardboard Fish and Cheese
- examine the diorama
- pick up the Picture Scrap 1 of 4
- pull the rope
- pick up Picture Scrap 2 of 4
- place the Cardboard Cheese in the mousetrap
- place the Cardboard Fish in the dish
- watch what happens
- pick up the Toy Bone
- pick up the Picture Scrap 3 of 4
- pull out King Crookshank and take Picture Scrap 4 of 4
- take the Wooden Puppet 1 of 3
- look out the window
- talk to Ran - he and the Dragon will rejoin you
- take the Wooden Puppet 2 of 3
- look at the skyline - it will be added to your journal
- take the Replica Tower
- examine the round table again
- give the Toy Bone to the Toy Dog and receive a Forked Stick
- use your Dragon to get rid of the cobwebs on the wall
- Dark Tower Wall Puzzle
- this is a matching game with a twist
- instead of matching two of the same items - match two items that go together
- examples: rain cloud + umbrella; hammer + nail
- take the Wooden Puppet 3 of 3
- take the Pallet With Paint
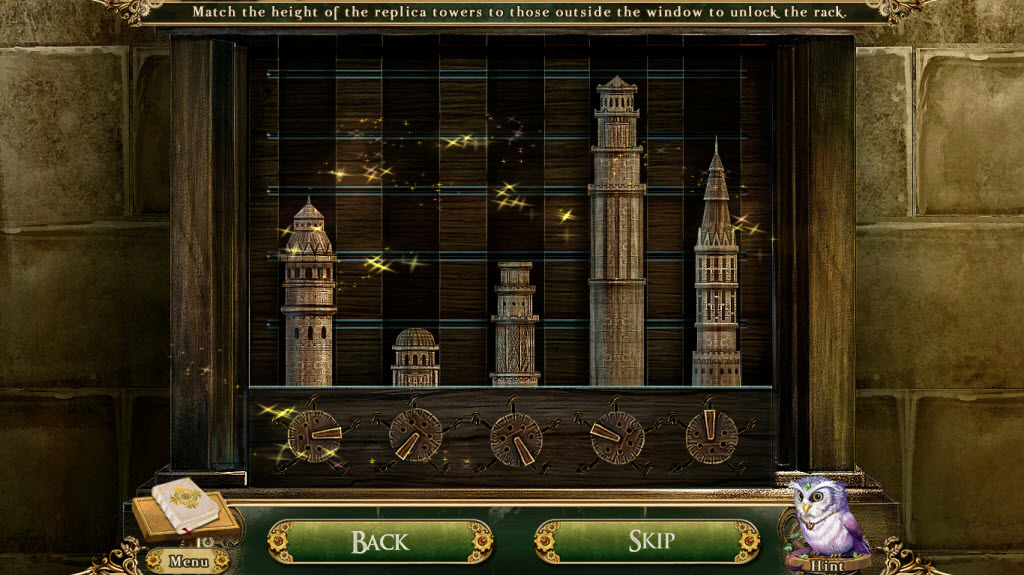
- examine the puppet rack to the left of the window
- Puppet Rack Puzzle
- replace the Replica Tower
- turn the knobs until the heights of each tower matches the ones outside the window - see your journal
- see screenshot for solution
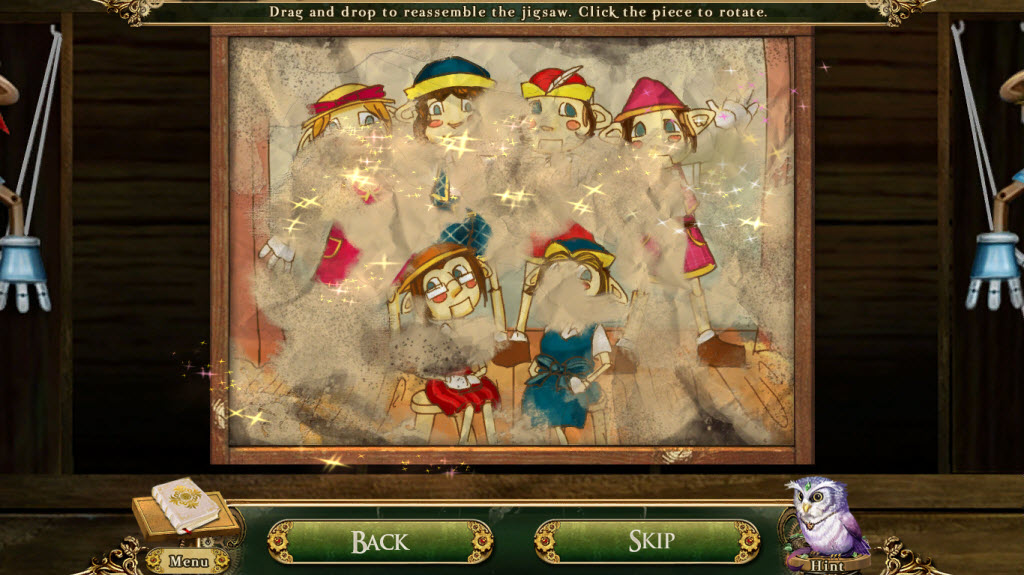
- replace the Picture Scraps
- Puppet Picture Puzzle
- replace the picture scrapes like a jigsaw puzzle to complete the picture
- left click to rotate the pieces
- see screenshot for solution
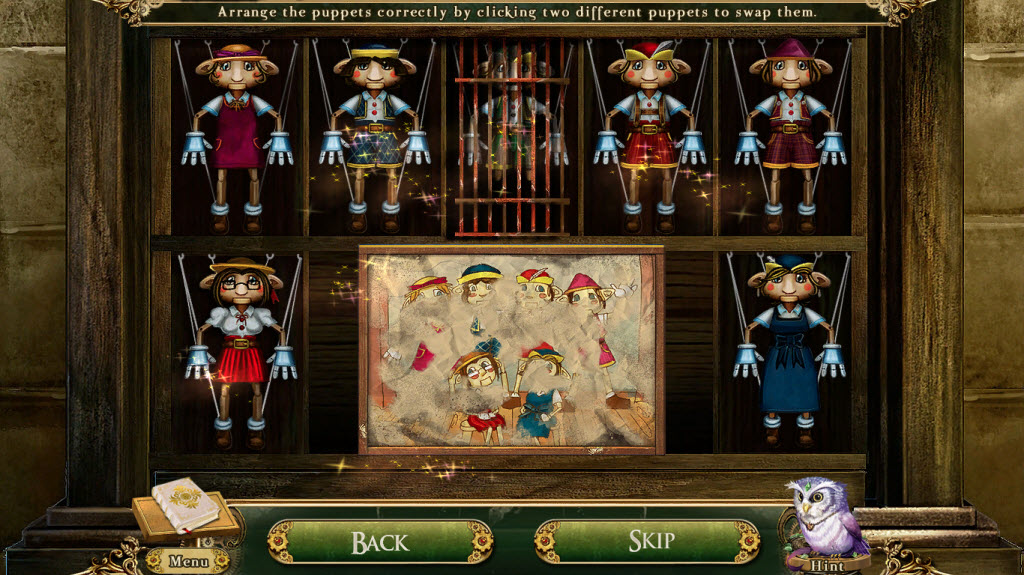
- place the Wooden Puppets on the shelf
- Puppet Puzzle
- rearrange the puppets to match the picture
- see screenshot for solution
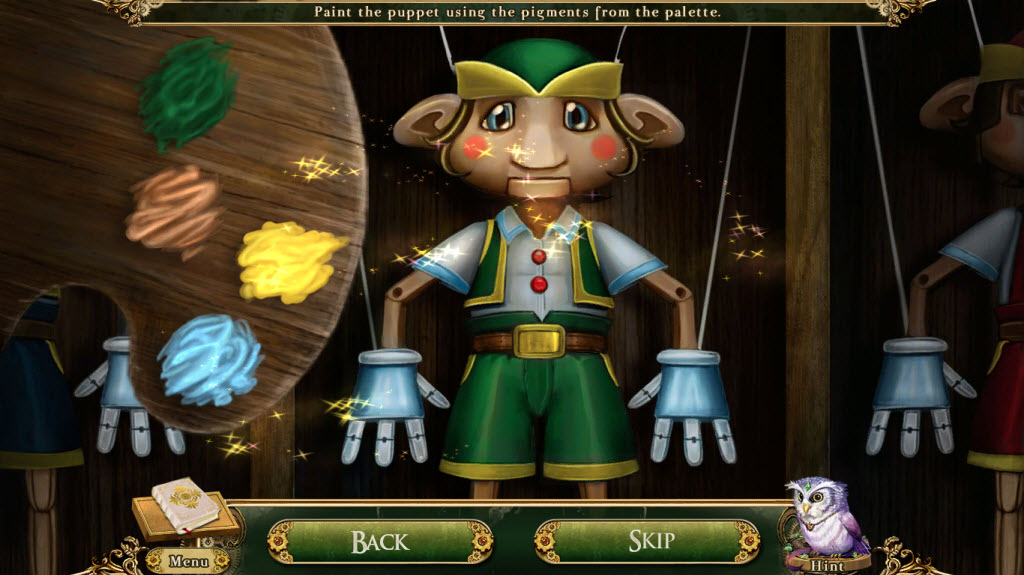
- use the Pallet With Paint on the Old Puppet
- repaint the Old Puppet
- talk to Xim the Magic Puppet
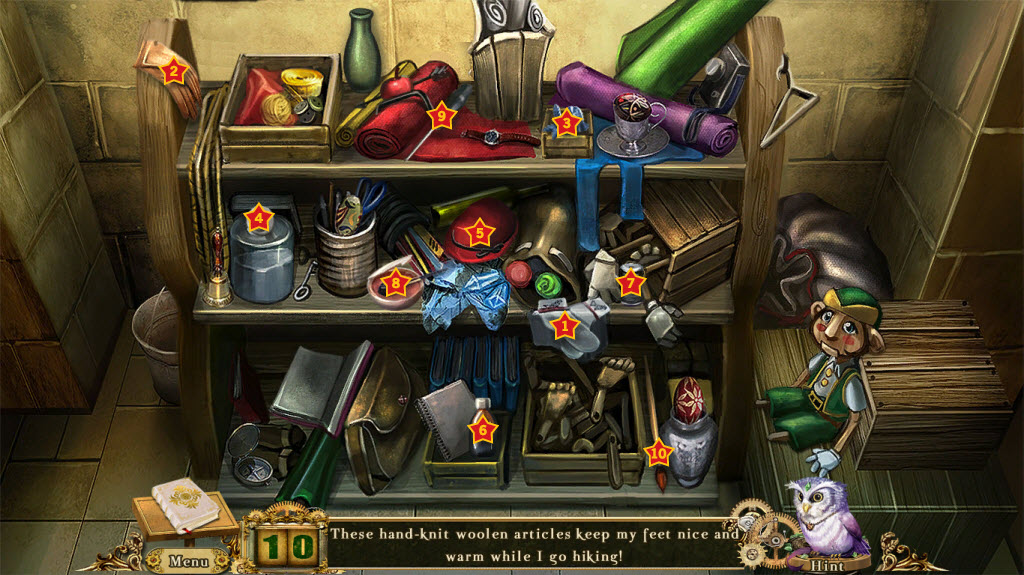
- place Xim on the puppet parts shelf
- Puppet Parts Puzzle
- find the items Xim requests
- see screenshot for solution
- examine the cell door
- use the Forked Stick to hold open the electric access slot
- put Xim through the access slot
- exit the cell
- talk to Leodici the Inventory
- pick up the Scissors
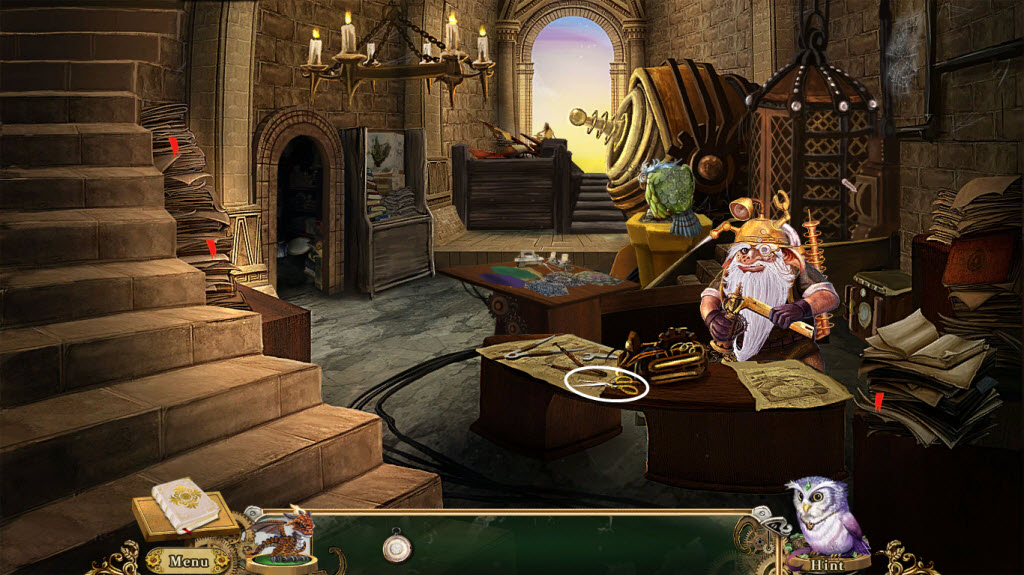
- examine the balcony
- attempt to pick up the Blueprints
- look at the shelf and examine the flying castle and plans on the cork board - these will be put in your journal
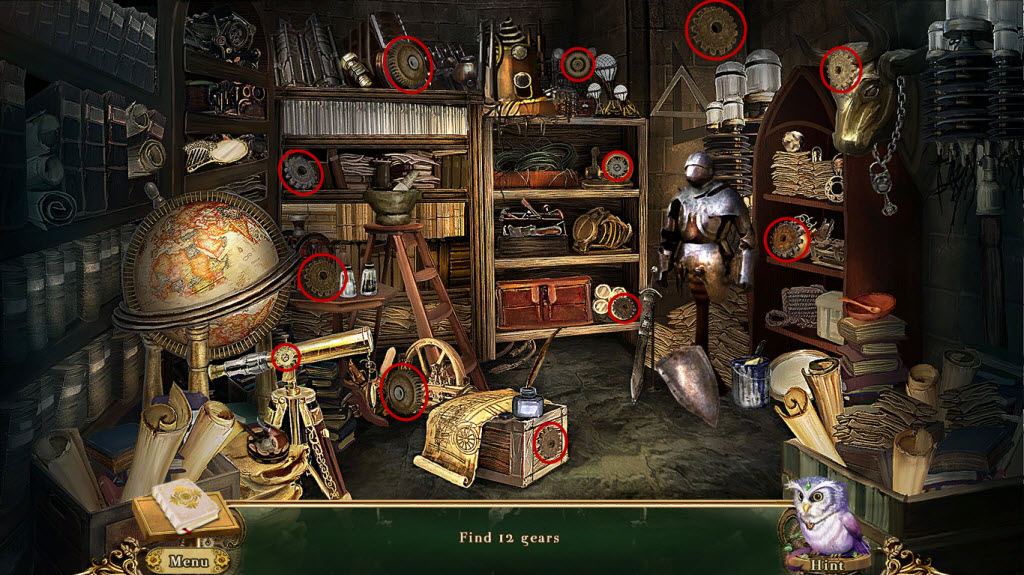
- look in the storage room
- put all of Leodici's items back in the correct places

- find twelve gears
- examine the drafting table
- put the Brass Cipher Plate on the table
- use the Scissors on the table
- Drafting Table Puzzle
- find the correct symbols and cut them out
- use the cipher plate to find the correct symbols
- see screenshot for solution
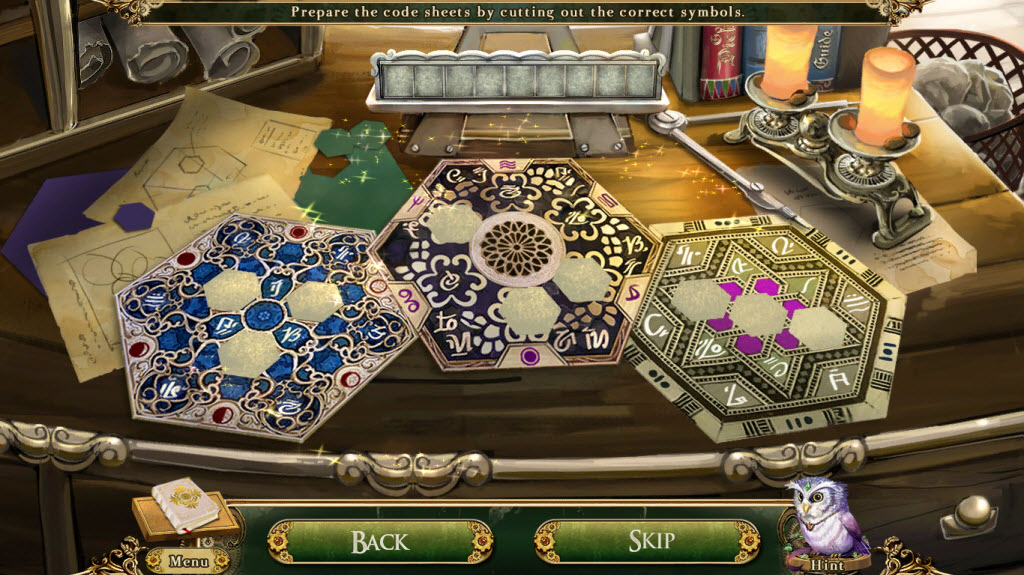
- receive Code Sheets
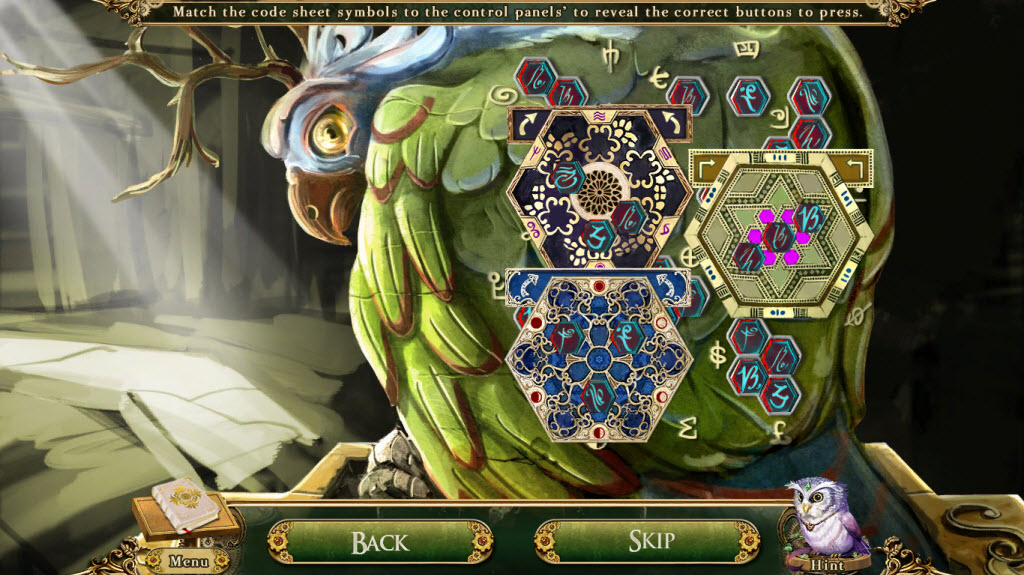
- examine the elevator control panel (looks like a bird to me!)
- place the Code Sheets on the panel (aka bird)
- Elevator Control Panel Puzzle
- slide the code sheets over the symbols until they fit
- press the symbols within the code sheet
- you can rotate the code sheets with the arrows on the top left/right
- once the code sheets are in place - push the buttons
- see screenshot for solution
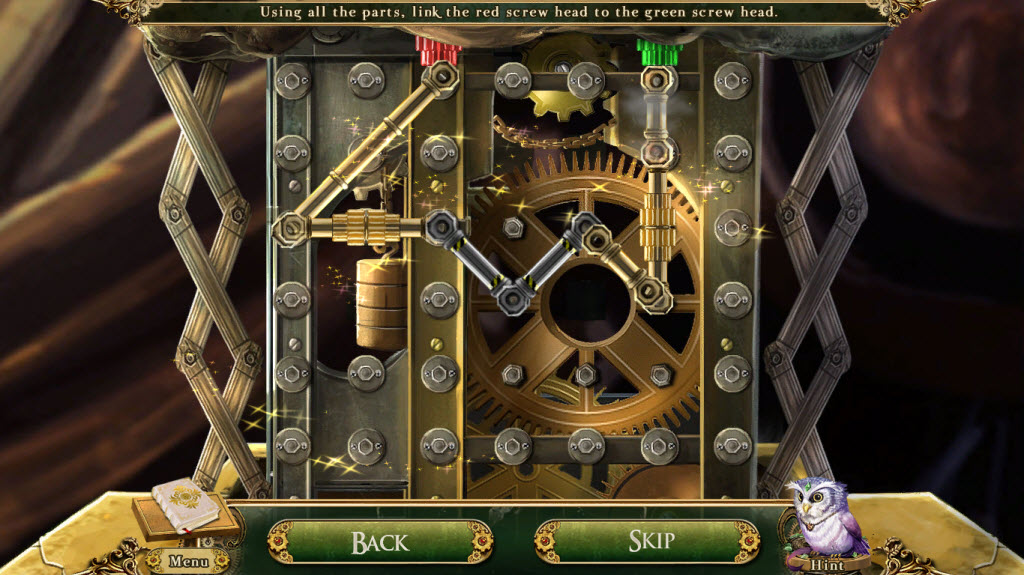
- use the Gears on the control panel
- Elevator Control Panel Puzzle Two
- arrange all the parts to link the red to the green
- there are multiple solutions
- see screenshot for solution (I was unable to get a screenshot of the first puzzle)
- pull the lever by the elevator
- enter the elevator
- examine the display case
- Display Case Puzzle
- push the red buttons to unlock the spokes
- solution: push the three left buttons and the top and middle right buttons - do not push the bottom right button
- take the Swordfish Crest
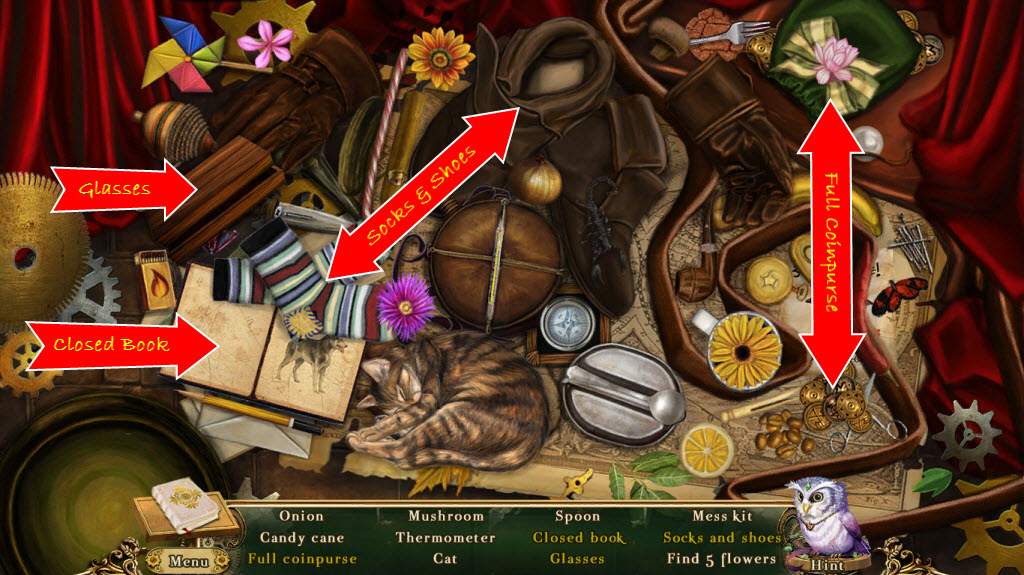
- examine the jumbled mess
- hidden object area
- Full Coinpurse - drag the coins from the lower, right corner into the purse
- Closed Book - close the book
- Glasses - open the wooden case
- Socks and Shoes - drag the socks into the shoes
- take Bolgin Coins 1-4 of 6 and Goblin Encyclopedia 1 of 6
- talk to the Peddler again - he will give you picture of his hamster
- go right
- move the potted plant
- take Goblin Encyclopedia 2 of 6
- examine the armoire
- find twelve differences on the right side
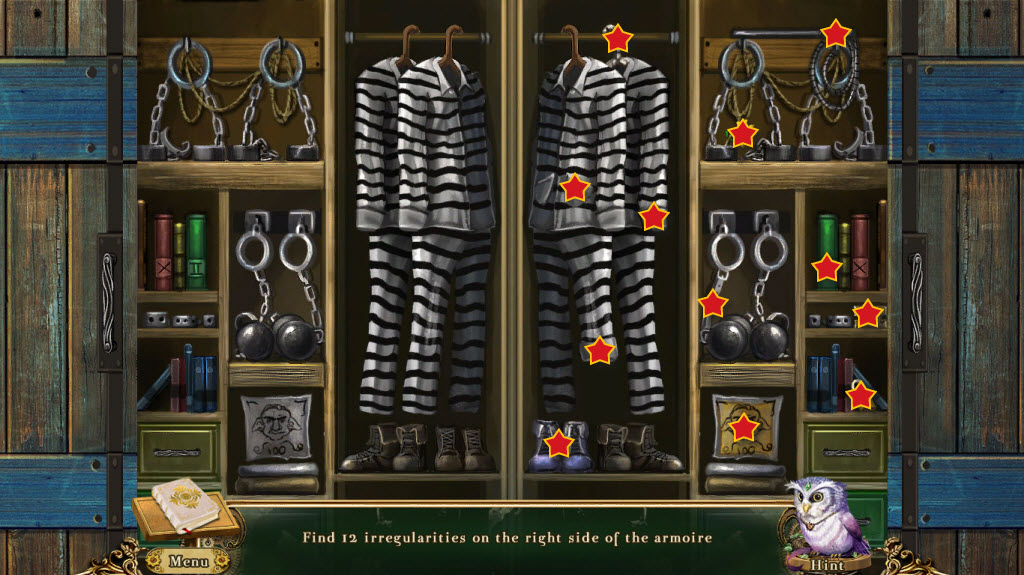
- receive Goblin Encyclopedia 3 of 6
- go left
- examine the filing cabinet
- look at the third and fifth folder - the information will be put in your journal
- find shelf BXY - 942
- receive Goblin Encyclopedia 4 of 6
- examine the stack of papers behind the right ladder
- take the Goblin Encyclopedia 5 of 6
- take the Toy Crank and Bolgin Coin 5 of 6
- go down
- examine the desk
- use the Toy Crank on the toy monkey and turn the crank
- take the Goblin Encyclopedia 6 of 6
- go down
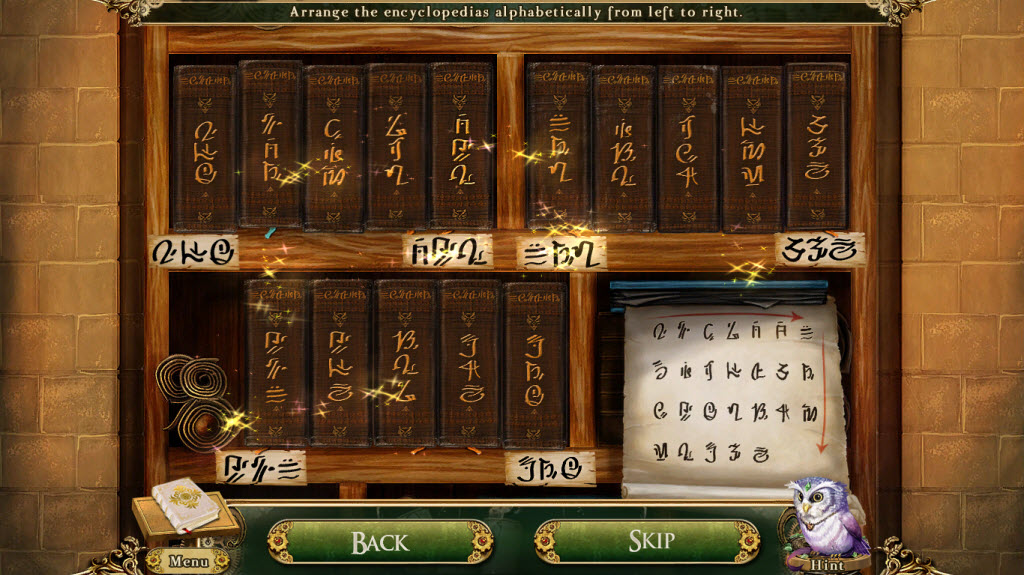
- examine the bookshelf behind the peddler
- Bookshelf Puzzle
- put the Goblin Encyclopedia's back on the shelf in the correct order
- use the alphabet on the right
- see screenshot for solution
- enter the secret chamber
- look at the rat cage
- Rag Cage Puzzle
- pull the levers in the correct order
- if you get it wrong the puzzle will reset and you have to start over
- see screenshot for correct order
- take Nibbles (the hamster) and Bolgin Coin 6 of 6
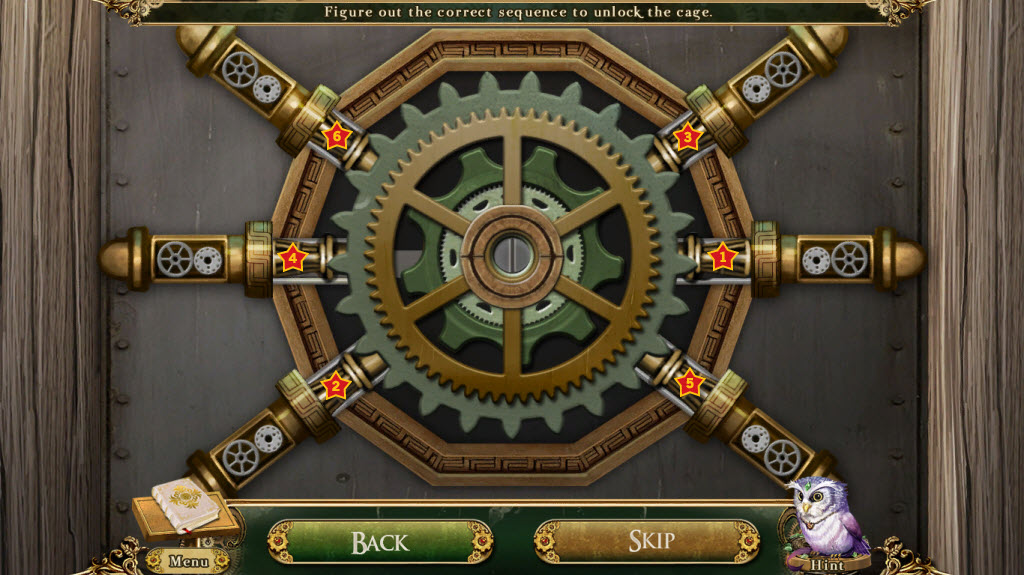
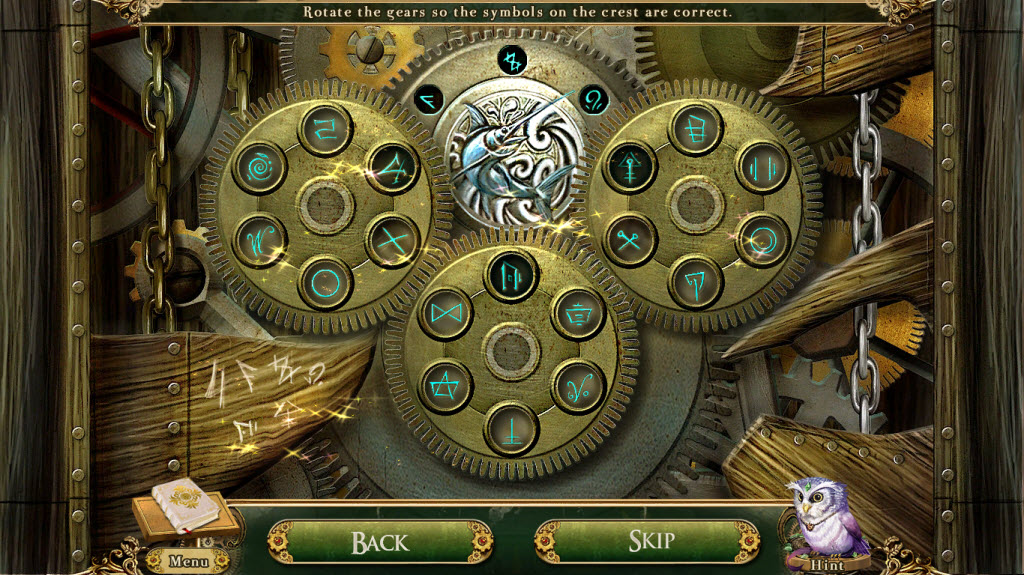
- examine the silver gear lever
- Silver Gear Lever Puzzle
- place the Swordfish Crest inside
- turn the gears so symbols match those engraved in the wood
- see screenshot for solution
- go down
- look in the display case
- take the Prize Fish Hook
- go right
- talk to the Peddler again
- give the Peddler Nibbles
- buy the Lockpicks
- go right
- examine the desk
- use the Lockpicks on the locked drawer
- Lock Puzzle
- when the lock goes all the way to the top quickly click the lock symbol underneath
- you must do this from left to right
- receive Blueprint 2 or 3
- take the Lion Crest
- go down and left
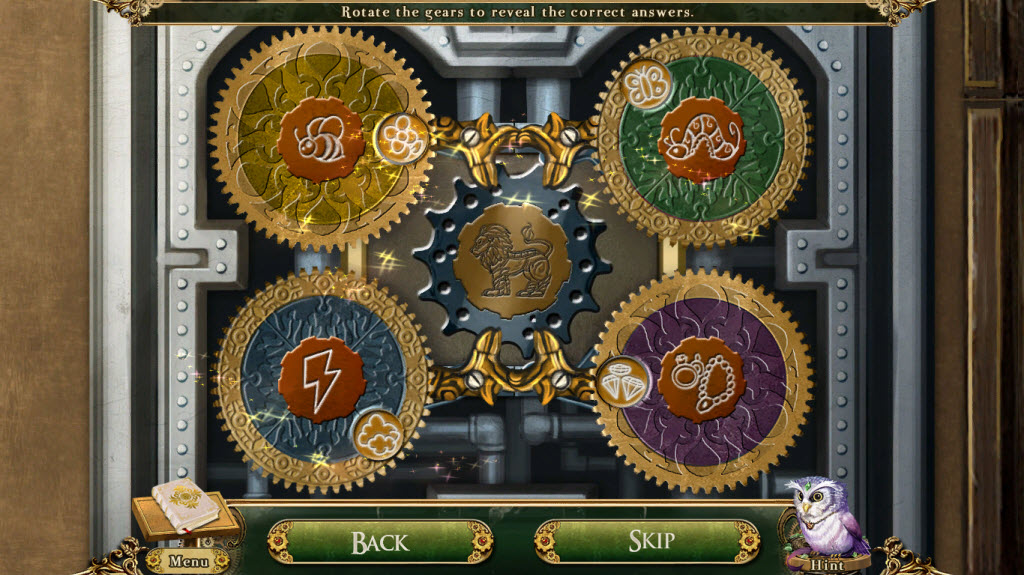
- examine the gold gear lever
- Gold Gear Lever Puzzle
- place the Lion Crest in the middle
- rotate the gears to reveal the correct symbol
- the symbol should be something that relates to the main image
- example: bee + flower
- see screenshot for solution
- pull the gold lever
- go down and right
- examine the wastebasket by the desk
- move all the items until you find the Goblin Superglue
- examine the display case
- take the Prize Fishing Rod
- examine the fish
- Broken Fish Puzzle
- use the Goblin Superglue to mend the fish
- use your cursor to put the glue on the cracks
- receive the Trophy Fish
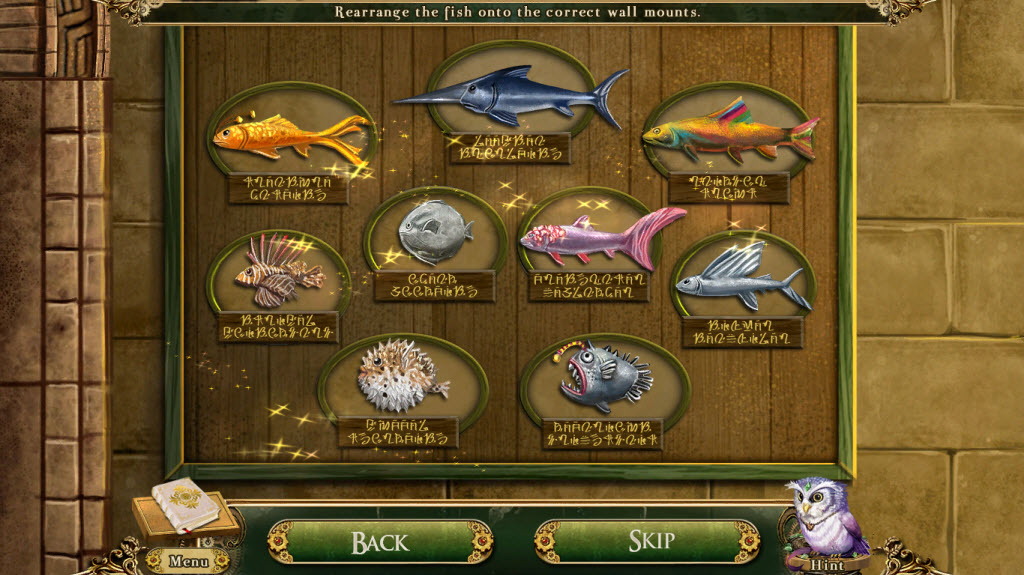
- examine the trophy board
- replace the Trophy Fish
- Trophy Fish Puzzle
- use your cursor to "read" the goblin words
- use them as hints as to which fish belongs where
- see screenshot for solution
- take the Prize Fishing Reel
- look out the window
- use the Completed Fishing Rod to retrieve the Blueprint 3 of 3
- go down twice
- talk to Leodici
- use the Blueprints on the flying machine
- Tangram Puzzle
- you're second tangram puzzle
- rotate the pieces so they fit without the outline to create a picture
- see screenshot for solution
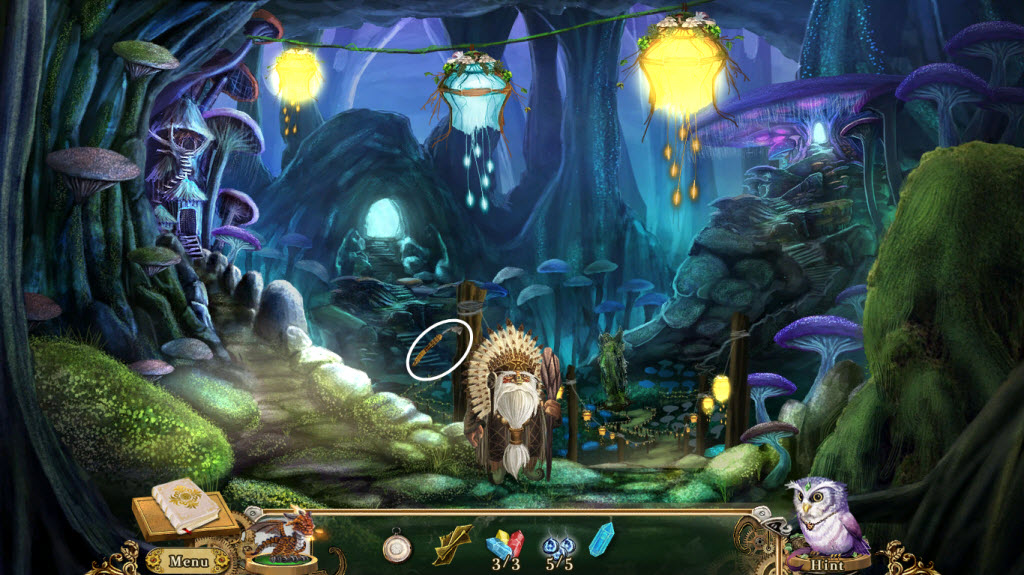
Chapter 3: The Fungal Forest
Rope Bridge
- take the Empty Glowspore Lamp
- go up

Village Square
- speak to the Gnomish Elder
- go left
- speak to the Wise One
- examine the planting trough
- take the Potting Soil
- go down
- examine the statue of the oracle
- take the Bark Paper
- go right
- look at the goblin shield
- examine the mushroom hedgerow
- move the plant debris and take the Glitterstone 1 of 3
- place the Potting Soil on the rock
- shake each of the mushroom tops and grab the Inktop Mushroom Spores
- touch the mushroom the glows silver
- catch the floating Silver Glowspore in the Glowspore Lamp
- return to the Wise One
- give the Glowspore Lamp to the Wise One
- Hidden Item Puzzle
- Star - use your Dragon to light the fire
- Mask - rotate the eyes and mouth on the mask until it's correct
- Totem - drag the wings back onto the totem
- Marbles - tip red jar over
- Blue Crystal - place the crystal over the diamond shape and then rotate the shapes above until you get to the moon
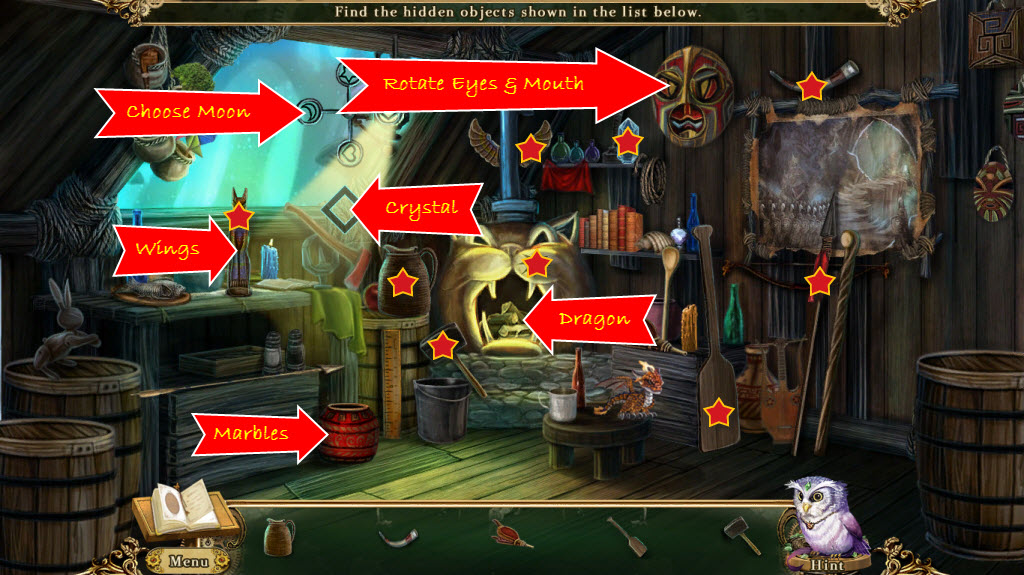
- receive Moongleam Crystal
- examine the painting behind the Wise One - it will be added to your journal
- go down
- examine the glowspore lantern (blue lantern)
- Lantern Puzzle
- pick the correct object according to the riddles
- see screenshot for solution
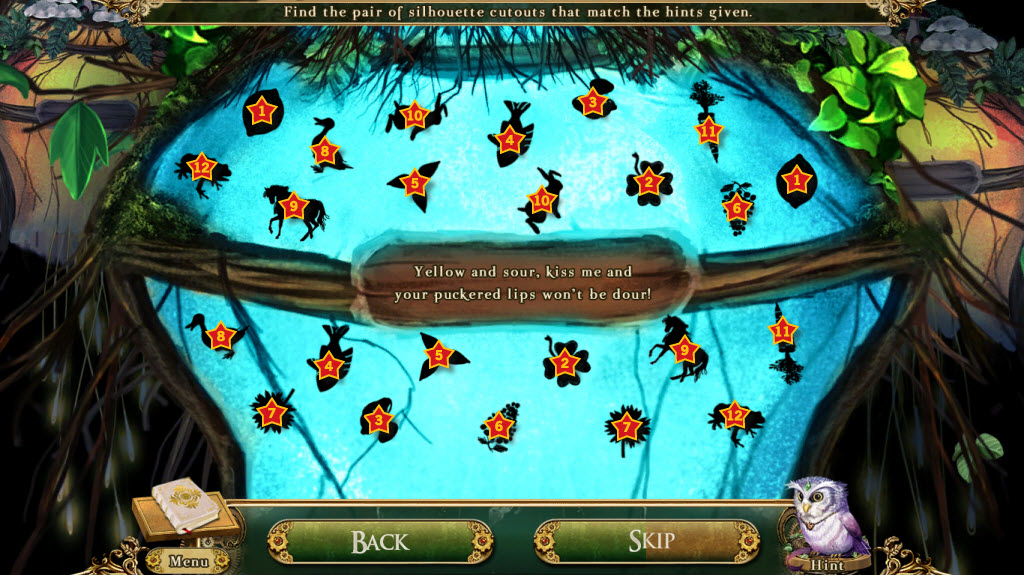
- receive Glitterstone 2 of 3
- talk to the Gnomish Elder
- Butterfly Puzzle
- pick the correct butterflies according to the clues on the left
- see screenshot for solution
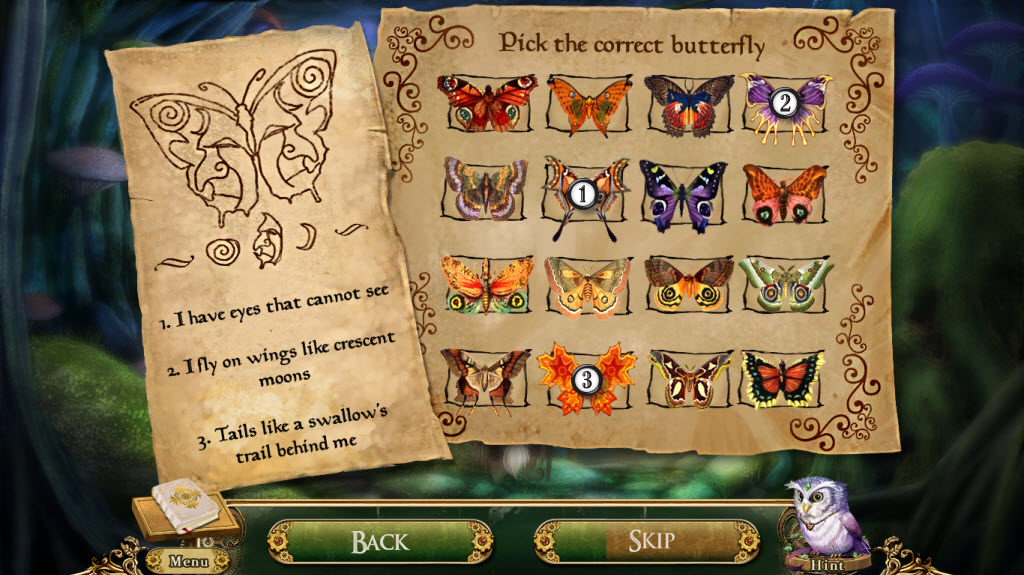
- receive Glitterstone 3 of 3
- take the Resin Tapping Knife
- return to the Wise One
- examine the mortar and pestle
- place the Glitterstones on the table
- drag each Glitterstone into the mortar separately and grind it up by moving the pestle in circles
- Glitterstone Puzzle
- combine the colors to create the color of the square
- see screenshot for solution
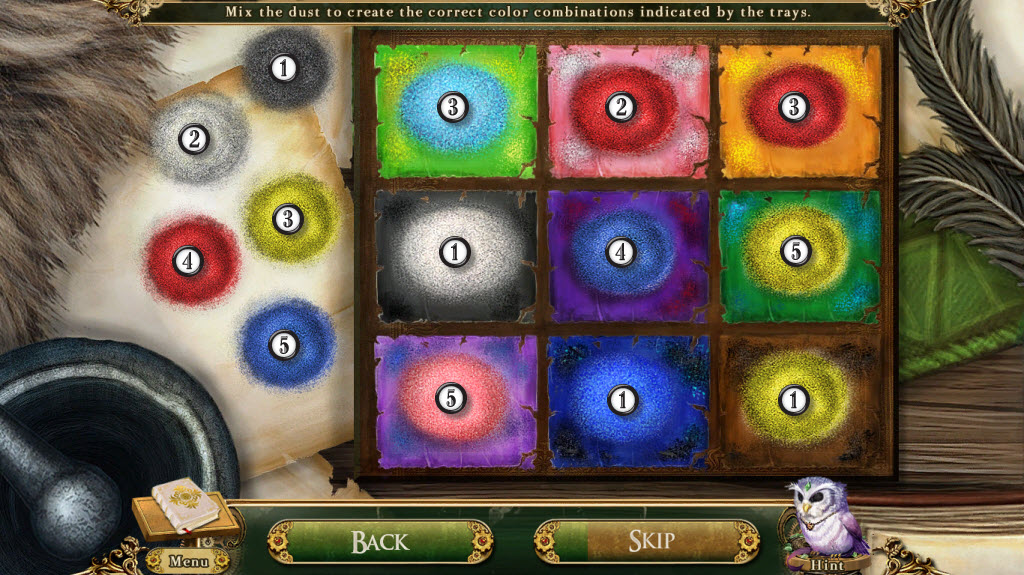
- receive Glitterstone Dust
- examine the garden trough again
- plant the Inkcap Spores in the soil
- put down the Bark Paper
- Ink Puzzle
- simply trace the faint likes with your cursor
- receive Abstract Painting
- go down and right
- examine the shrine to the oracles
- examine the right oracle
- Crystal Puzzle
- place the Moongleam Crystal in the hole
- arrange the crystal pieces like jigsaw puzzle
- see screenshot for solution
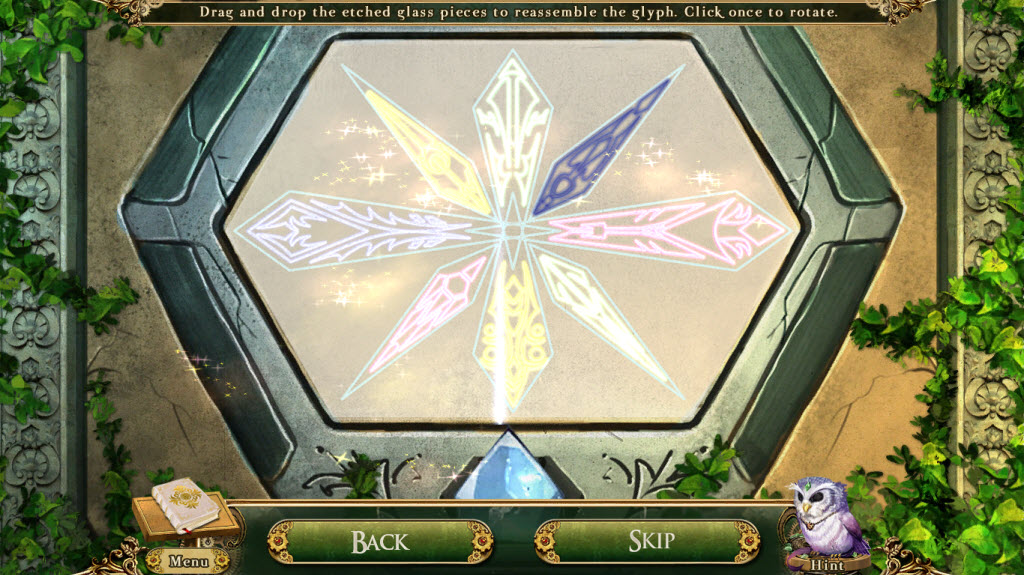
- take the Resin Collecting Kit
- back out of the shrine and look at the tree
- use the Resin Tapping Knife all over the bark
- use the Resin Collecting Kit on the tree
- Resin Puzzle
- arrange all the pipes from the arrow to the bottom spout
- left click on a pipe to rotate it
- there are various solutions for this puzzle
- see screenshot for solution
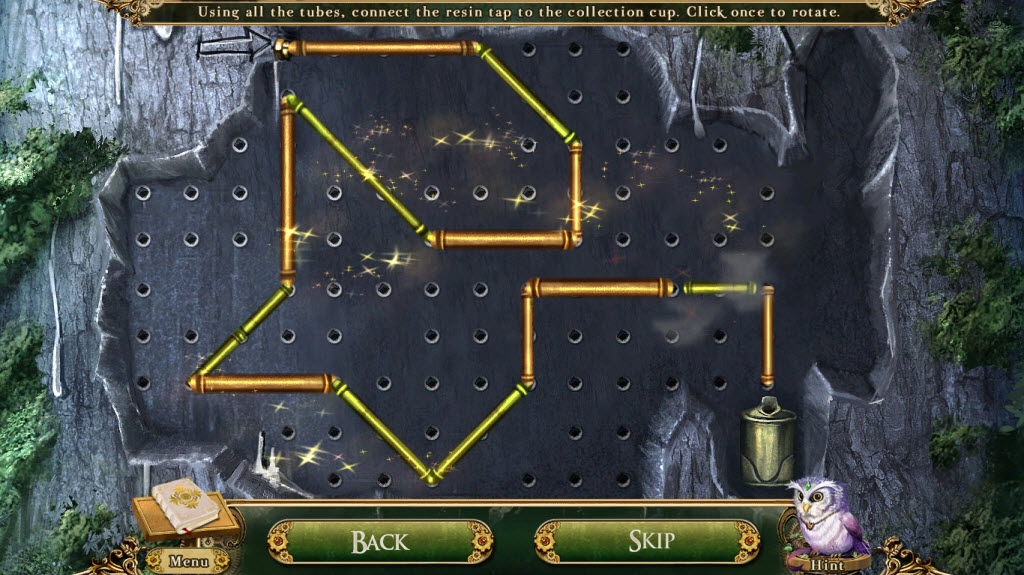
- receive the Trollbane Resin
- look at the shrine to the oracles again
- examine the middle oracle
- Butterfly Puzzle
- replace the Glitterstone Dust
- use the dust to repaint the butterfly to match the picture on th left
- examine the left oracle
- pour the Trollbane Resin into the molds
- Chess Puzzle
- drag the chess pieces to untangle all the threads
- there are various solutions for this puzzle
- go down
- speak to the Gnomish Elder
- receive the Encryption Plate
- go right
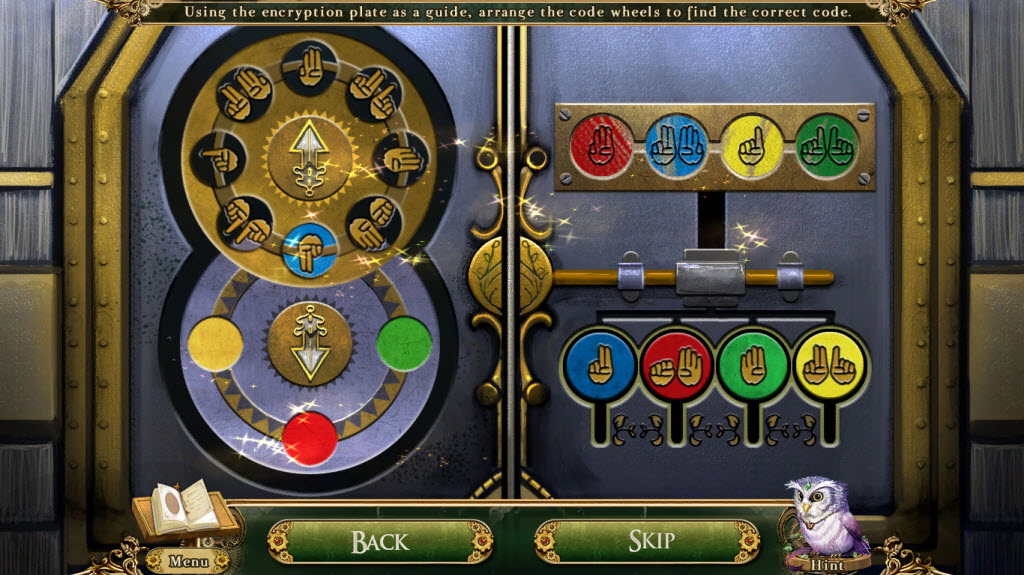
- examine the sacred grove door
- Sacred Grove Puzzle
- place the Encryption Plate into the door
- use the plate as a guide
- turn the top wheel so the hand matching the first circle in the encryption plate is at the very top
- turn the bottom wheel so the color matching the first circle in the encryption plate is at the very bottom
- look at what appears in the middle
- note the color and hand symbol
- below the encryption plate is another row of colors/symbols
- click the first symbol to match what is currently in the middle
- repeat this process for the rest of the encryption plate
- see screenshot for solution
- enter the sacred grove
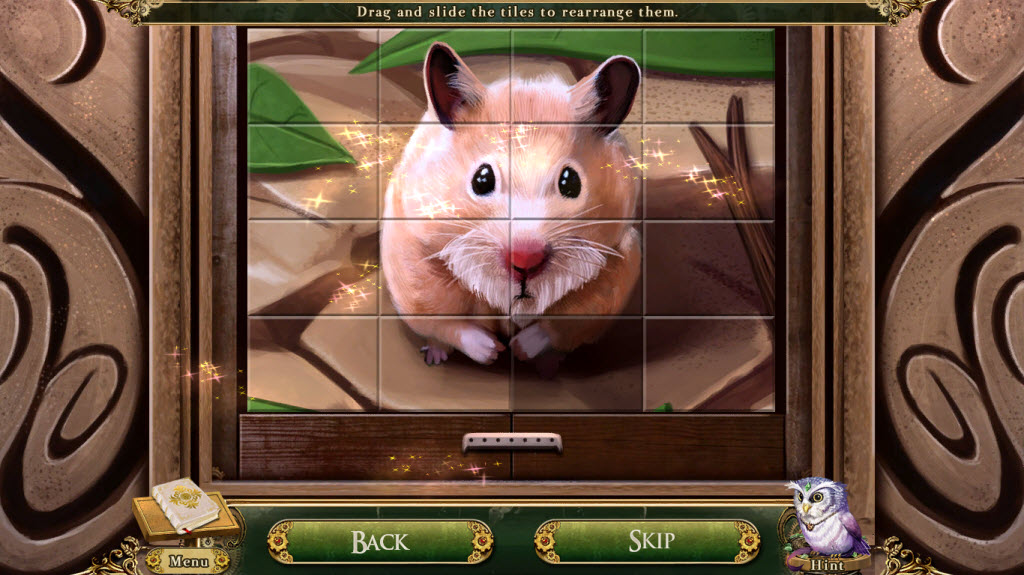
- examine the ornate crate
- remove the Bolgin Coin 1 of 4
- open the crate
- Ornate Crate Puzzle
- rearrange the tiles to create a picture of Nibbles the hamster
- talk to the Peddler
- examine the fairy ring
- Fairy Ring Puzzle
- speak to each of the mushrooms
- find the bolgin coin it wishes and place it there
- see screenshot for solution
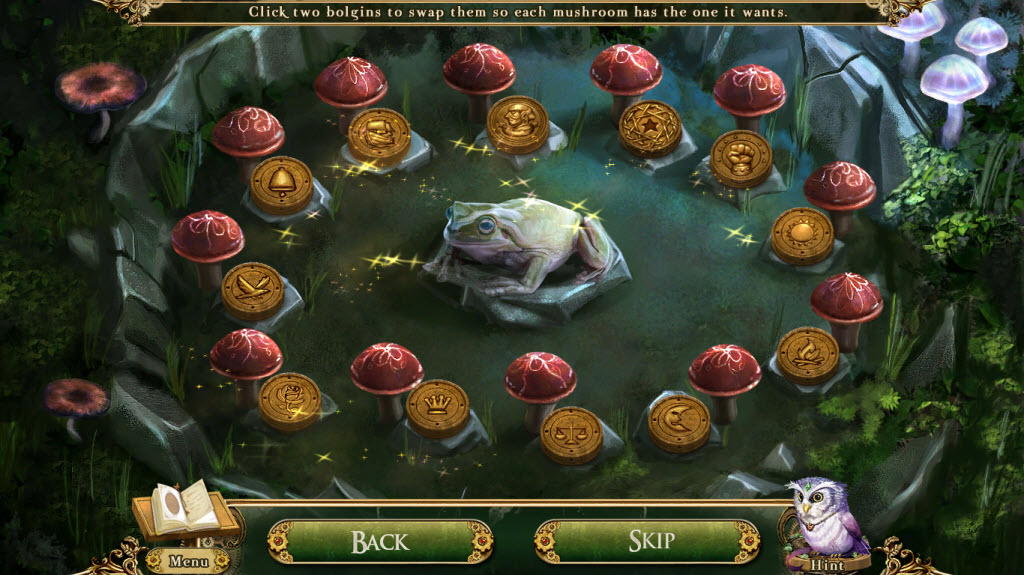
- receive Fairy Ring Spores and Bolgin Coin 2 of 4
- examine the lichen patch
- Lichen Patch Puzzle
- collect the matching dew drops until only one remains
- take the Pure Dew Water
- examine the stone basin
- take the Bolgin Coin 3 of 4
- go forward to the hedge maze
- examine the singing shrooms
- click a mushroom
- Singing Shrooms Puzzle
- clear all the beads
- first puzzle solution (clear in order): lower green, upper green, all red, all blue
- second puzzle solution (clear in order): all blue, middle stars, all red, all stars, all green
- third puzzle solution (clear in order): bottom stars, upper stars, all red, all green, all blue
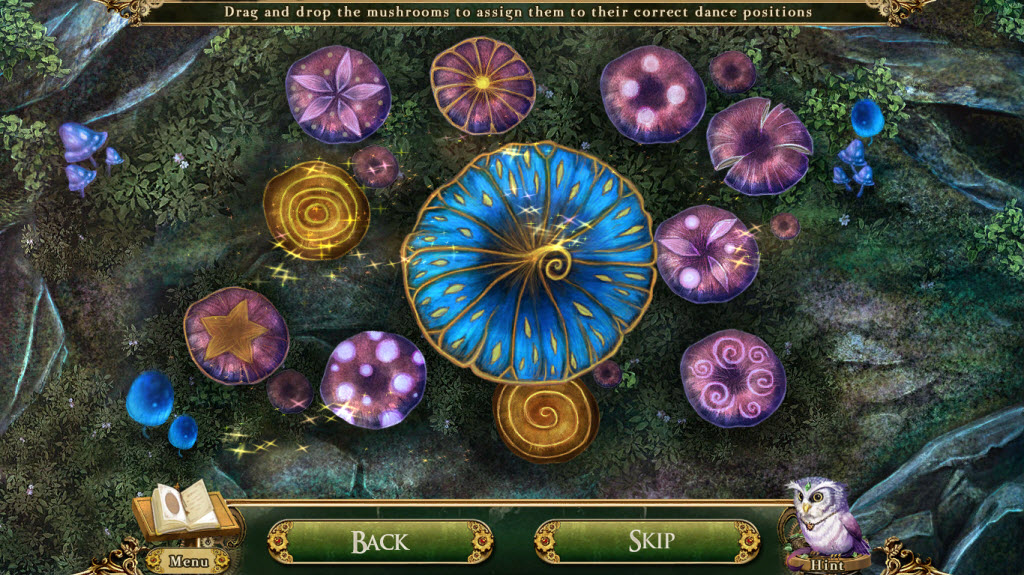
- use the Fairy Ring Spores on the shrooms
- Dancing Mushroom Puzzle
- drag the mushrooms to their correct positions
- match what is on the top of the mushroom to the symbol underneath
- see screenshot for solution
- pick up Bolgin Coin 4 of 4
- each shroom has a little sign in front of it - read them
- give the first shroom on the left the Pure Dew Water
- pick up the Fungal Tweezers that appear on the rock
- use the Fungal Tweezers on the third from left shroom
- Shroom Spot Puzzle
- pick out the "spot" that is different from all the rest
- give the fourth from left shroom the Abstract Painting
- pick up the Round Lens that appears near its base
- use the Round Lends on the last (far right) shroom
- Round Lens Puzzle
- using the lens find all the bugs
- there are pictures of them at the bottom and you cannot take a bug unless it's shown there
- listen to the song - make a note of the directions
- go up

Tangled Hedge Maze
- use the directions from the singing shrooms
- solution: Right, Right, Up, Left, Up
- take the Spore of the Venerated Toadstool
- go down twice
- talk to the Peddler
- take the Vial
- examine the stone basin
- use the Vial to get Liquid Mojo
- receive Torn Boat Blueprints
- return to the Wise One
- give the Vial of Liquid Mojo and Spore of the Venerated Toadstool to the Wise One
- receive Potion of Goblin Disguise
- go down
- speak to the Gnomish Elder
- speak to the Fairy Queen (Statue of the Oracle)
- go up
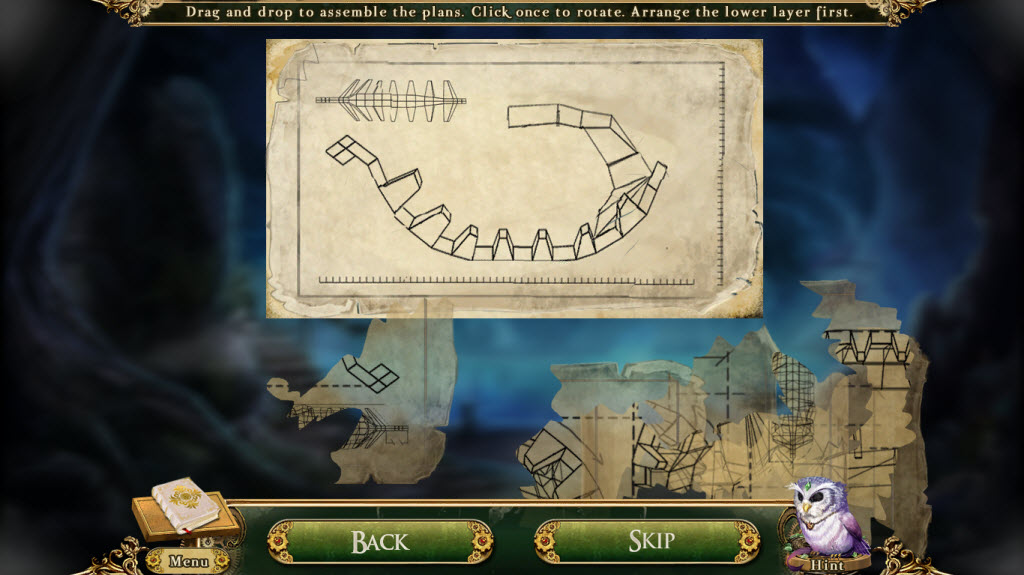
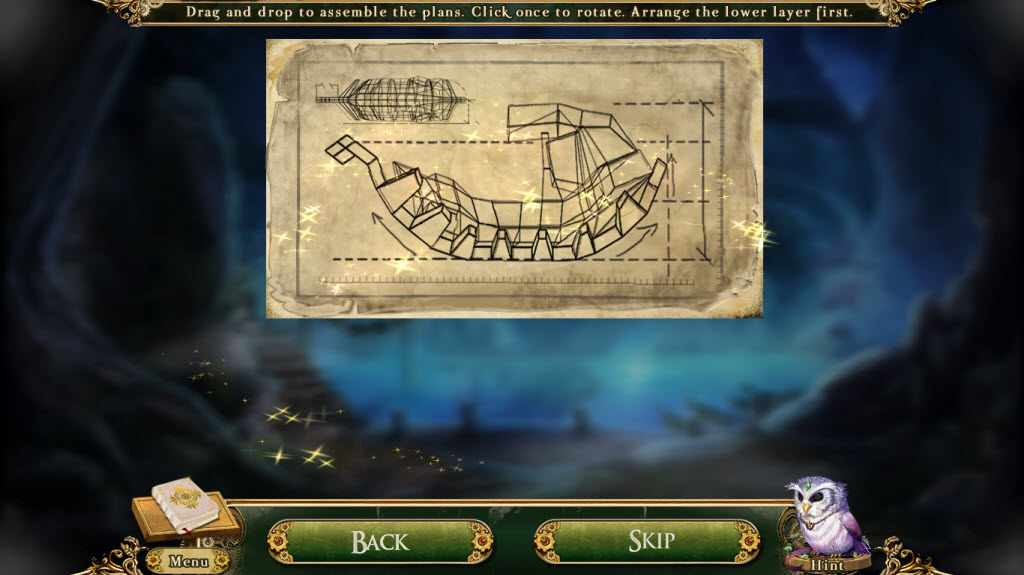
- use the Torn Boat Blueprints on the broken boat
- Boat Blueprint Puzzle
- arrange the blueprint pieces like a jigsaw puzzles
- you will have to do several layers
- see screenshots for solutions
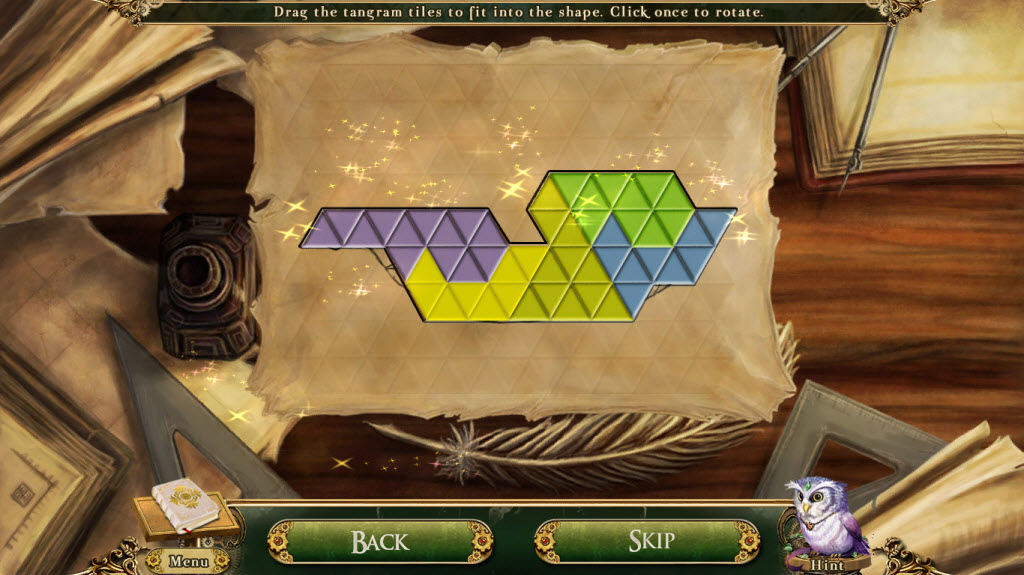
- Tangram Puzzle
- complete your third tangram puzzle
- see screenshot for solution
- examine the boat
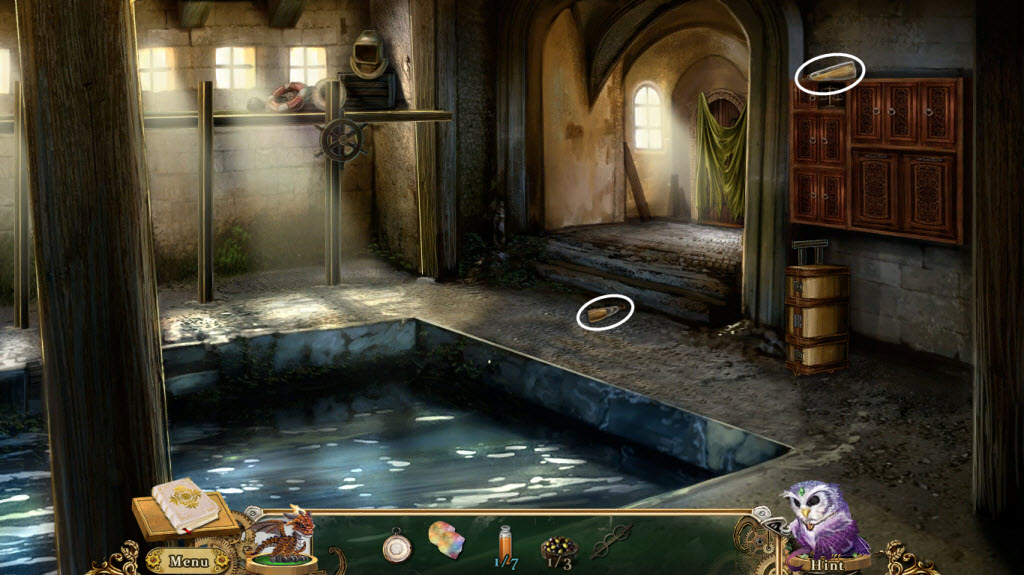
The Docks
- pick up the message in a bottle
- read the journal entry
- pick up Moonflower Nectar 1 of 7
- pick up Delicious Olives 1 of 3
- examine the fishing net
- Fishing Net Puzzle
- pick out the fish in pairs according to the riddle
- see screenshot for solution
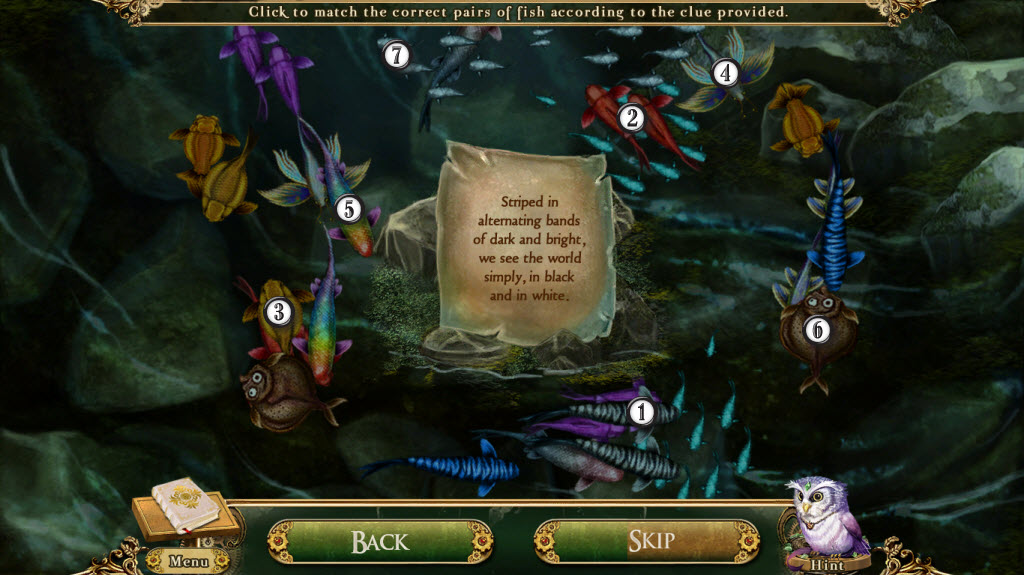
- receive Rainbow Scales
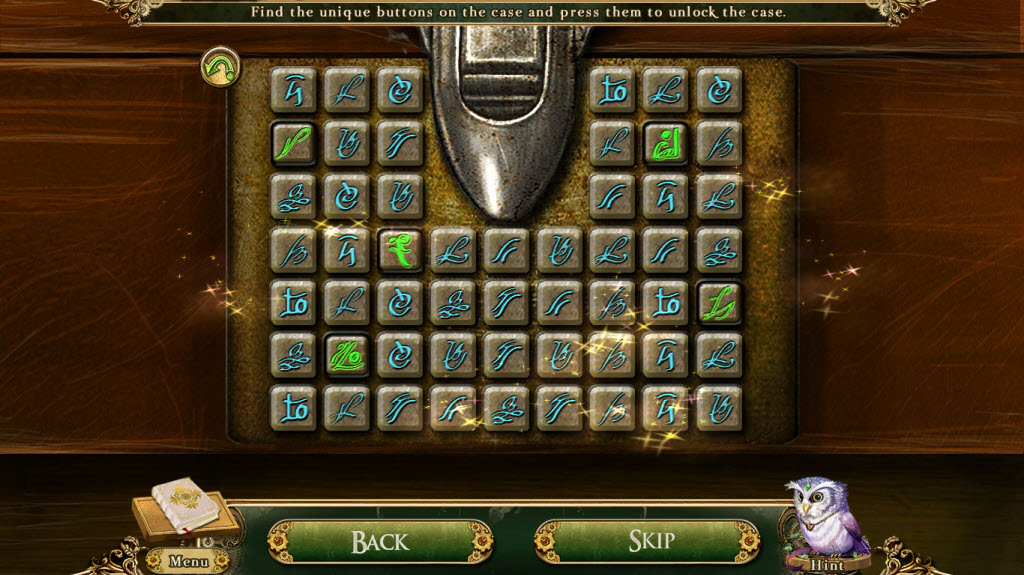
- examine the wheelie bag
- Wheelie Bag Puzzle
- find the buttons on the case that don't have a match
- push them to unlock the case
- see screenshot for solution
- move all the clothes aside and take the Wheelie Bag Caster
- place the Wheelie Bag Caster on the wheelie bag
- move the wheelie bag under the cupboards on the left
- hidden object area
- Unbalanced Scales - find the scale and put it on the scales
- Oar - find the oar and place it on the oar handle
- Red Anchor - take the paintbrush out of the red paint can and use it on the anchor
- take the Spectacle Frames
- pick up the Moonflower Nectar 2 of 7
- pick up the Moonflower Nectar 3 of 7
- move the wheelie bag to the docking frame
- Docking Frame Puzzle
- this is a matching puzzle
- clear three or more of like images to clear the board
- examine the rags covering the door and take the Rag Cloth
- use the Rag Cloth to clean the docking frame
- place the Spectacle Frames and Rainbow Scales on the wood
- Spectacle Puzzle
- use the scales to create lenses like a jigsaw puzzle
- read the note by the door
- examine the door with the Prismatic Glasses
- Dock Door Puzzle
- move the symbols so that none of the threads are touching
- there are various solutions to this puzzle
- go through the door
- enter the tavern
- take the Moonflower Nectar 4 of 7
- take the Delicious Olives 2 of 3
- exit
- talk to the goblin at the refreshment stand and the Stonemason
- go up
- talk the Palace Guards
- return to the tavern
- listen to the Off-Duty Captain
- exit the tavern
- attempt to talk to the Peddler
- go right
- take Moonflower Nectar 5 of 7
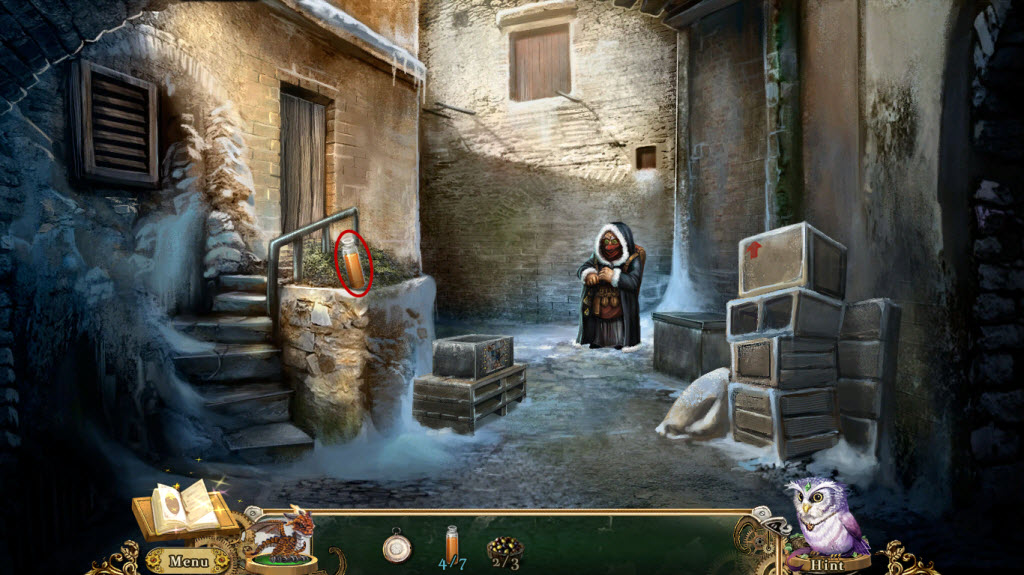
- talk to the Peddler
- examine the secure container
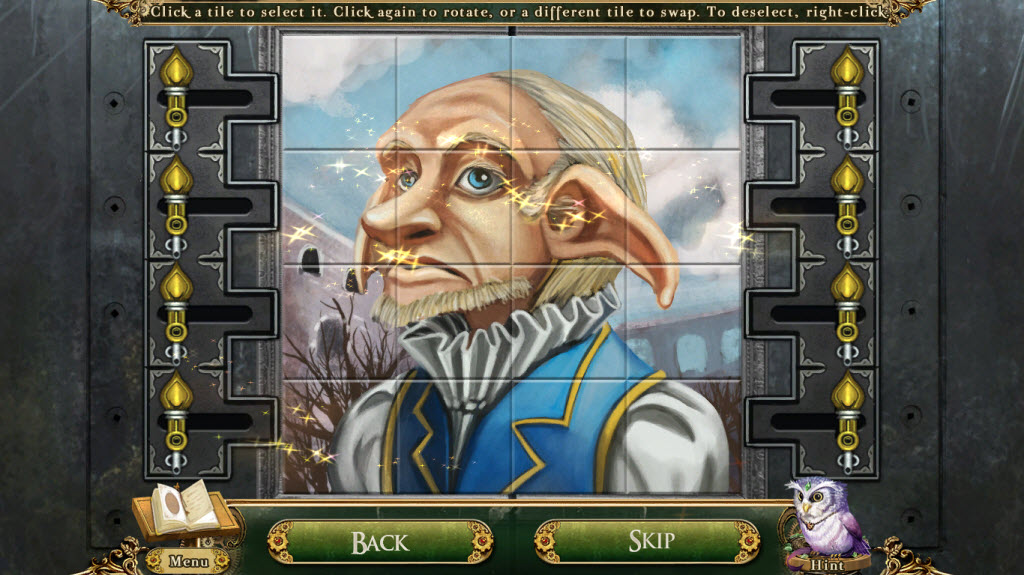
- Secure Container Puzzle
- swap the tiles to complete a picture
- left click to rotate a tile
- see screenshot for solution
- take Moonflower Nectar 6 of 7
- move the loose wood panel - with the red arrow on it
- take the Delicious Olives 3 of 3
- go down
- give the Delicious Olives to the goblin at the refreshment stand
- find twelve tankards
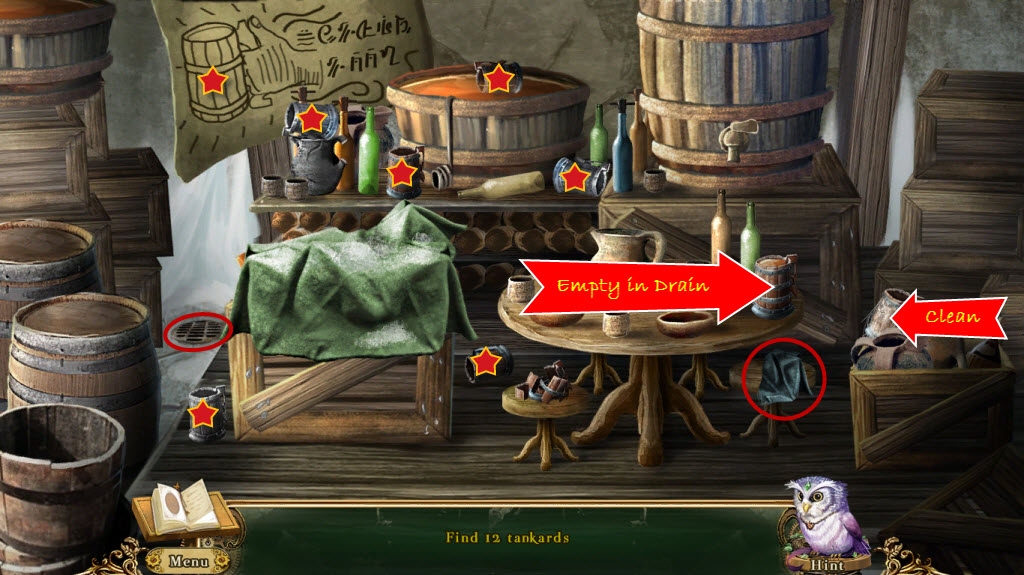
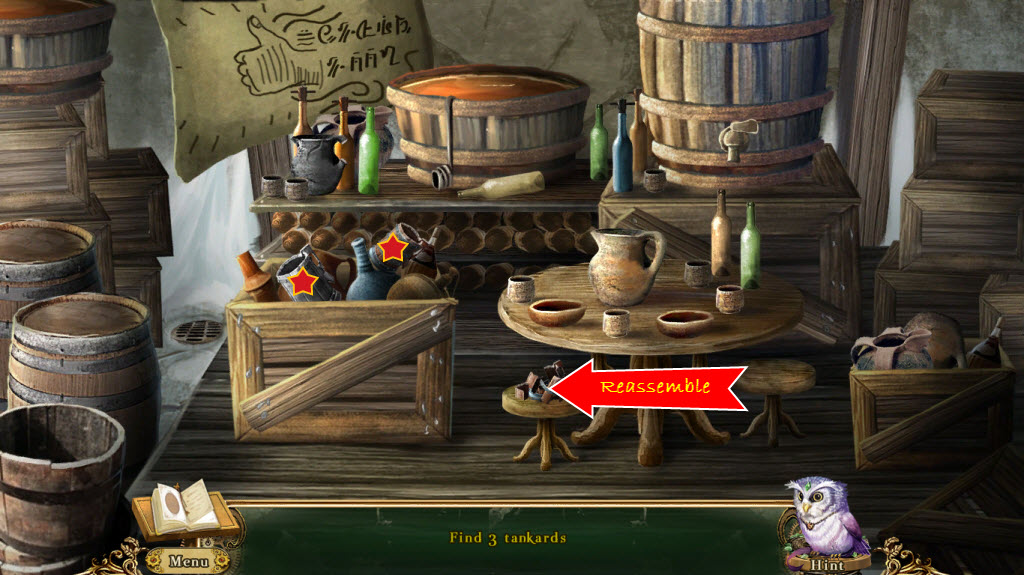
- receive Bolgin Coins 1 - 2 of 8
- talk the souvenir shop goblin
- Souvenir Shop Puzzle
- find the souvenirs that don't match the rest
- receive Bolgin Coins 3 - 4 of 8
- talk to the fruit vendor goblin
- Fruit Vendor Puzzle
- find the matching pairs
- pick up the last remaining berry
- receive Bolgin Coin 5 of 8
- talk to the Shipwright
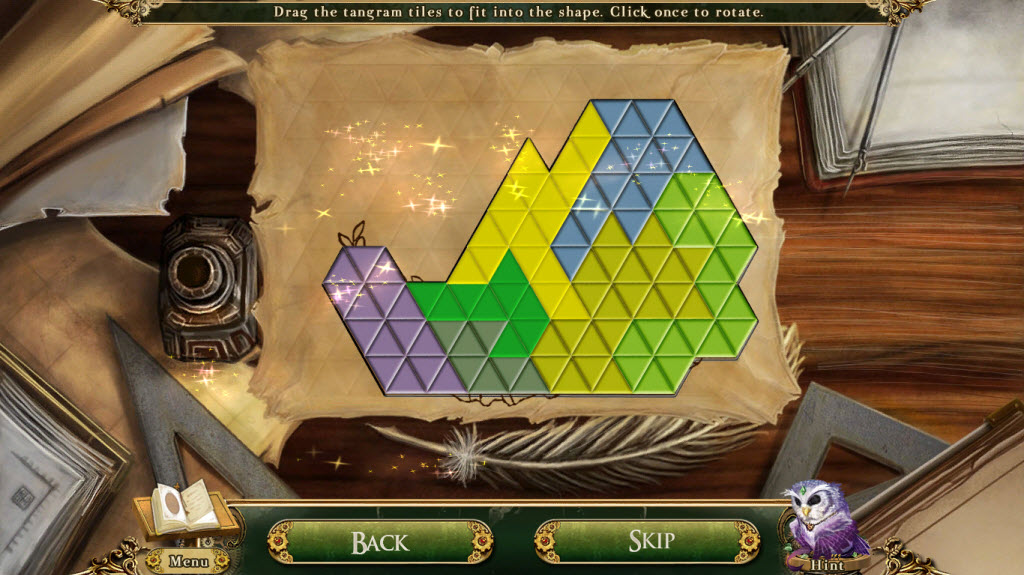
- Tangram Puzzle
- complete the fourth tangram puzzle
- see screenshot for solution
- receive Heavy Duty Chains
- give the Heavy Duty Chains to the Stonemason
- Stonemason Puzzle
- when both arrows on in the green areas click on the crank beneath your hands
- do this three times
- receive Bolgin Coins 5 - 7 of 8
- return to the tavern
- talk to the Goblin Bartender
- you will enter the maze automatically
- Tavern Maze
- each color flame means a different direction
- Blue Flame - you are a lost (go down)
- Yellow Flame - Up/Forward
- Green Flame - Right
- Red Flame - Left
- solution: Up, Right, Up, Left, Right, Up, Left
- find the correct cask
- go down
- give the Cask of Alex's Finest 10-Year Special to the Goblin Bartender
- receive Bolgin Coin 8 of 8
- return to the dark alley
- talk to the Peddler
- take the Sap of Sleeping Poppy
- receive Clipped Coin
- return to the tavern
- show the Clipped Coin to the goblins in the back corner
- examine the cocktail bar
- take Moonflower Nectar 7 of 7
- place the Moonflower Nectar in the empty bottle
- Cocktail Bar Puzzle
- look at each page of the cocktail recipe book
- for each page pick up the matching liquid at the bottom and pour it into the matching container on the shelf
- receive Unmixed Cocktail
- use the Unmixed Cocktail on the cocktail shaker
- shake cocktail shaker
- receive Moon Rock Shooter Cocktail
- pour the Moon Rock Shooter Cocktail and Sap of Sleeping Poppy in the guards glass
- you will end up in the dark alley
- remove the clothes from the passed out guard (what cute long johns!)
- take the Guards Journal on the stair steps
- read the new entry in your journal
- return to the palace grounds
- talk to the Palace Guard
- answer the questions correctly to enter the palace
- solution: Leodici, Xim, Venerated Toadstool, The Oracle, Grimble
- enter the palace
- examine the back of the Goblin King's throne
- use your Dragon on the hidden panel
- take the Goblin Blueprints
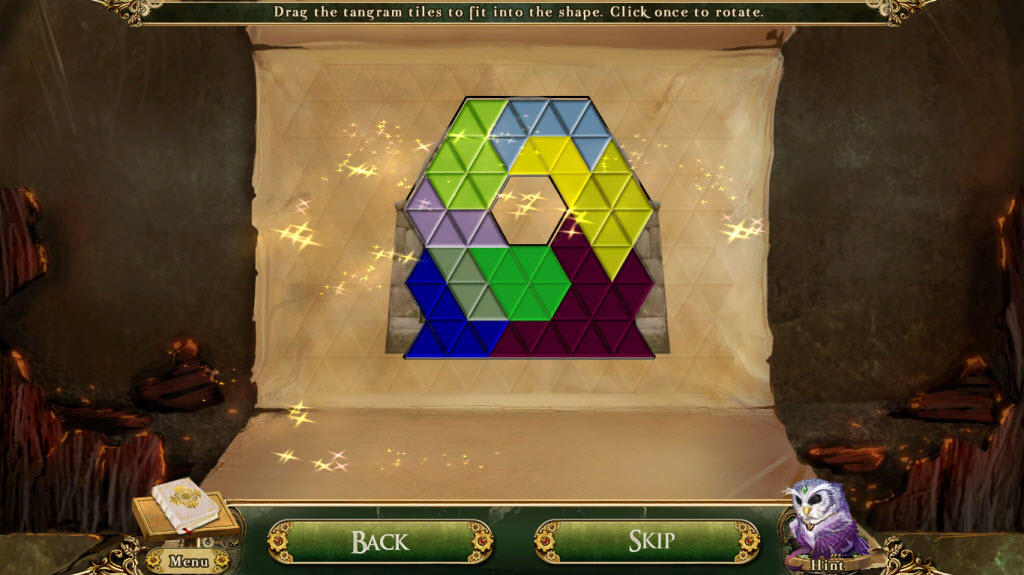
- Tangram Puzzle
- complete your fifth tangram puzzle
- see screenshot for solution
- King Grimble Puzzle
- drag your cursor over three or more matching symbols to clear the board
Train Station
- examine locker 1
- Locker 1 Puzzle
- find the gear that doesn't match any of the others
- take the Bronze Key
- use the Bronze Key on the train station gate
- go through the gate
- examine the checkpoint building
- find related pairs
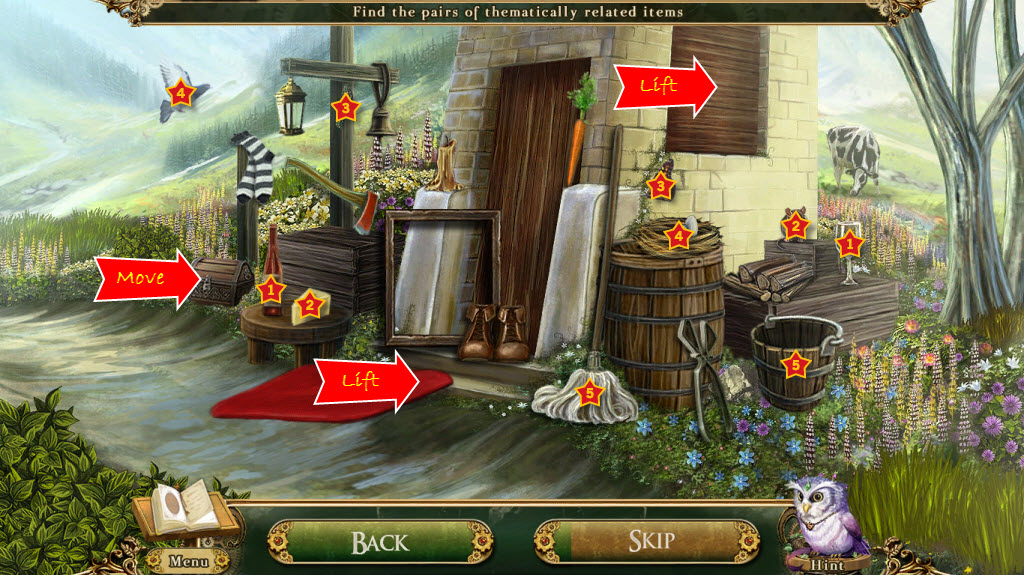
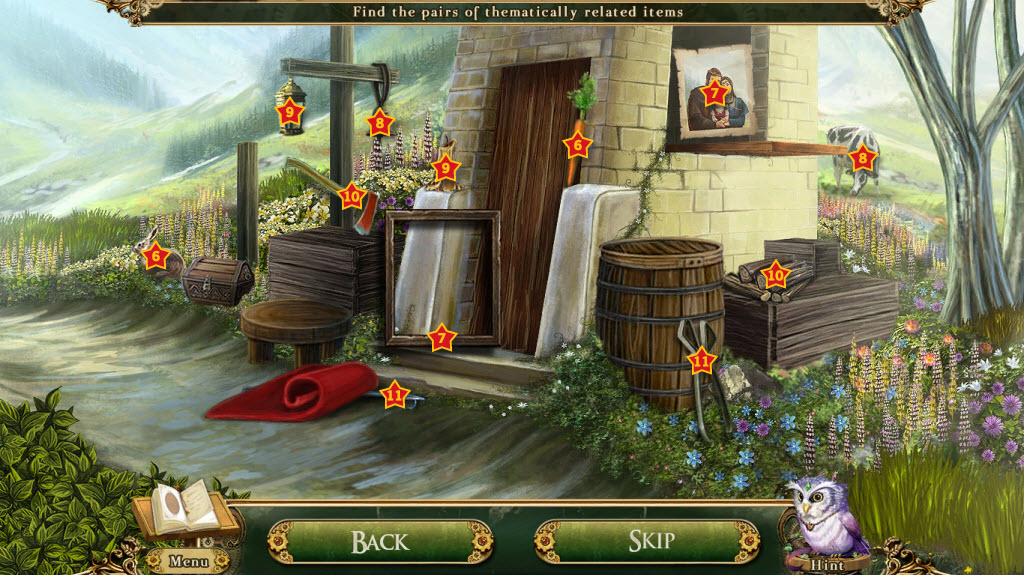
- receive Fireplace Poker
- examine the dried up fountain
- find twelve pipes
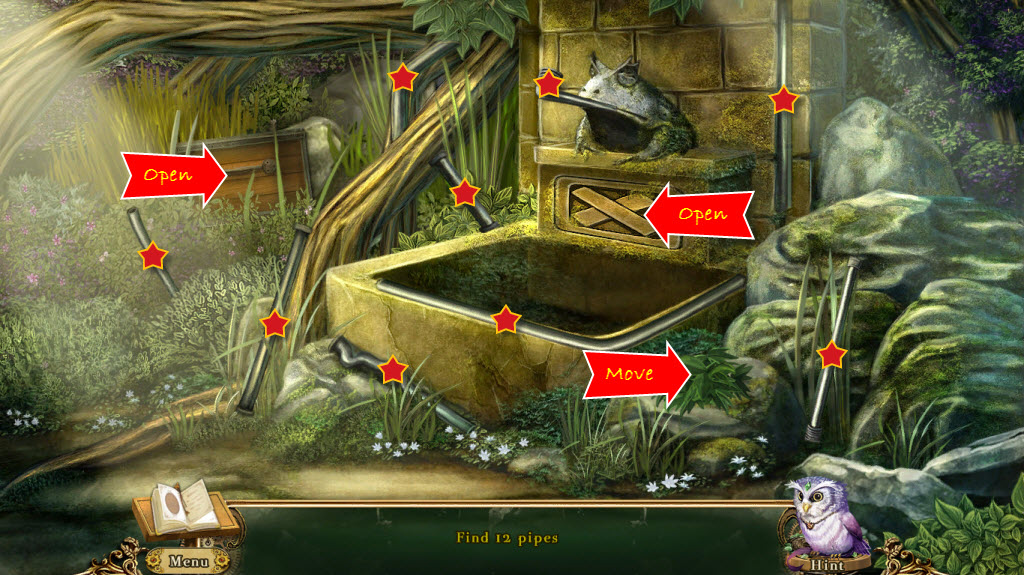
- receive Water Pipes
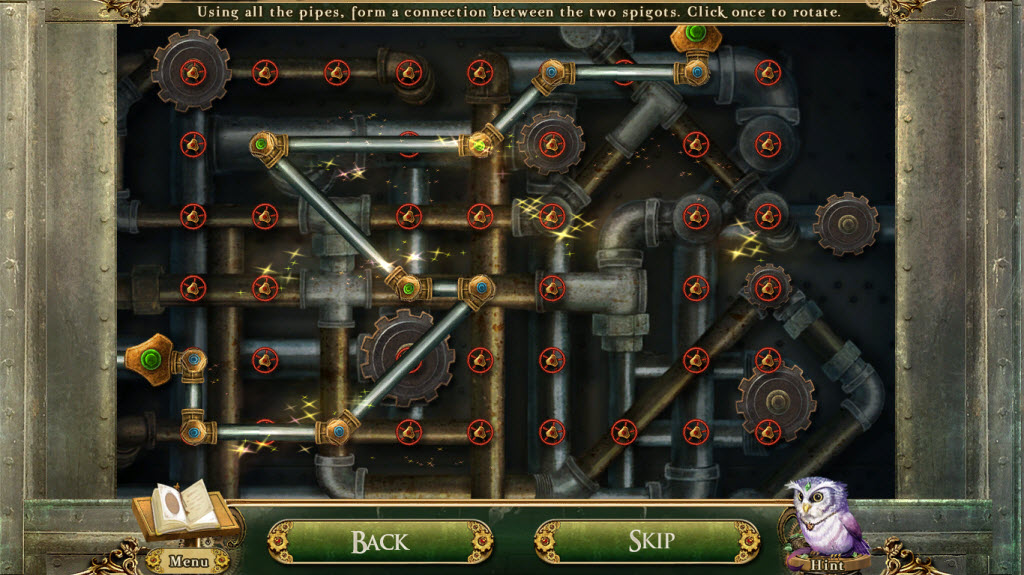
- use the Water Pipes on the dried up fountain
- Fountain Puzzle
- arrange all the pipes so they connect from the top to the bottom
- there are multiple solutions
- see screenshot for solution (I was unable to get a screenshot of the first puzzle)
- go right
- examine the scarecrow
- open his pouch and take the Sewing Kit
- take the Broom
- use the Fireplace Poker to remove the Keyring from around his hat
- go down
- use the Keyring on the checkpoint building
- look at the tour guide book
- flip through the pages until you find the unicorn and take the Scrap of Paper
- pick up the Slingshot
- read the note
- go right
- use the Slingshot on the pile of rocks
- use the Slingshot to knock down the nest
- take the Locker Card and Crystal Fragment 1 of 6
- go up
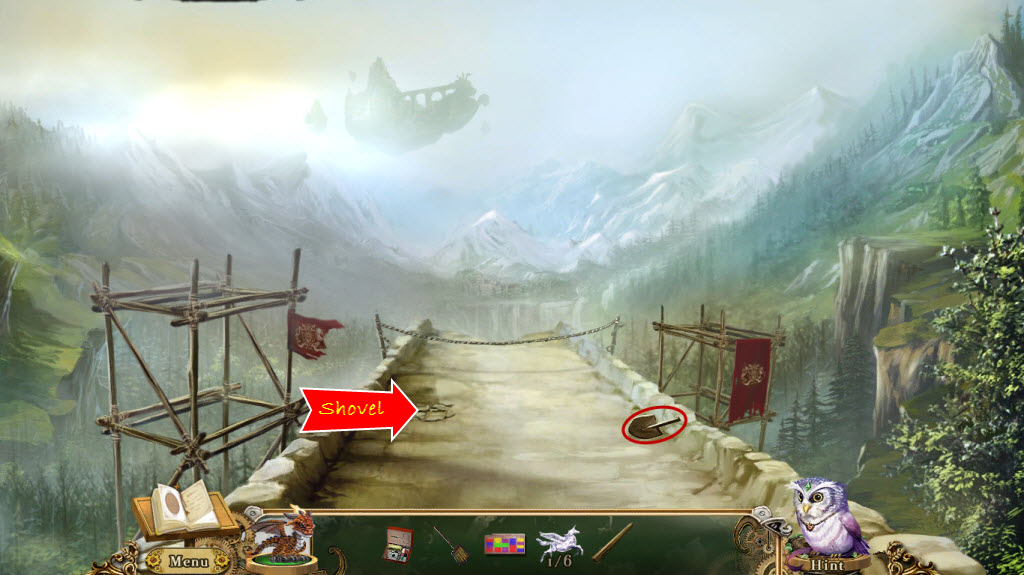
- examine the elemental alter and take the Screwdriver
- take the Headless Shovel
- go down twice
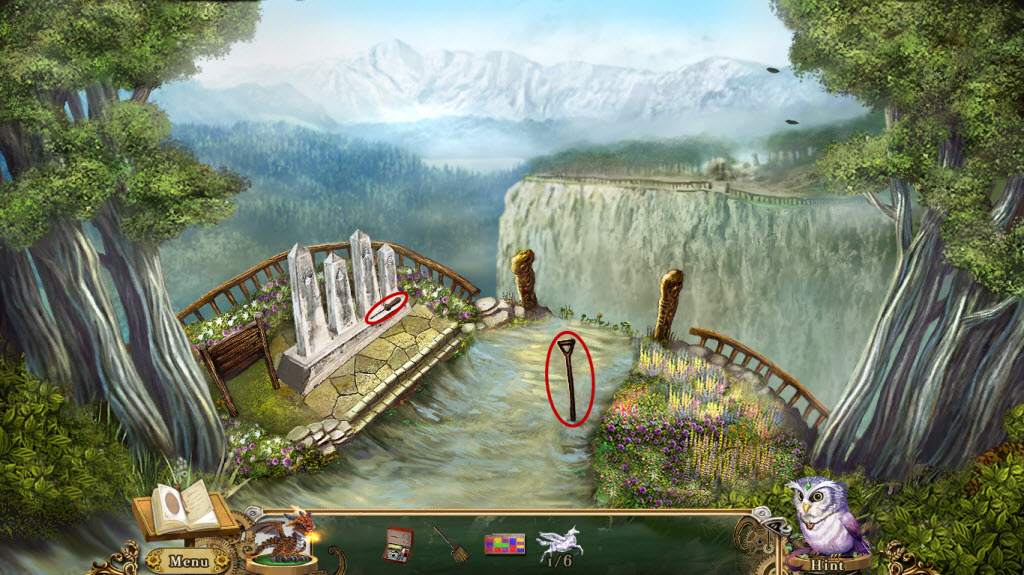
Border Crossing
- examine the turnpike
- use the Screwdriver to remove the screws
- remove the Turnpike
- go left
- pick up the Shovel Head 1 of 2
- take the Rope
- use the Shovel on the loose mortar
- Bridge Box Puzzle
- rearrange the body parts on the nutcrackers
- use the marks in the wood as a guide
- see screenshot for solution
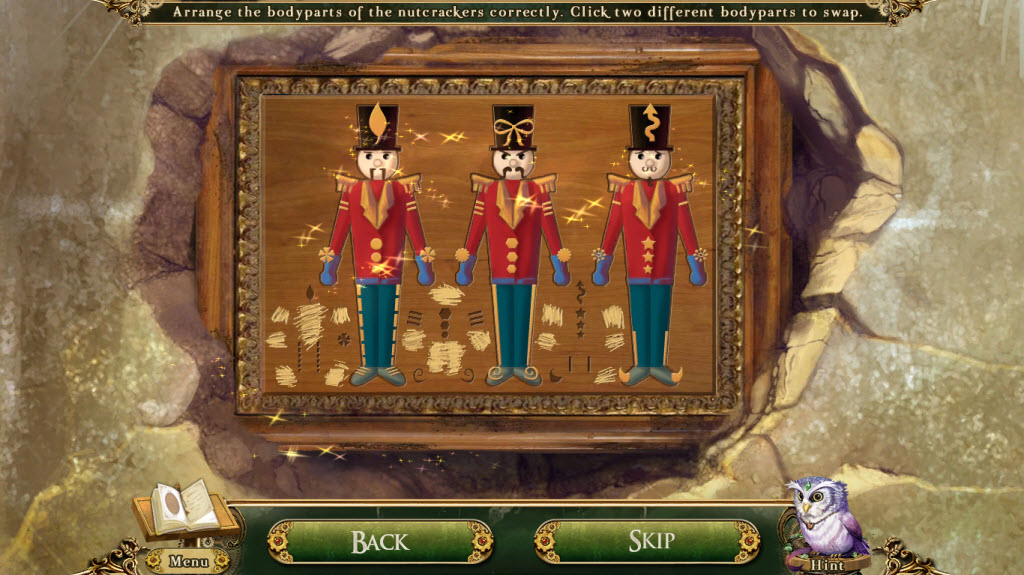
- take the Fold of Silk
- go down
- look inside the checkpoint building
- examine the fan
- Fan Puzzle
- use the Fold of Silk on the fan
- put it together like a jigsaw puzzle
- use the Sewing Kit on the fan
- draw a line from hole to hole - like a dot to dot - to string the fan together
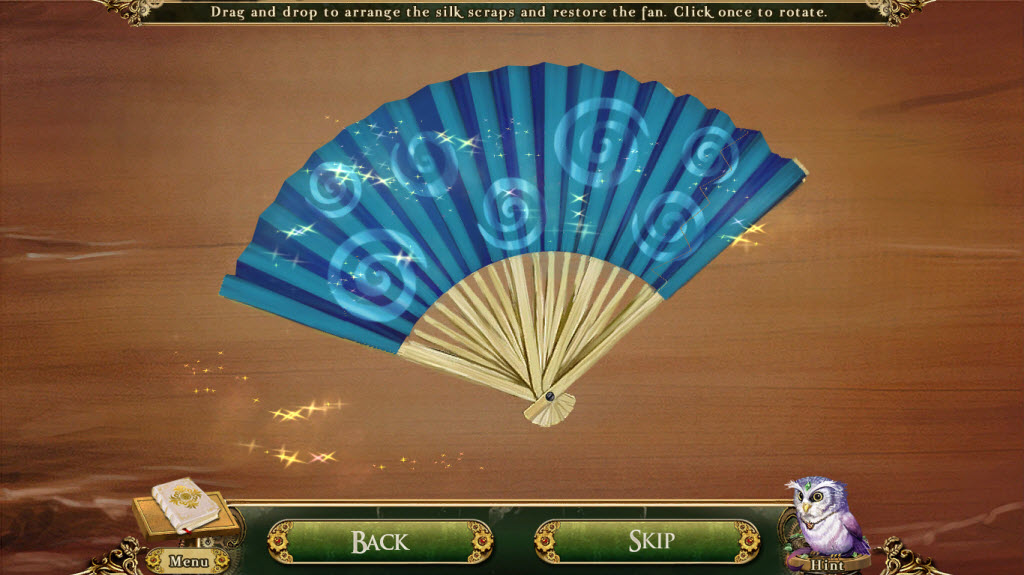
- receive Folding Fan
- pick up Crystal Fragment 2 of 6
- go down
- use the Broom to sweep up the dirt on the floor
- examine the trap door
- use the Turnpike to pry open the door
- use the Rope to go down
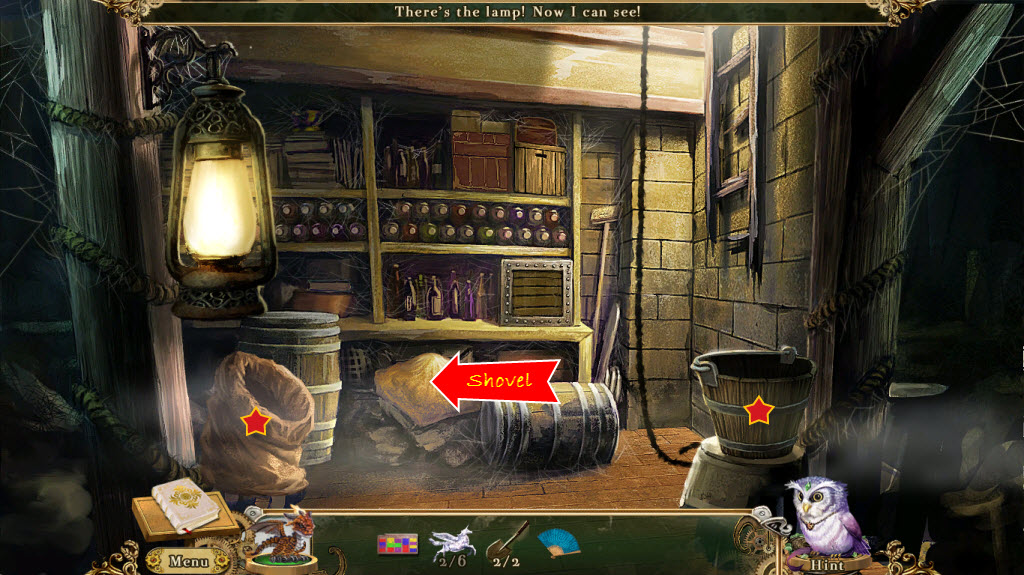
- go down
- find the lantern - left side - and use your Dragon to light it
- take the Hemp Sack
- examine the sack of grain
- use the Shovel on the sack of grain
- take Crystal Fragment 3 of 6
- take the Wooden Bucket
- go up
Train Station
- examine locker 29
- use the Locker Card on the locker
- Locker Puzzle
- use the card in the corner to figure out what number each color represents
- example: Red = 1 and Red + Purple = 6. If Red = 1 then Purple = 5.
- Red = 1
- Green = 2
- Yellow = 4
- Blue = 3
- Purple = 5
- add up each column
- press the button under each column under the correct number of dots appears - what each column added up to
- see screenshot for solution
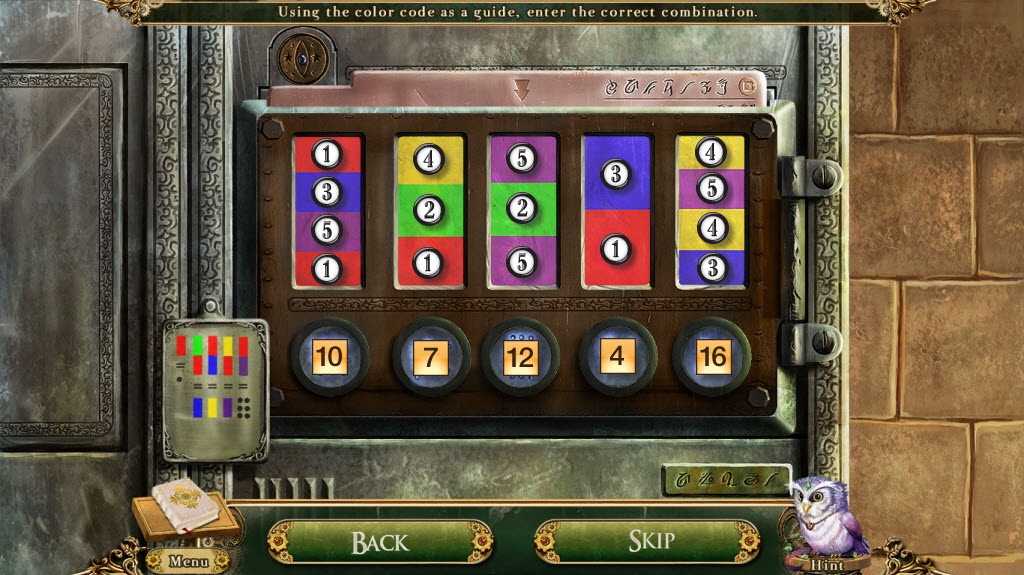
- take Crystal Fragment 4 of 6
- look at the treasure map - it will be added to your journal
- return to the overgrown path
- use the Shovel to dig three times where the treasure map indicated - under the scarecrow
- take the Dirty Lump
- use the Hemp Sack on the mound of dirt you just created
- go down
- use the Wooden Bucket on the fountain
- place the Dirty Lump in the Wooden Bucket
- take the Crystal Fragment 5 of 6
- take the Wooden Bucket and use it on the fountain again
- return to the alter
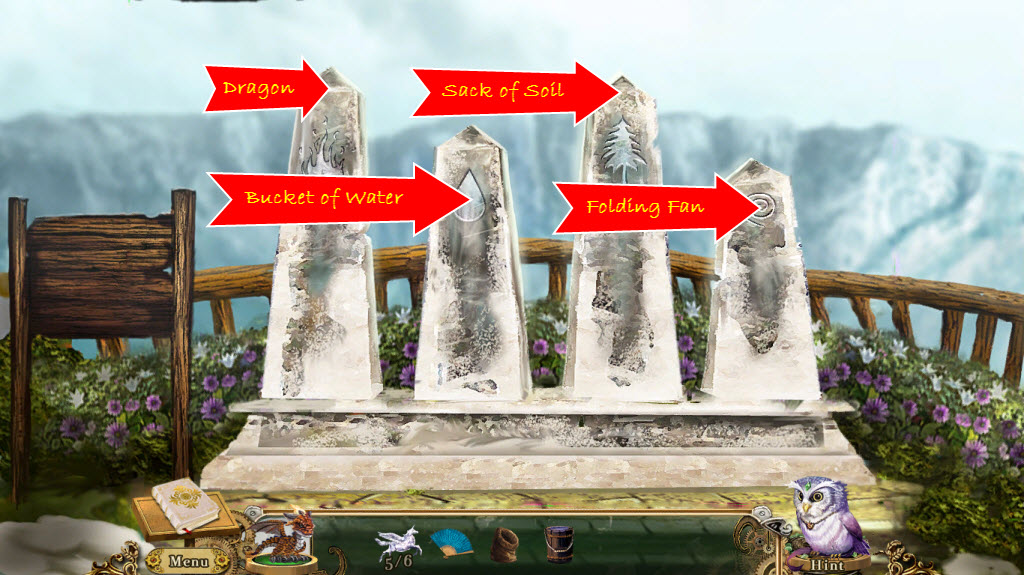
- examine the elemental alter
- Elemental Altar Puzzle
- use your Dragon on the fire symbol
- use the Bucket of Water on the water symbol
- use the Sack of Soil on the tree symbol
- use the Folding Fan on the wind symbol
- go across the bridge
- look around - there is nothing we can do here yet
- go up
- a human! speak to her!
- Goblinjong Puzzle
- match tiles of two to clear the board
- in the upper left corner you can also undo a move or shuffle the board
- receive Crystal Fragment 6 of 6
- examine the silver chest
- use the Crystal Unicorn on the chest
- Unicorn Puzzle
- put the unicorn back together like a jigsaw puzzle
- see screenshot for solution
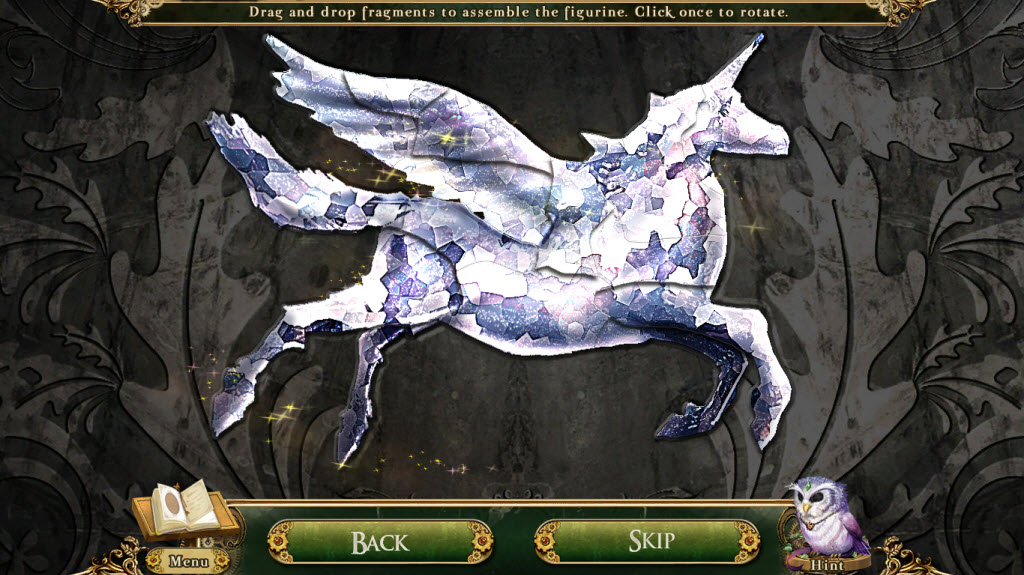
- take the Unicorn Horn
- examine the painting - a sketch of it will be added to your journal
- exit
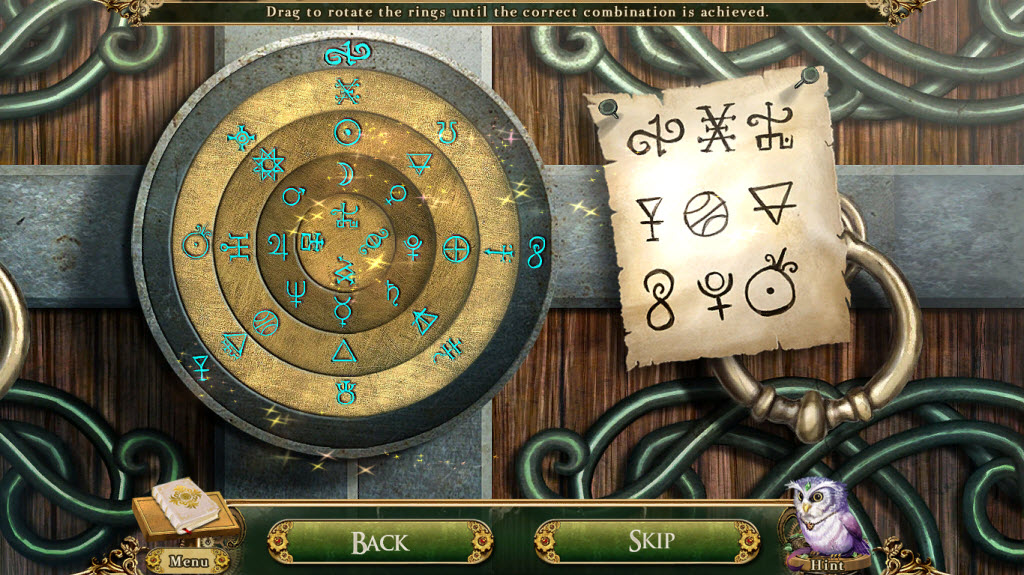
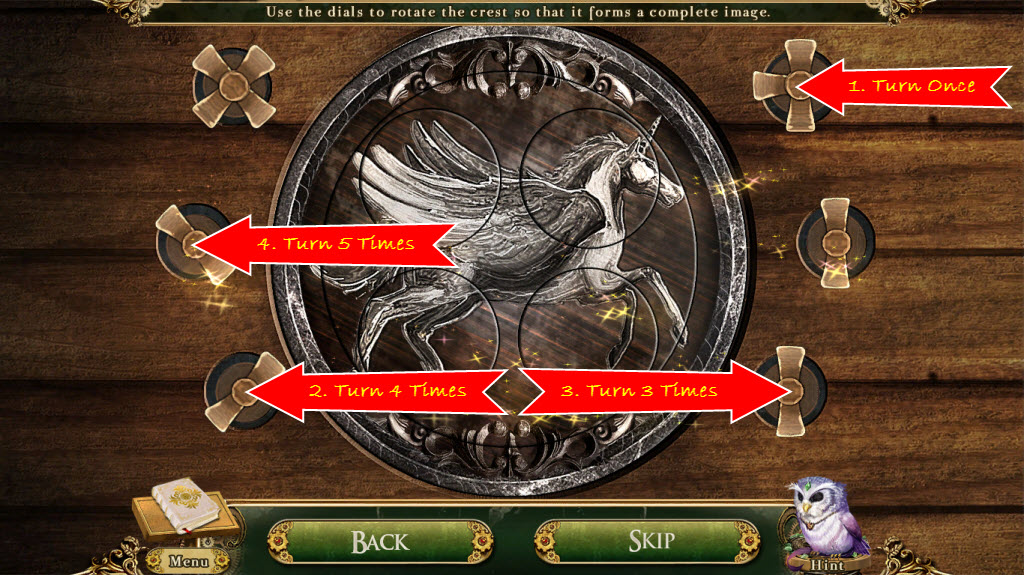
- look at the stable door
- Stable Door Puzzle
- rotate the rings so the symbols on the paper line up on the dials
- the top set of symbols will line up on the dials up/down
- the middle set of symbols will line up on the dials diagonally
- the bottom set of symbols will line up on the dials right/left
- see screenshot for solution
- enter
- examine the feed trough
- take the Pressed Iron Plate
- take the Pitchfork
- remove the tarp
- place the Unicorn Horn on the unicorn statue
- receive a Smithy Key
- use the Smithy Key on the door to the left
- examine the tool rack
- find the tools that match the silhouettes
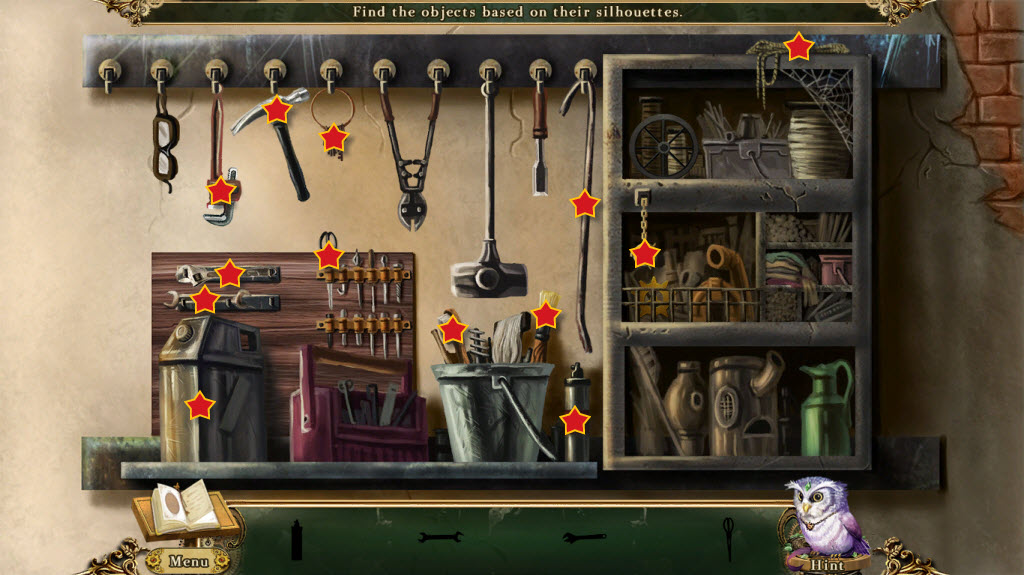
- receive Bolt Cutter
- go down twice
- use the Bolt Cutter on the tinker's shed
- hidden object area
- Hand Drill - open right cupboard door
- Engraving Tool - examine tool box and drag the diamond handle over the shaft
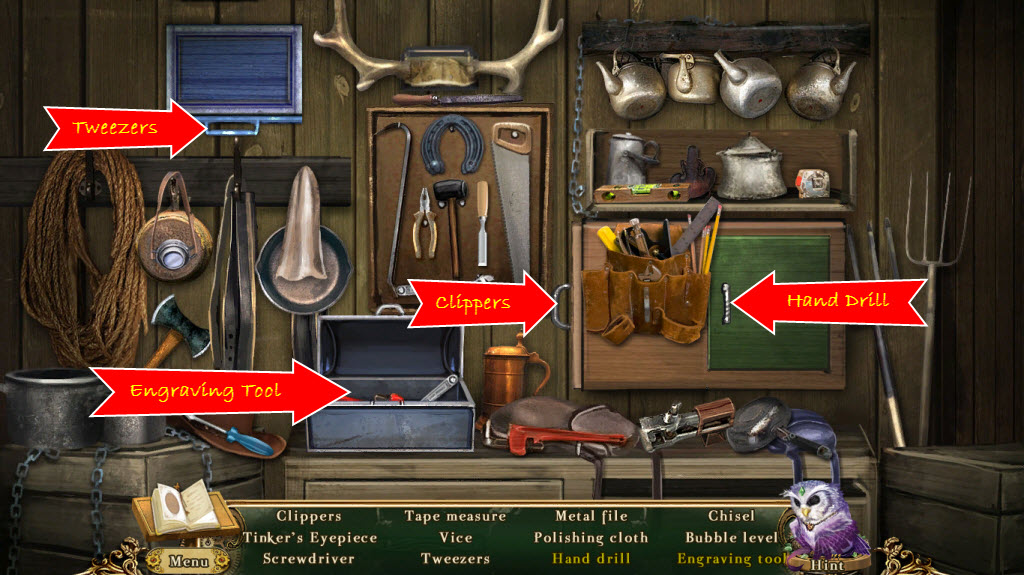
- receive Tinker's Tools
- return to the blacksmithy
- use the Tinker's Tools on the empty toolbox
- place the Pressed Iron Plate on the anvil
- use your Dragon to breath fire on the Pressed Iron Plate until you get a Rough Iron Key
- place the Rough Iron Key on the tool bench
- Iron Key Puzzle
- use the parts on the left to finish the key
- Chisel - use on teeth and handle
- Engraving Tool - use this on the "fancy" parts
- Polishing Cloth - use it on the "rough" spots
- Hand Drill - use it on holes above the teeth
- see screenshot for solution
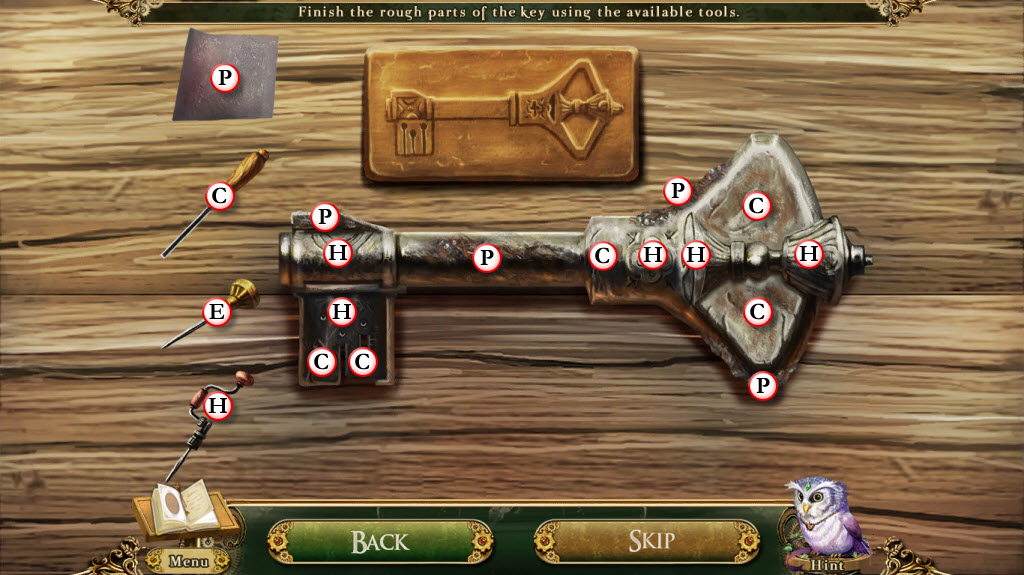
- receive Iron Key
- go down twice
- use the Iron Key on the feed silo
- enter
- use the Pitchfork on the iridescent hay and place it in the feed sack
- do this four times
- pick up the Ebony Crest
- take the Sack of Iridescent Hay
- return to the stables
- place the Sack of Iridescent Hay into the feed trough
- return to the weathered lodge
- examine the groom kit display on the bottom shelf
- place the Ebony Crest in the box
- Groom Kit Puzzle
- turn the knobs to rotate the circles into position
- see screenshot for solution
- take the Diamond Key and Grooming Kit
- return to the stables
- use the Grooming Kit on the Unicorn
- use the Diamond Key on the tackle rack
- take the Unicorn Tackle and pull the lever down
- place the Unicorn Tackle on the Unicorn
- return to the weathered lodge
- talk to Cecil
- return to the bridge
- click on the Unicorn
The End...?
Content(s) of this game guide may not be copied or
published on any other site without permission from Casual Game Guides.
©CasualGameGuides.com 2006 - 2021