
Haunted Manor: Lord of Mirrors
Haunted Manor: Lord of Mirrors Walkthrough includes step-by-step instructions on how to beat the game, complete with more than 150 detailed screenshots with every hidden object marked. Can you help Stan Riddle escape the Haunted Manor?
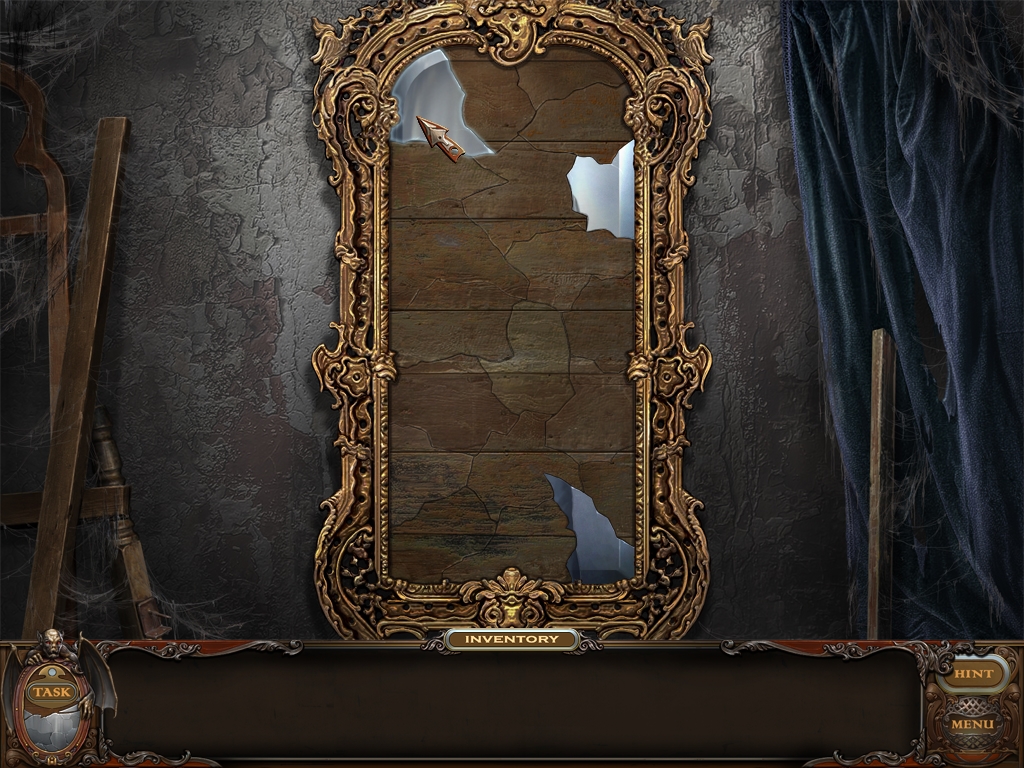
Opening Story:
The spooky house on the edge of town is avoided by everyone. Well, almost everyone. Young Stan Riddle can't resist a bet and he enters the house upon the urging of his buddies. The mirror at the end of the hall beckons him. As he gazes inside, he sees a reflection of himself, only with someone else's eyes. Suddenly the mirror breaks sending shards of glass flying. Stan has been trapped inside the mirror by the Lord of Mirrors. Can you help him escape?
General Tips:
Following this game guide exactly is not necessary. However, some actions must be performed to complete a certain scene before progressing.
Use the OPTIONS button to customize the screen size, music, sound, and cursor.
Click PLAY to begin your adventure.
You may CHANGE PLAYER to manage your activities within the game.
Hidden Object Areas sparkle. Zoom into these sparkling areas to initiate that activity. Both Hidden Objects and some puzzles within the game are random. Use this game guide as an example only.
You may proceed through the introduction to the story by using the NEXT button or skip with the SKIP ALL button.
Haunted Manor: Lord of Mirrors is an untimed game. Please realize that excessive incorrect clicks will cause the screen to "crack" for a short period of time. Rather than making mistakes, you may prefer to obtain hints, which are unlimited, but require a waiting period for the meter to refill.
In addition to a hint meter, the game also contains a "skip meter." Mini games may be skipped when the skip meter is full.
You may monitor your progress and view your current task within the game by viewing the Task button at the lower left hand corner of the screen. Directly beneath the Task button is the Shards button from which you can view your progress in assembling the mirror. Hint and Menu buttons are located at the opposite corner (lower right). Finally, you may keep track of your current inventory or item list in the window located along the bottom of the screen. Use the tab key to switch between the two.
At the beginning of the game, you will be given the option of accessing interactive help. Choose this if you would like some extra assistance.
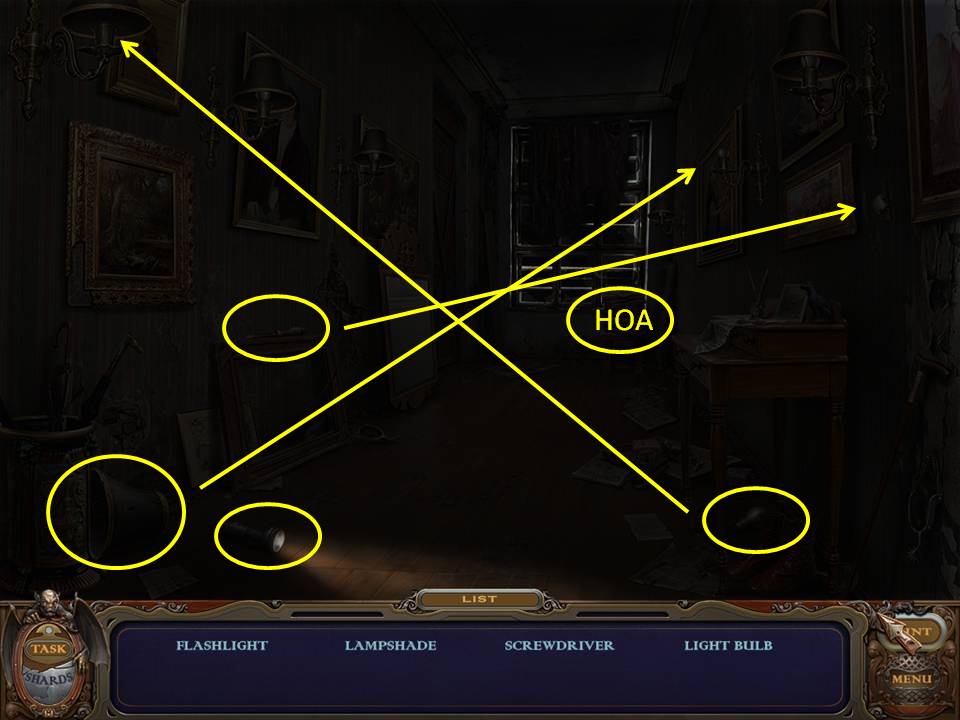
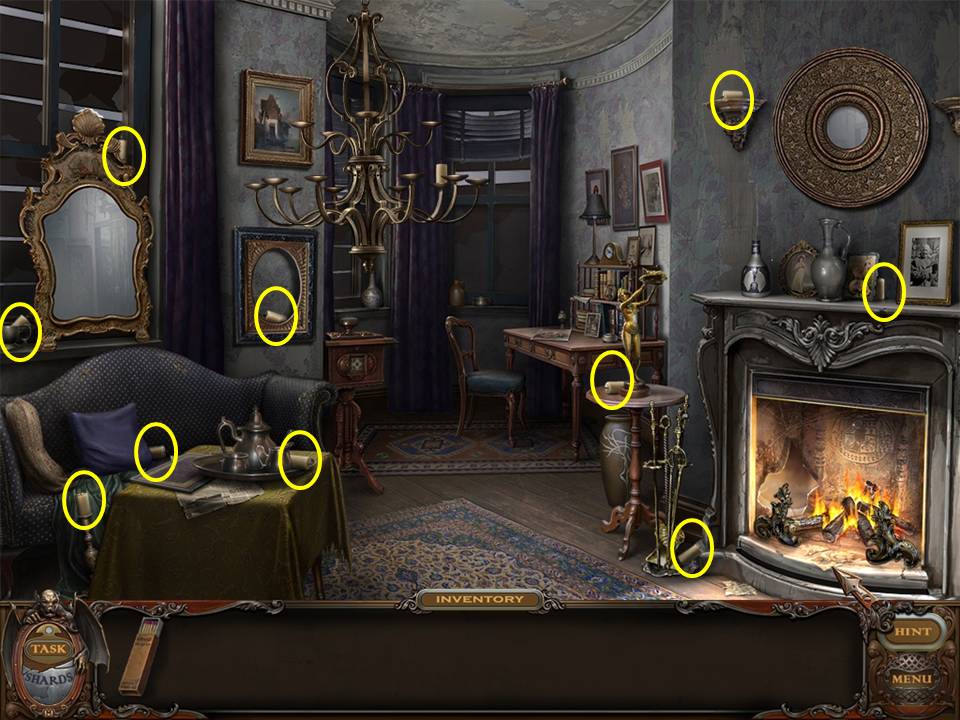
Pick up the blinking flashlight located on the floor.
Pick up the LIGHT BULB under the desk on the right. Insert this into the lamp located on the top left corner of the screen. Once inserted, click on the bulb to turn on the light.
Pick up the LAMPSHADE on the lower left.
Place the LAMPSHADE on the middle right lamp.
Use the SCREWDRIVER on the broken switch under the lamp located at the top right corner of the screen.
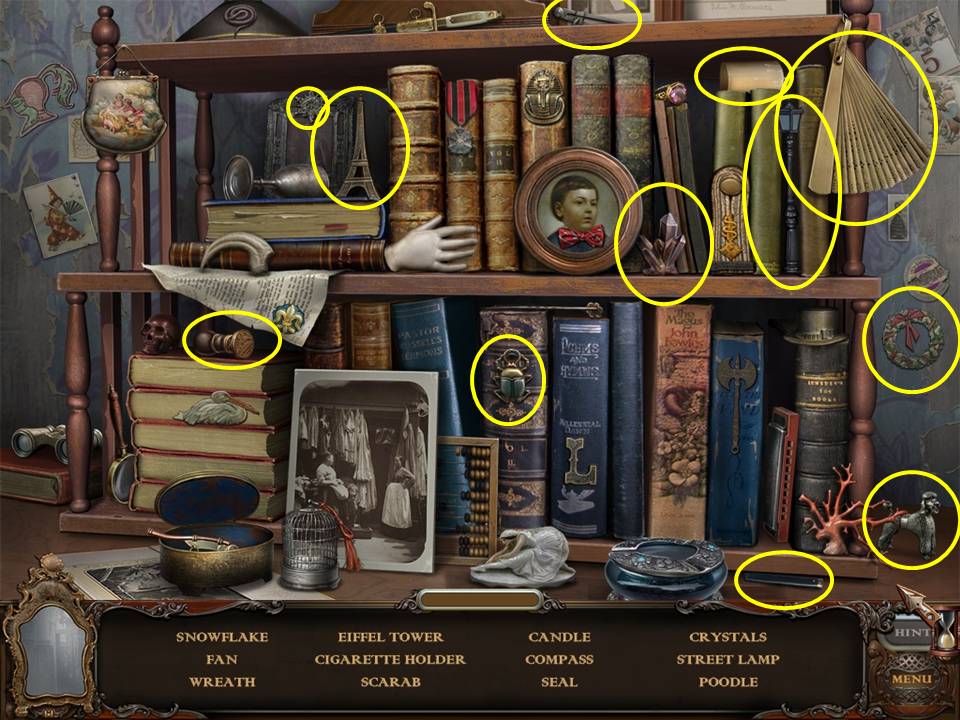
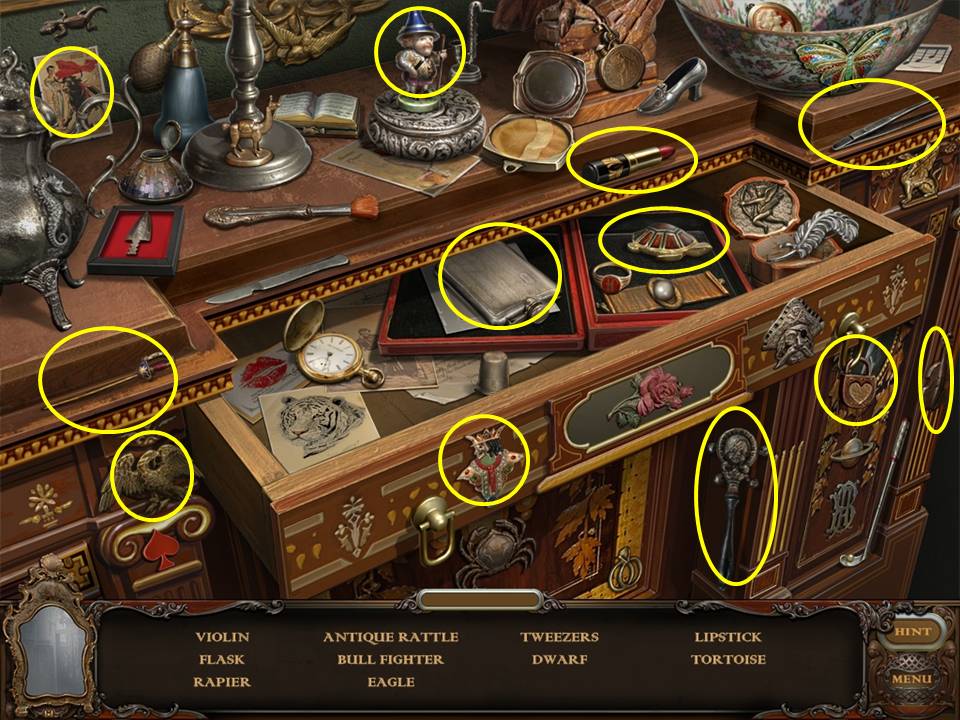
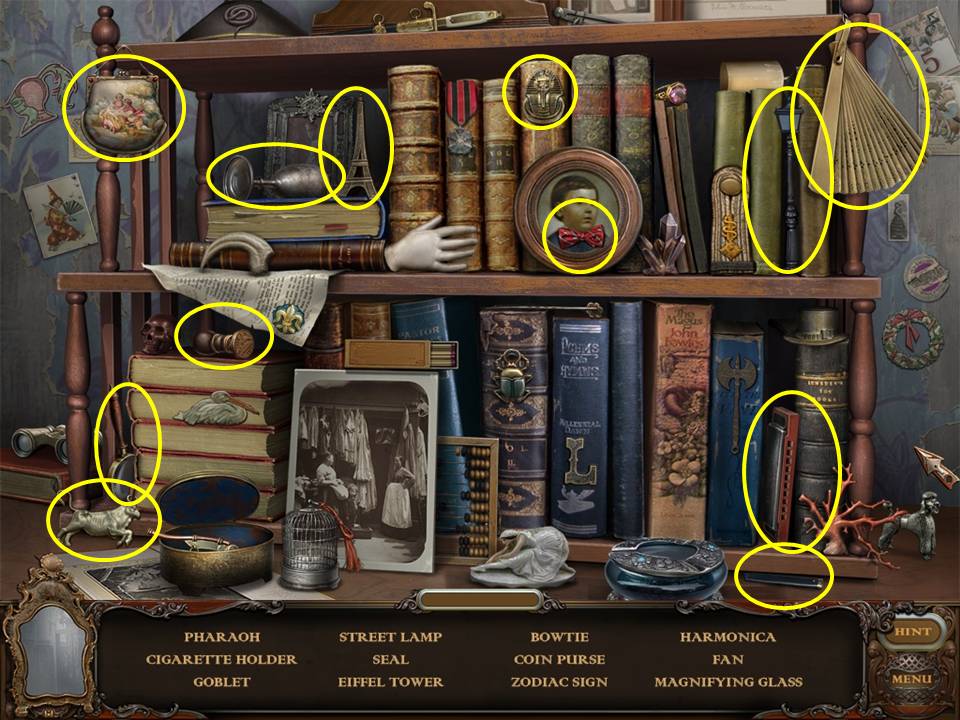
Play the Hidden Object Area (HOA) located by the stack of books at the back of the corridor.
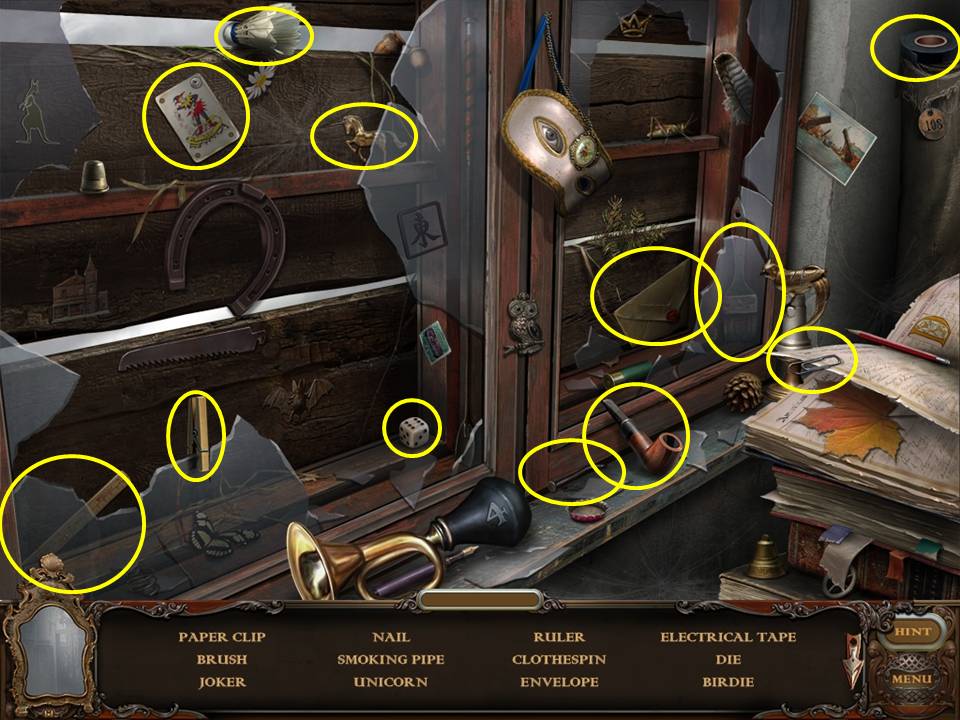
Find the objects indicated.
Locate and receive the ELECTRICAL TAPE.
Return to the Corridor.
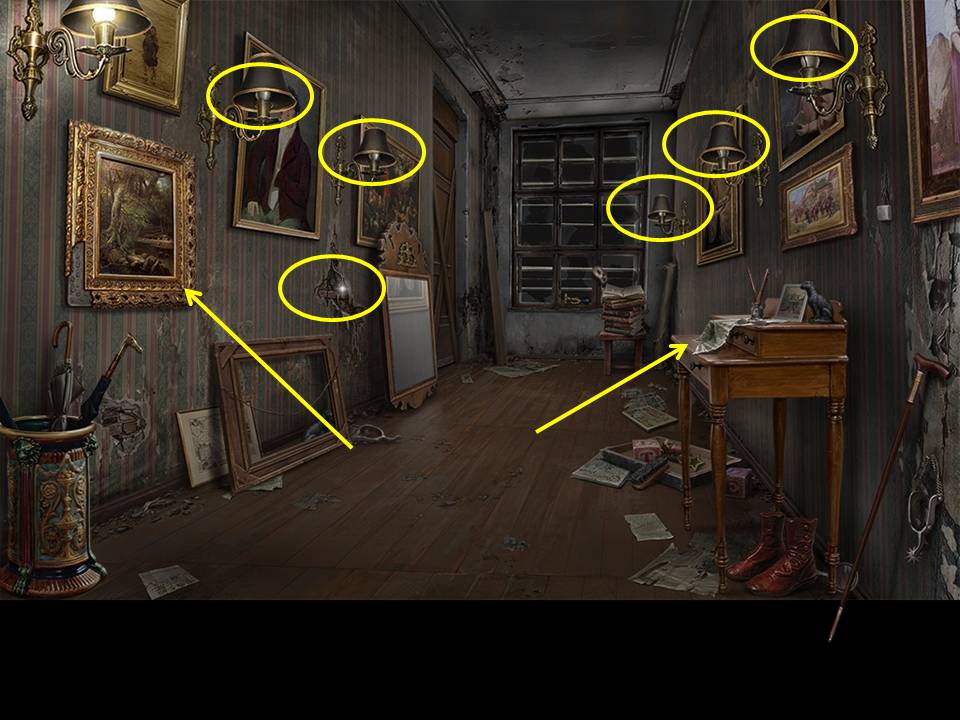
Repair the wire on the lefthand wall with the ELECTRICAL TAPE.
Turn on the five remaining lights by clicking their lightbulbs.
Pick up the newspaper article on the desk against the right wall to read about a missing nobleman.
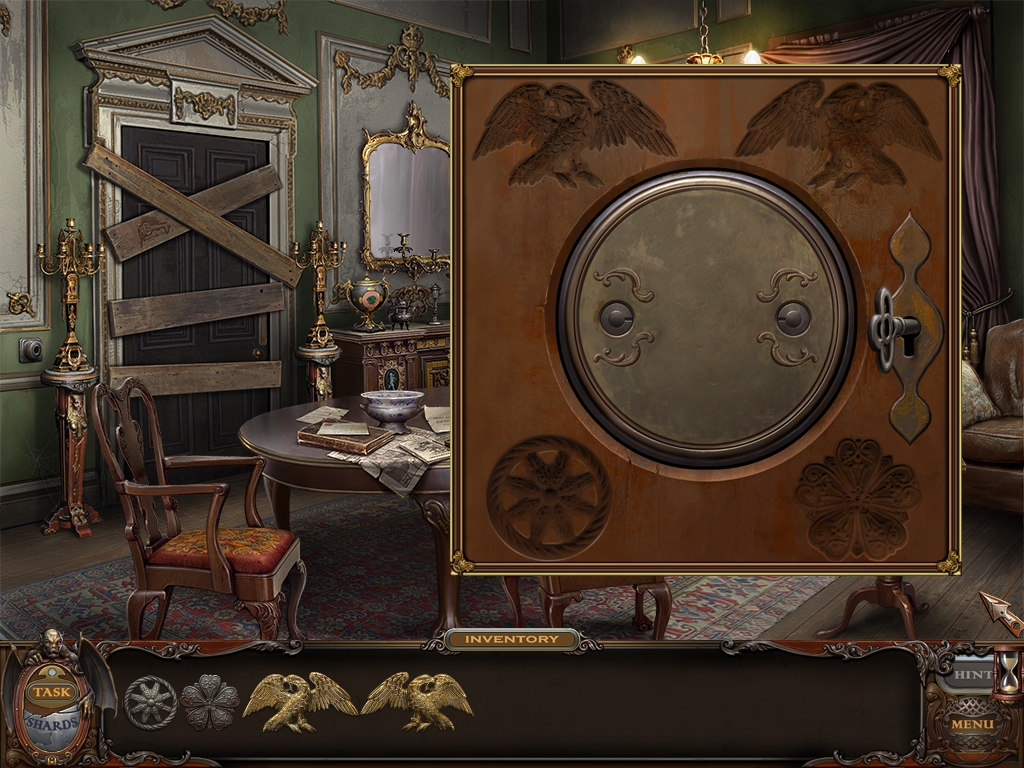
Click on the painting underneath the wall lamp in the top left corner to reveal a hidden safe.
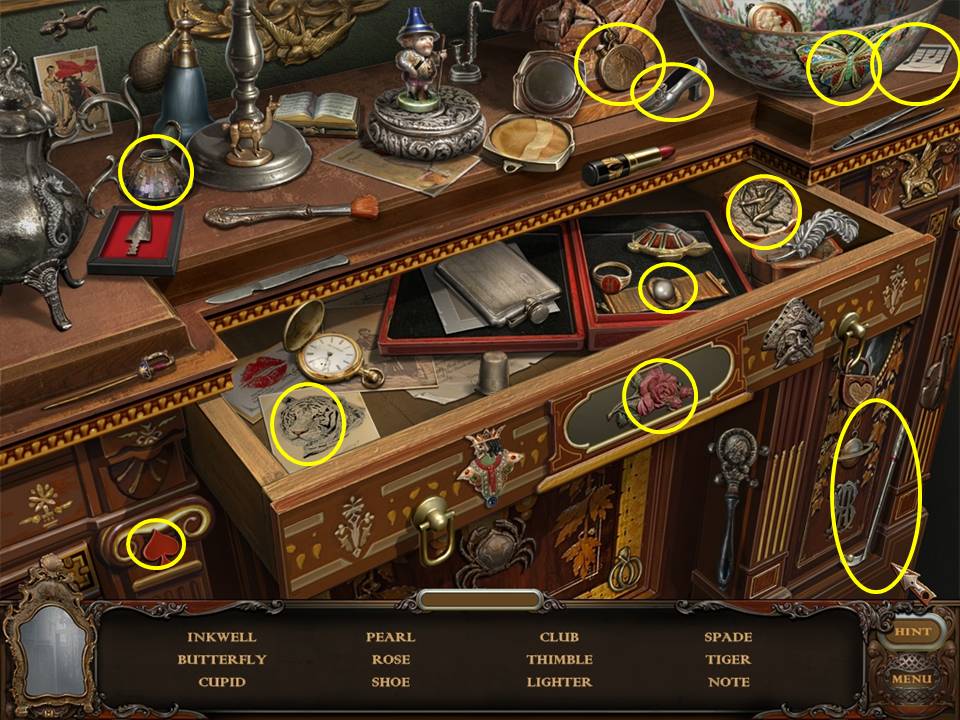
Return to the Hidden Object Area.
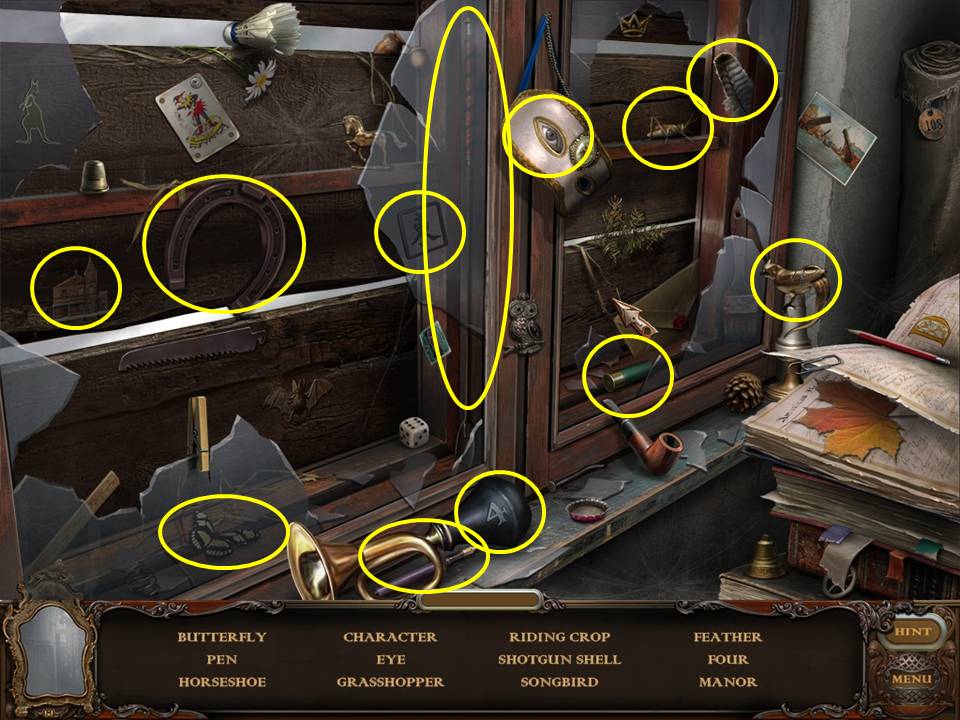
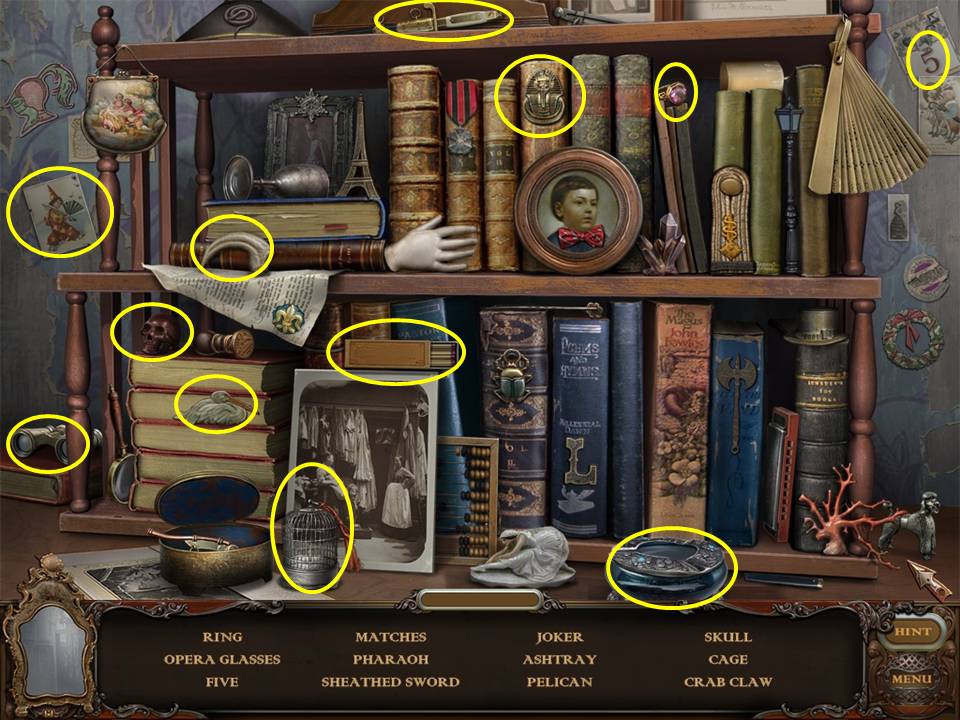
Within the Hidden Object Area, locate the objects requested.
Receive the HORSESHOE.
Find the SPUR STAR, STAR and two CAT FIGURES within the Corridor Scene. Note the HAND MIRROR in the bottom right corner of the screen. You will need it momentarily.
Click on the Safe.
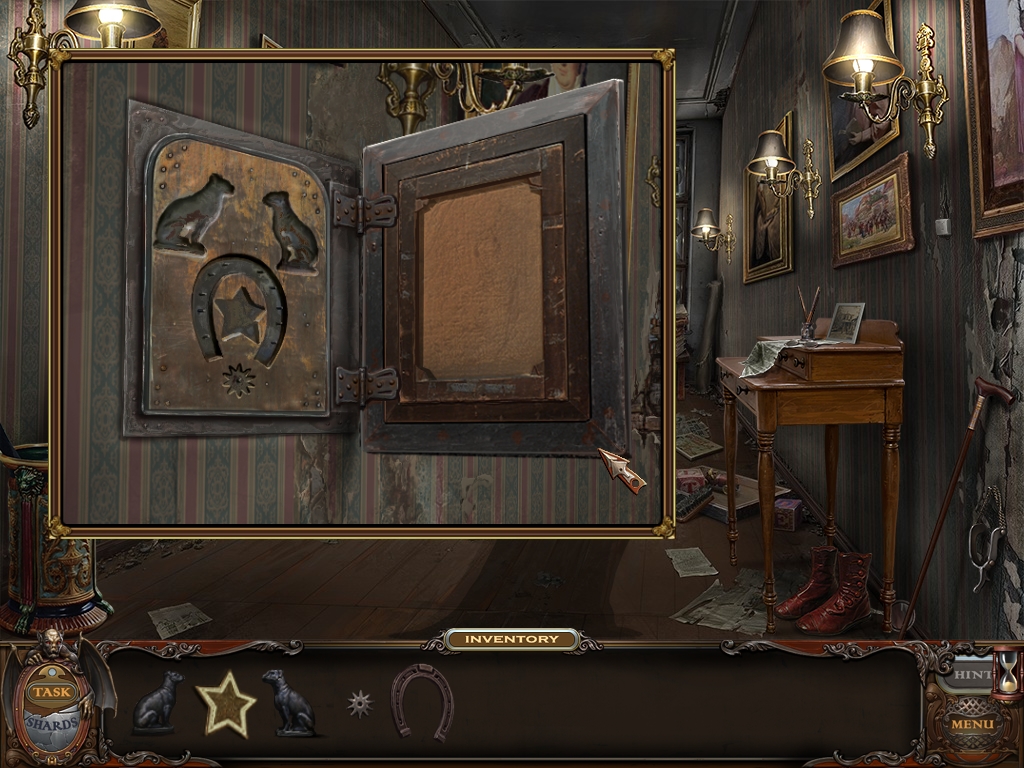
Insert the HORSESHOE, SPUR, STAR and CAT FIGURES into the appropriate spaces behind the painting to open the safe.
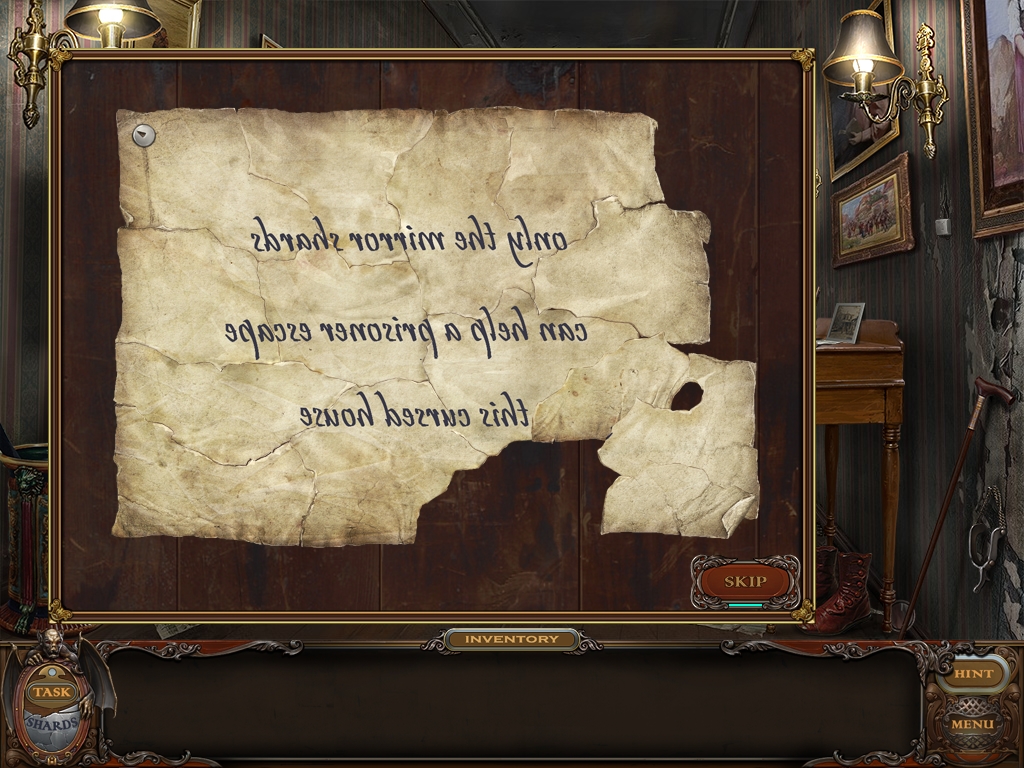
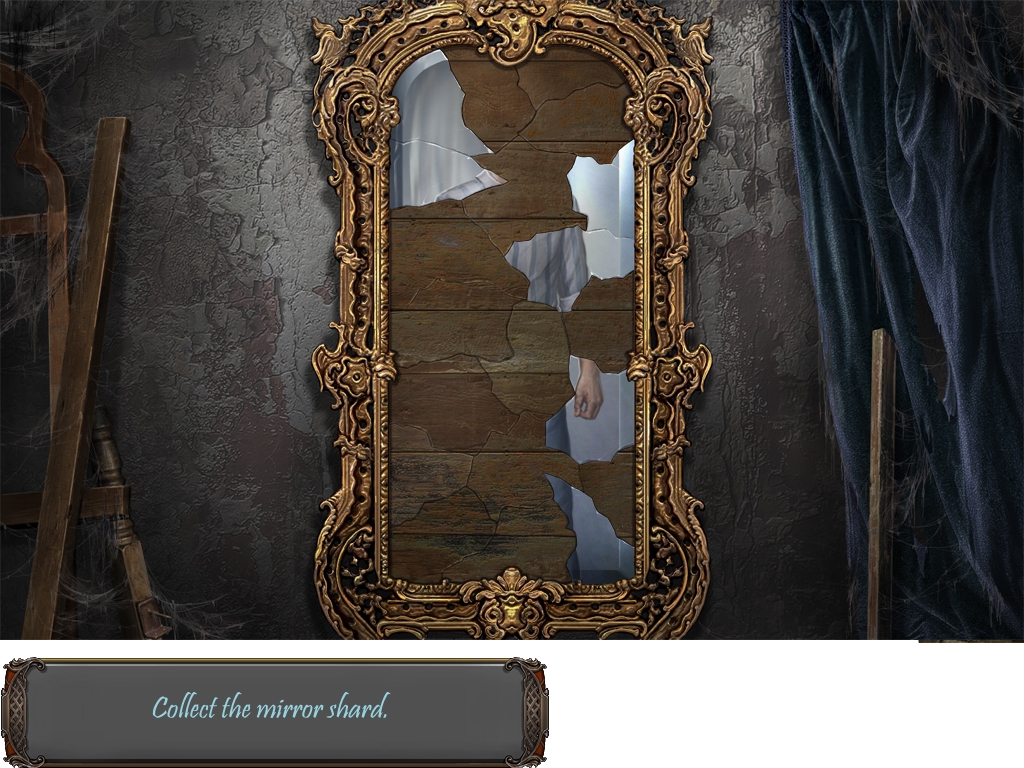
Click on the roll of paper to initiate a mini game. The object of the mini game is to assemble the pieces of a note in order to read the message. Drag and drop the pieces of the note to assemble. Use the paper's straight edges as your guide. When the note is fully assembled, you'll notice that the script is in reverse. Go back to the corridor and pick up the MIRROR located in the lower right corner of the screen to read the note. The note reads, "Only the mirror shards can help a prisoner escape this cursed house."
Exit the note screen by clicking outside the inset. A SHARD has now appeared within the safe. Take the SHARD.
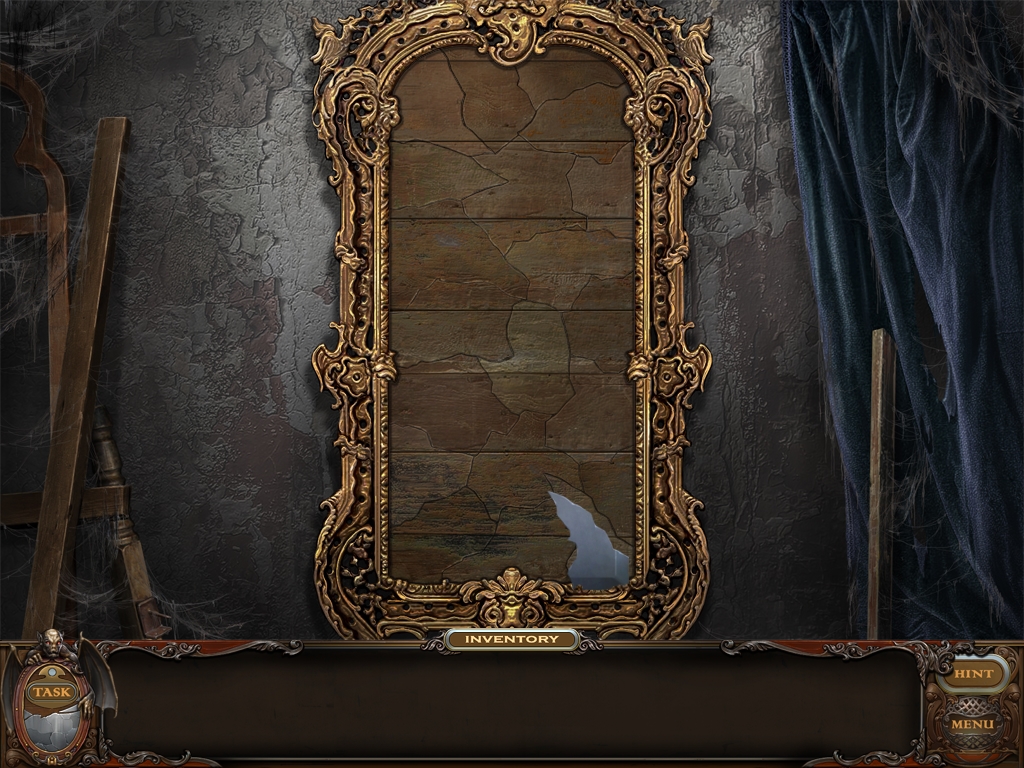
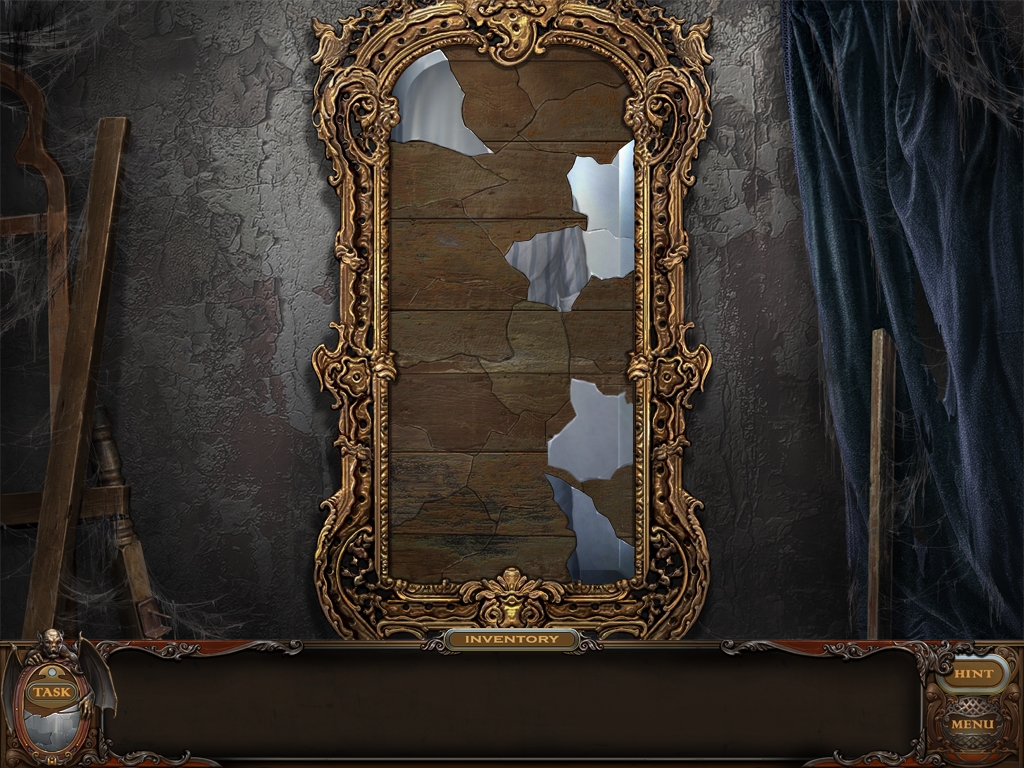
Place the SHARD in the appropriate space in the mirror.
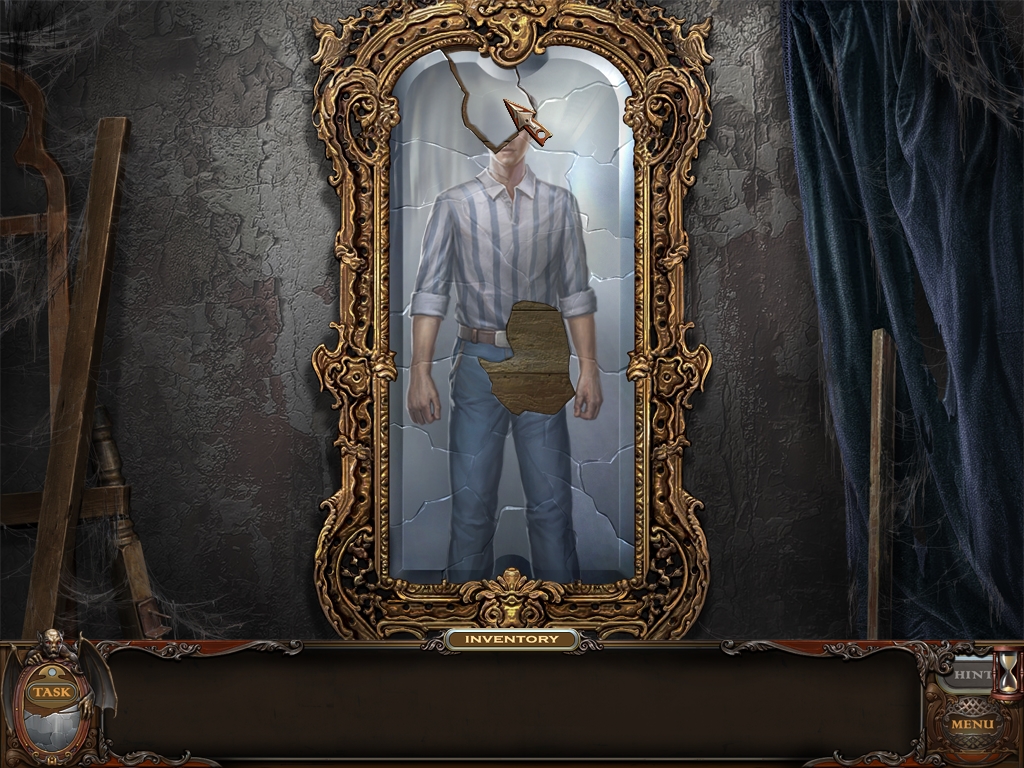
Return to the Corridor and initiate a mini game by clicking on the mirror on the left with the words "want to play."

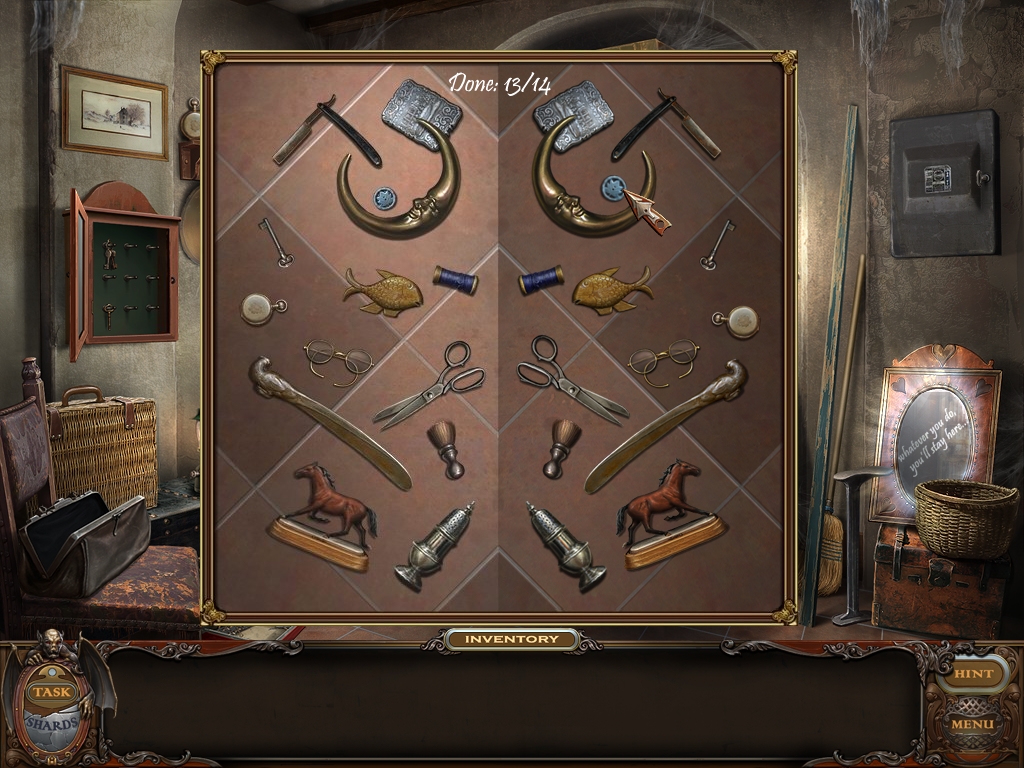
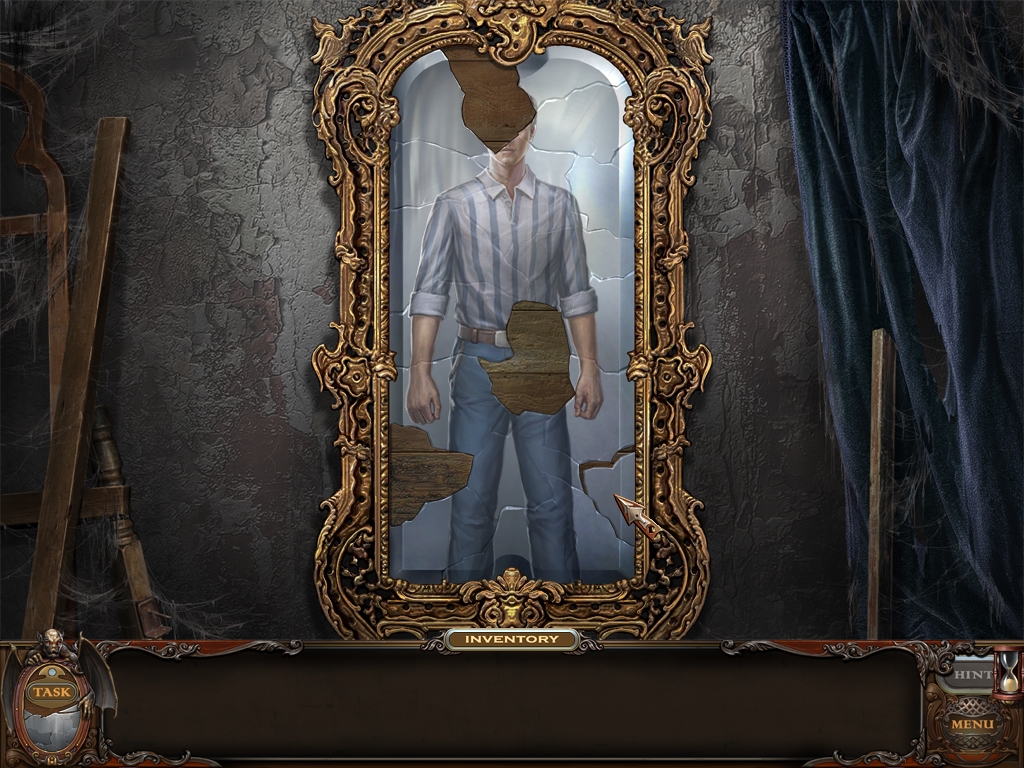
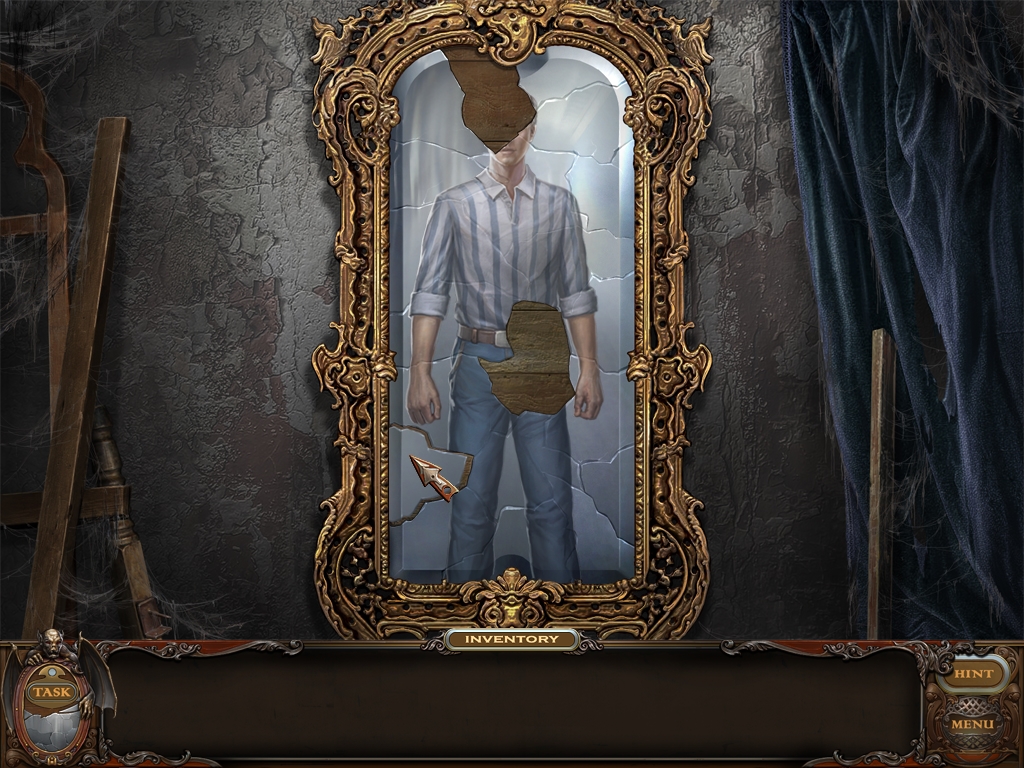
In this game, you must spot 17 differences between the reflection on the left and the person on the right. The reflection on the left is the only one that is clickable. Return to the Corridor.
Pick up the BRUSH that is by the leg of the chair on which the stack of books rests.
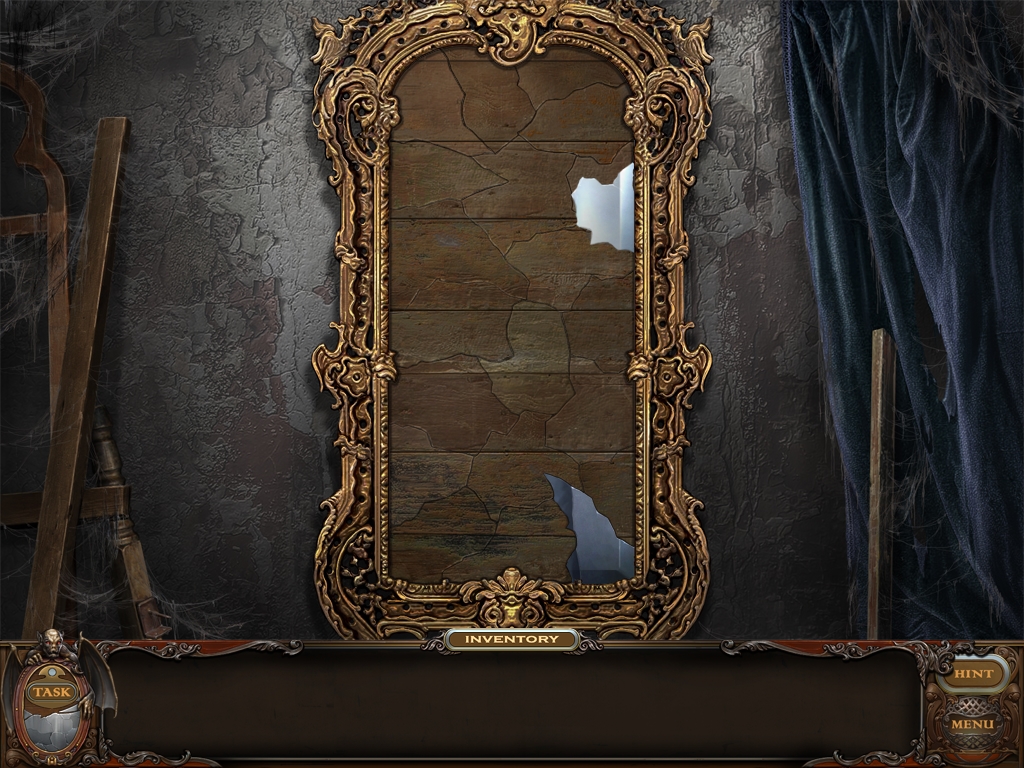
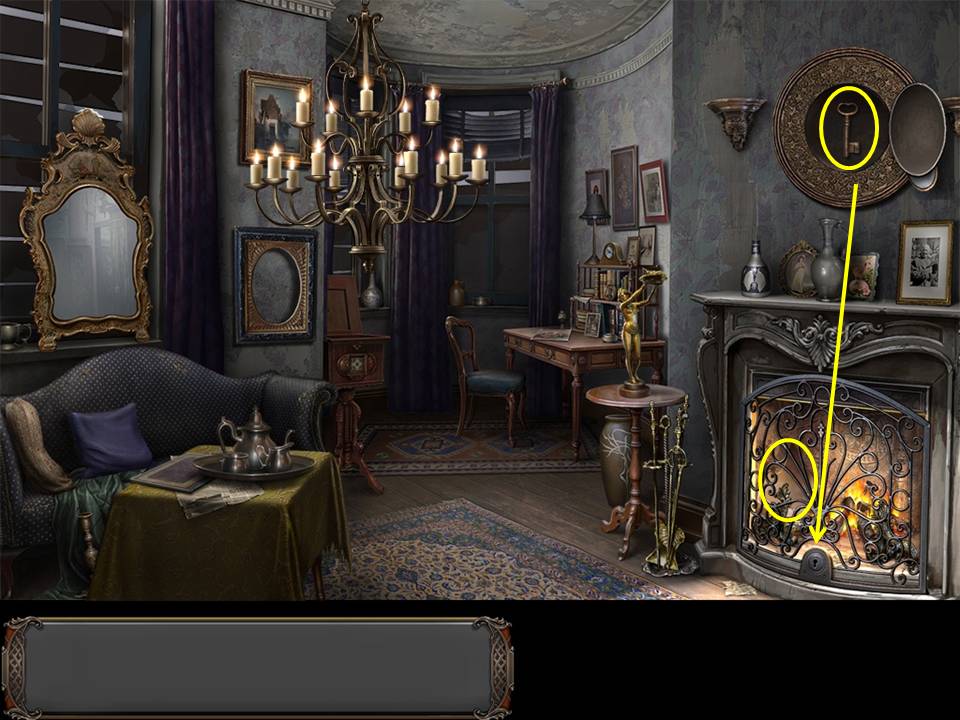
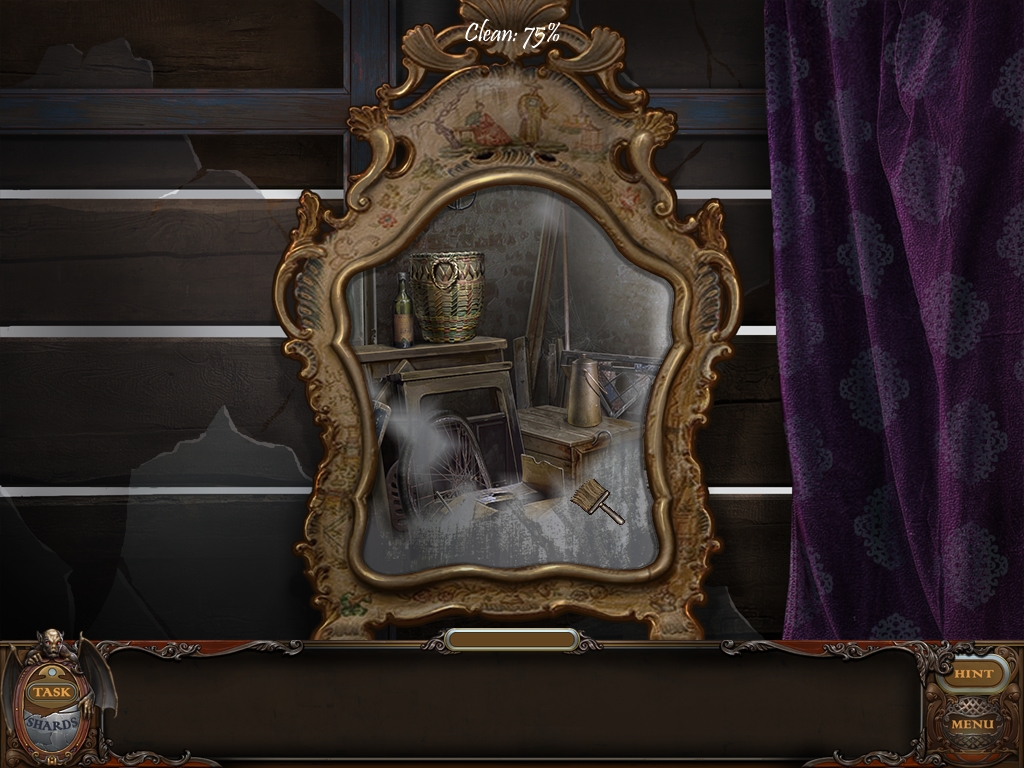
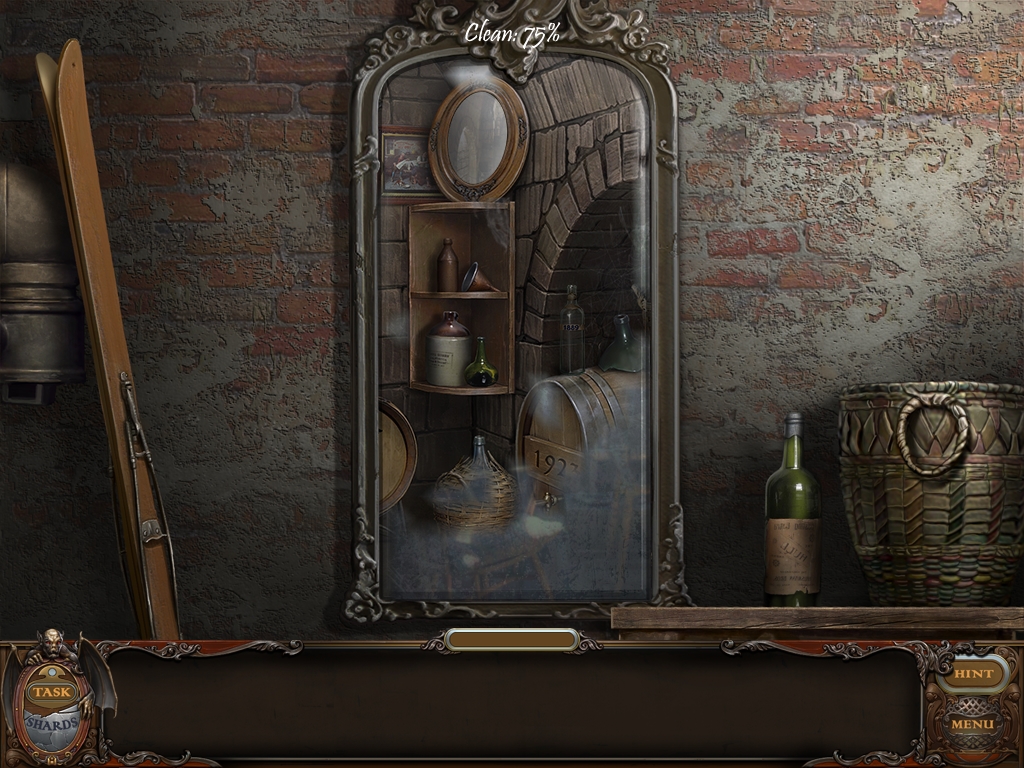
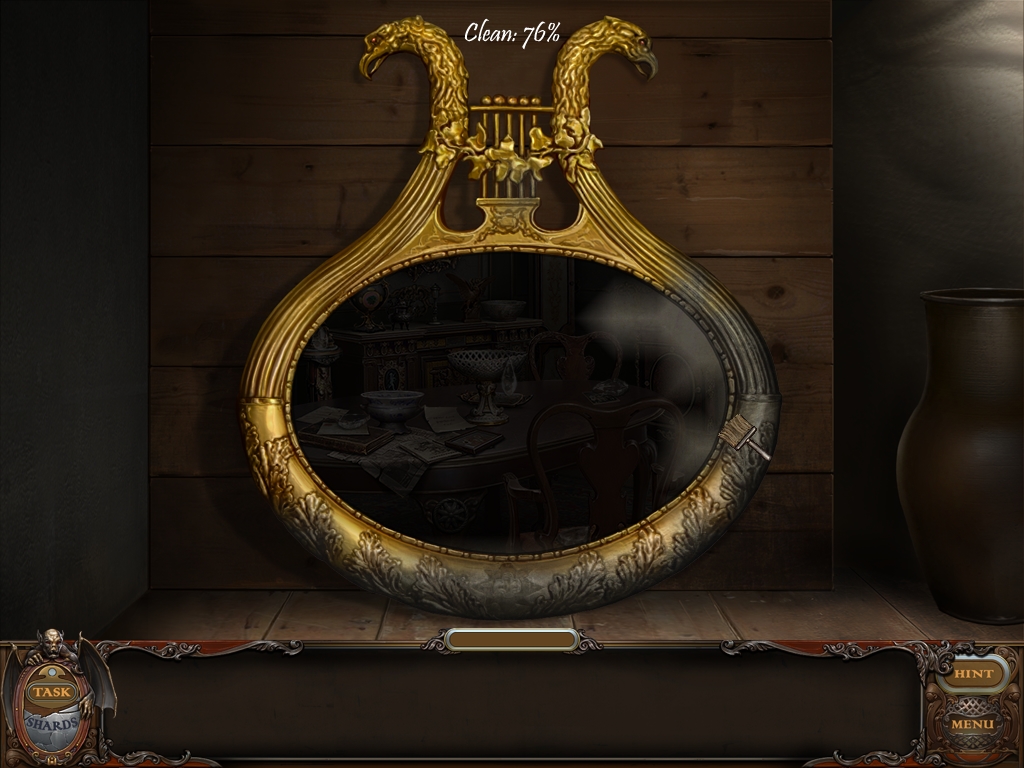
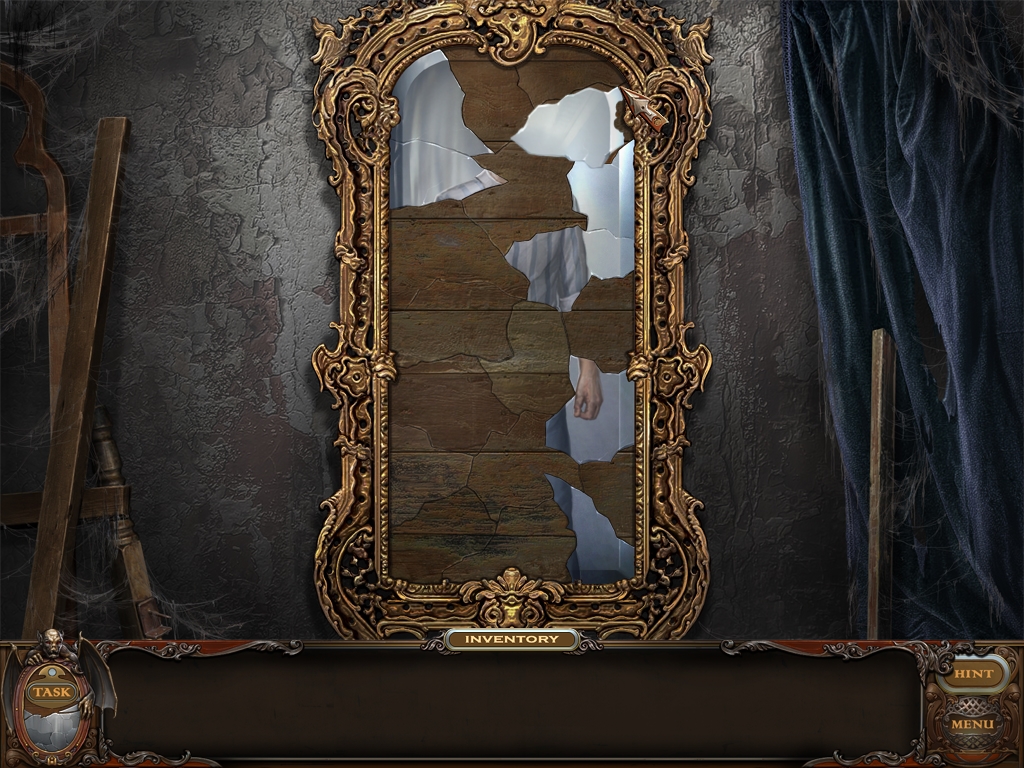
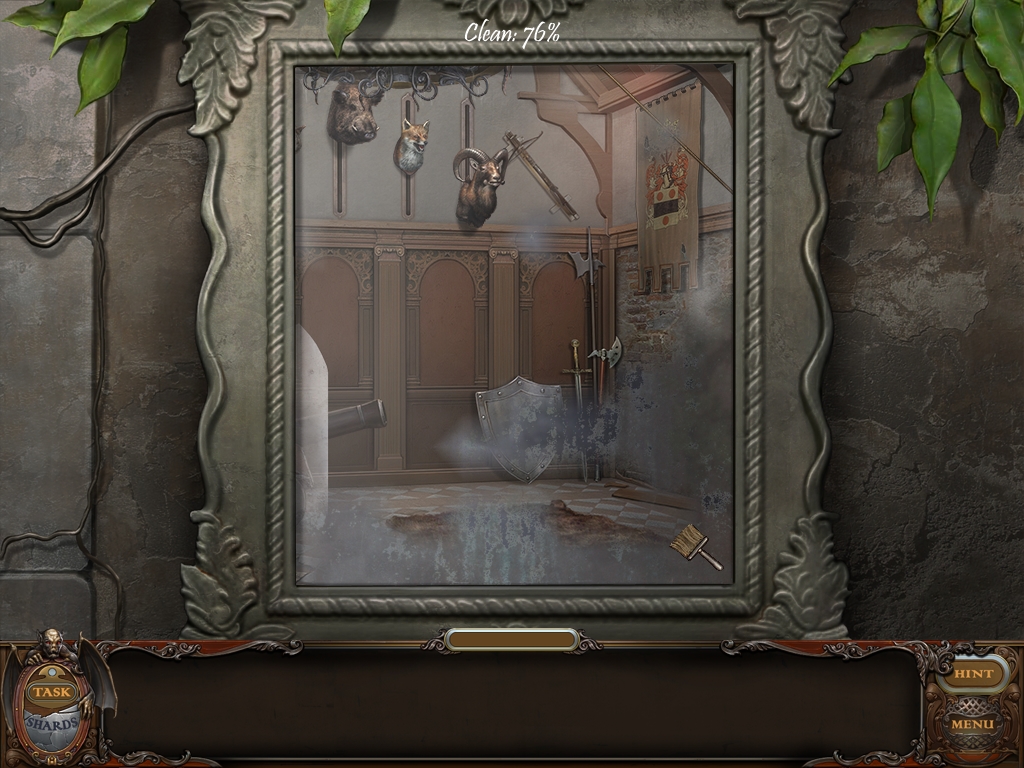
Use the BRUSH on the mirror leaning against the left wall.
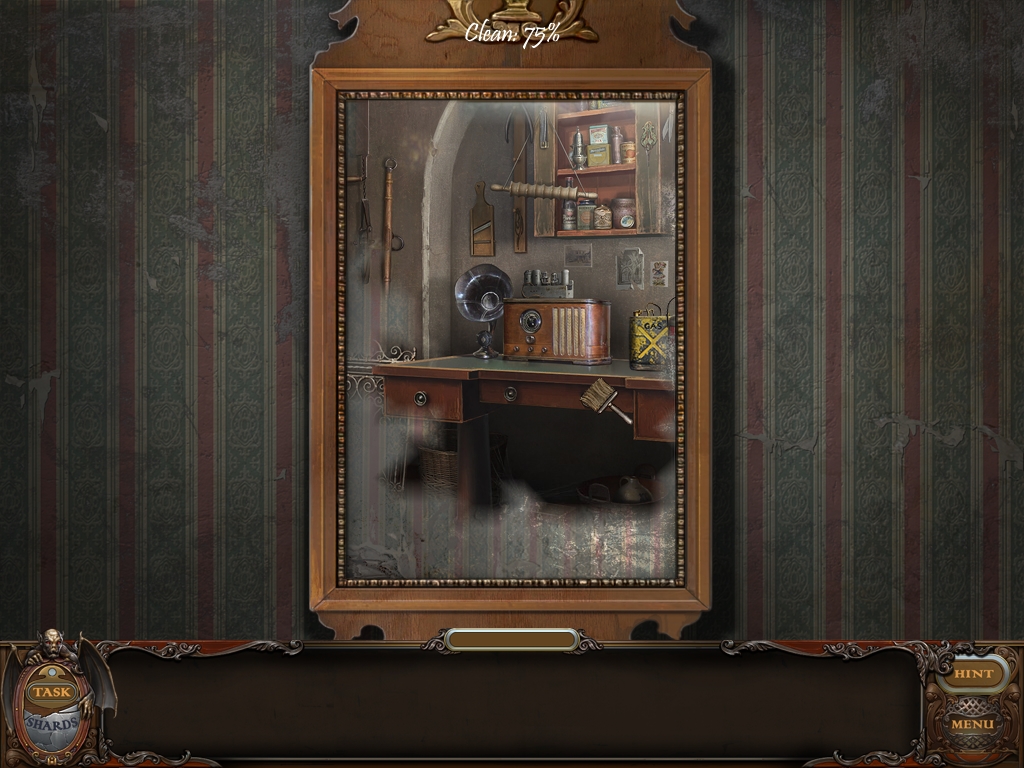
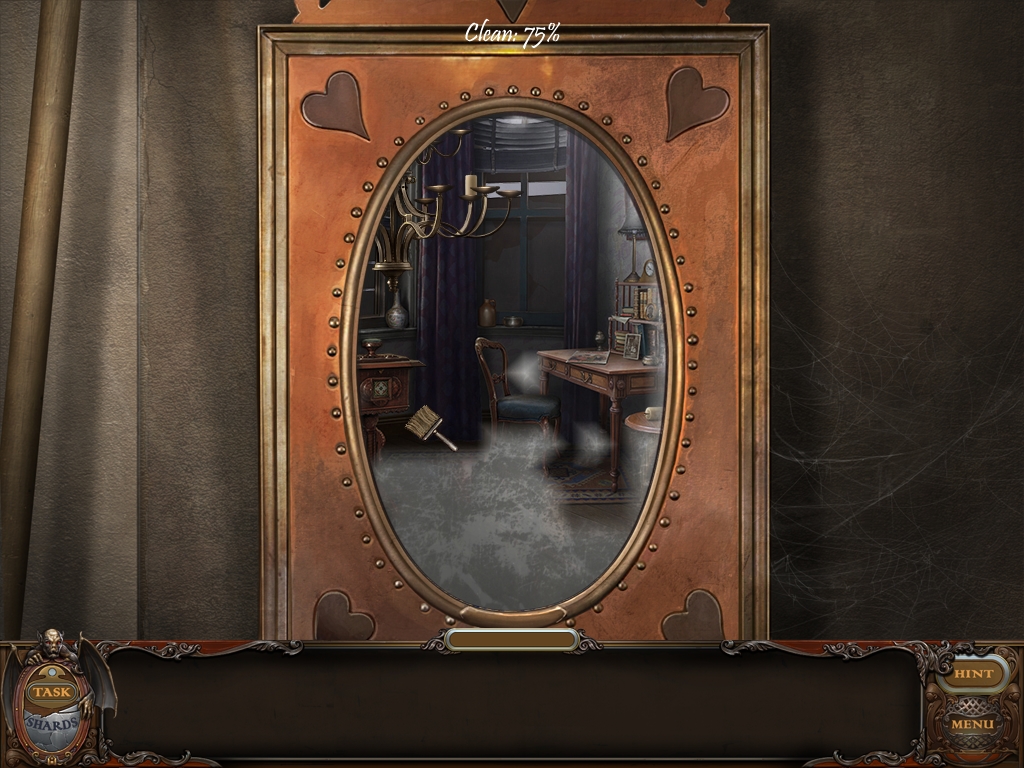
Left-click and hold when you brush the mirror to remove all the dust. You must get the mirror totally clean. Your progress percentage is indicated on the top frame of the mirror.
When the mirror is totally clean, you may click anywhere to enter the Electrical Room.
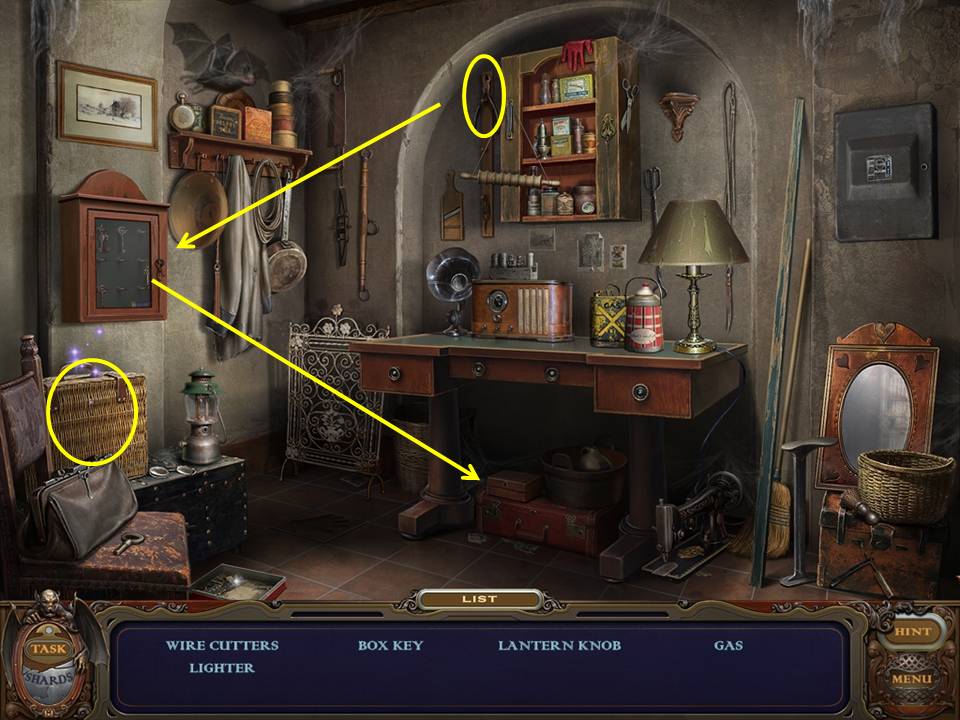
Pick up the WIRE CUTTERS.
Use the WIRE CUTTERS to open the key cabinet.
Pick up the ornate BOX KEY.
Use the BOX KEY to open the small box.
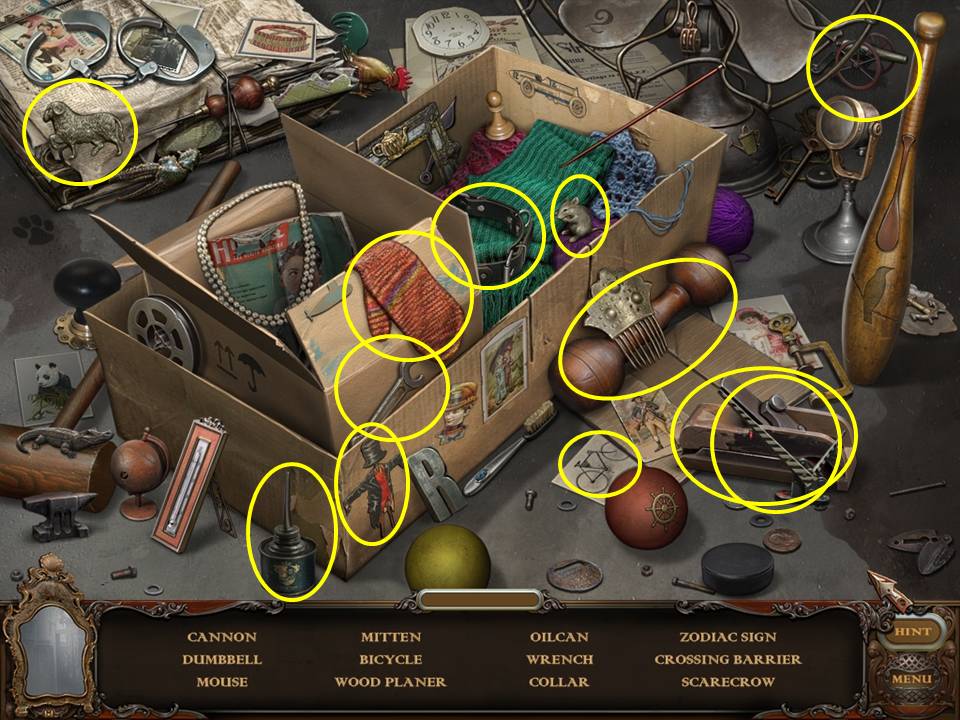
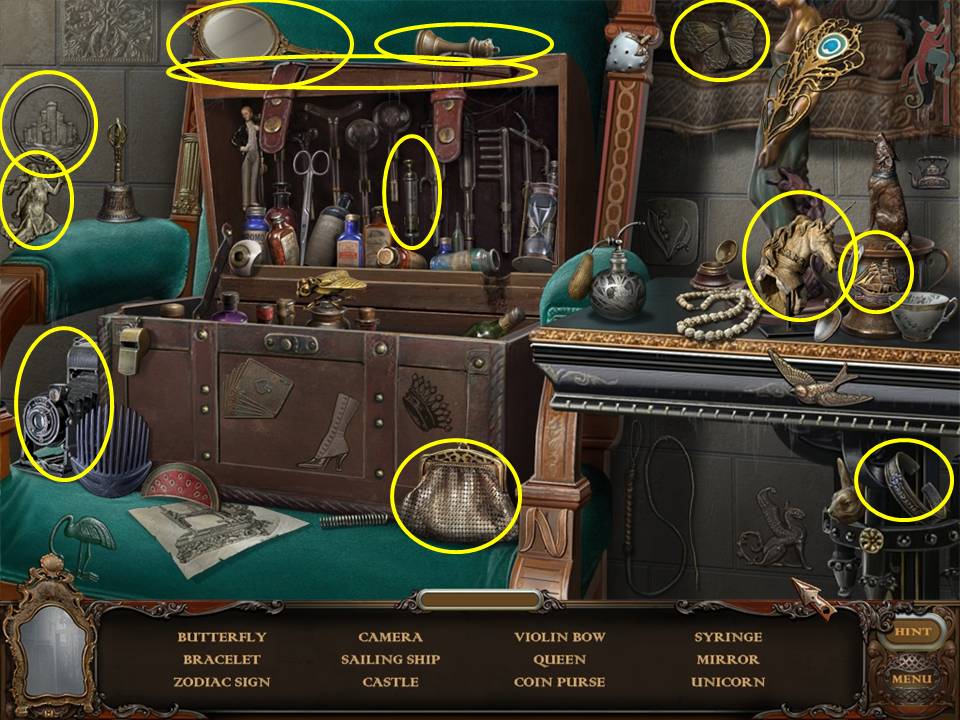
Click on the Hidden Object Area located by the suitcase just below the key cabinet.
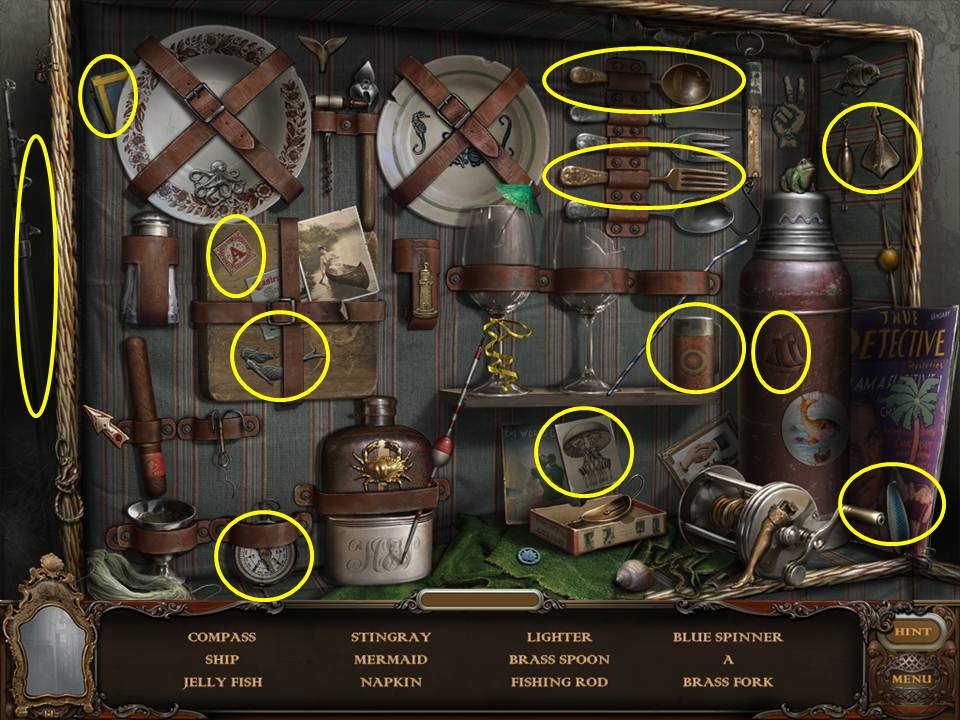
Locate the items indicated.
Pick up the LIGHTER.
Return to the Electrical Room.
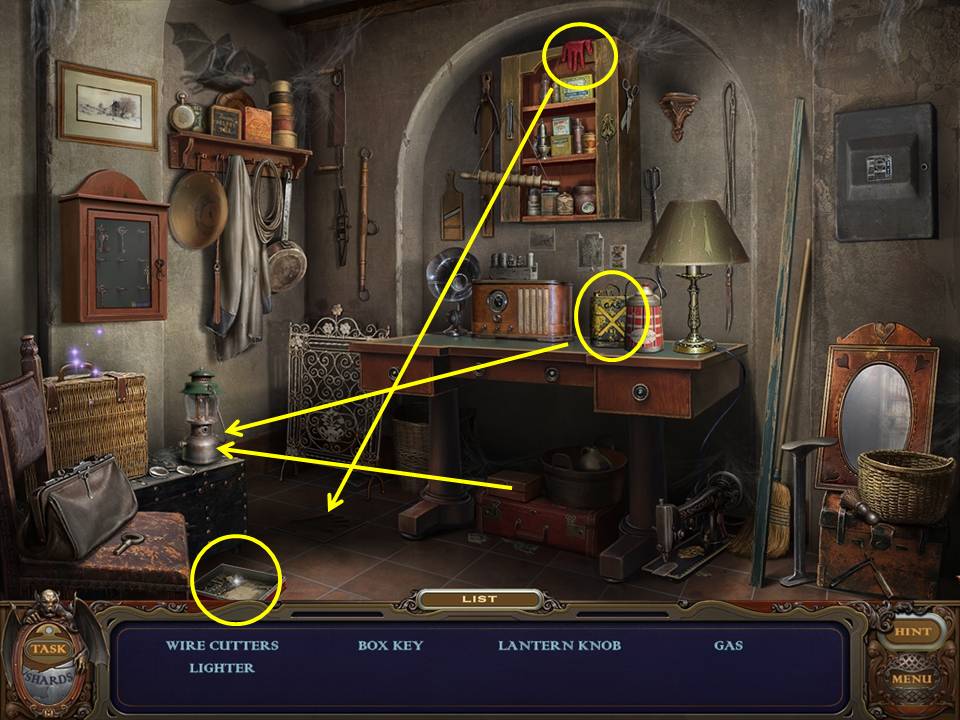
Pick up the GAS from the desk. Put the GAS in the lantern.
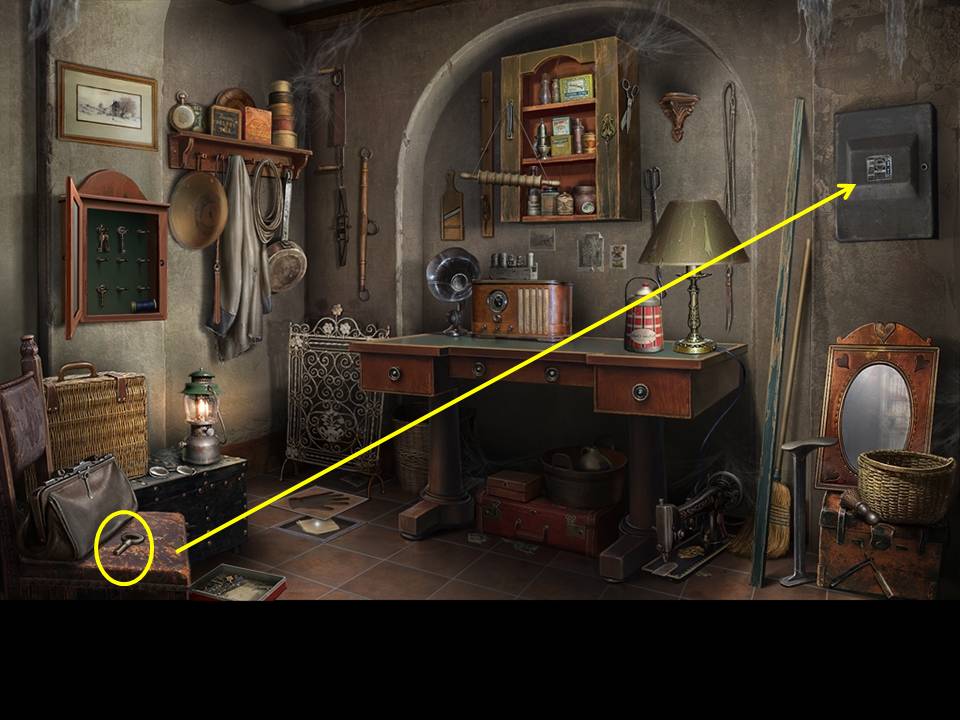
Locate the LANTERN KNOB in the small box underneath the desk. Use the LANTERN KNOB on the lamp.
Light the lamp with the LIGHTER.
Pick up the red GLOVE on top of the cabinet. Use the GLOVE on the handprint. The tile will move to reveal a hiding place.
Look at the fuse box diagram in the hiding place.
Click on the box of fuses in the lower left corner.
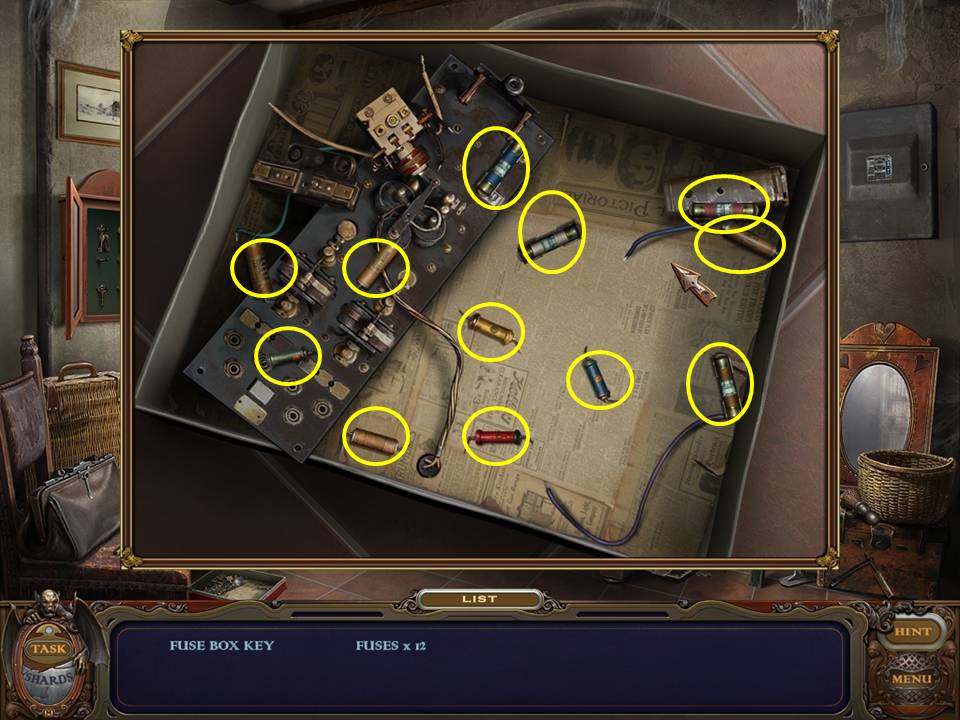
Locate 12 FUSES in the box.
Pick up the FUSE BOX KEY and unlock the fuse box.
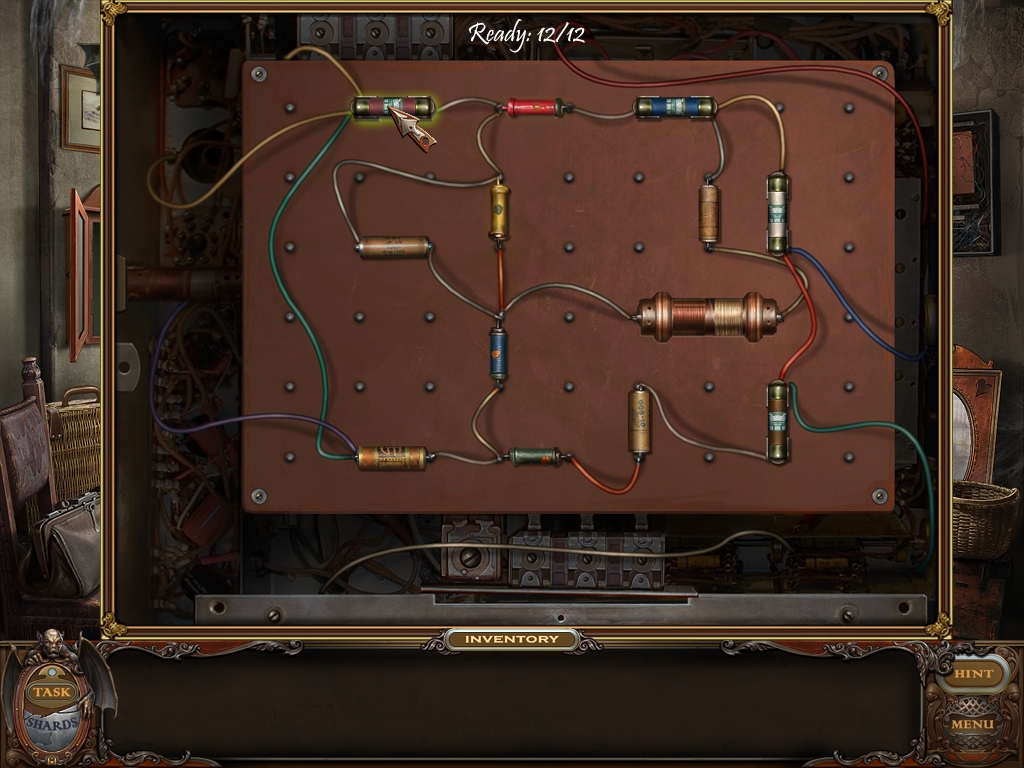
Insert the 12 FUSES in the appropriate spaces. Left-click, hold, and drag the fuses into position. When positioned properly, fuses will lock in place. Remember, you are matching the fuses to the silhouettes. Ignore color and focus on shape. You may find it simpler to move all the horizontal fuses to one side of the screen and all the verticals to the opposite site.
Click on the mirror under the fusebox to initiate the next task.
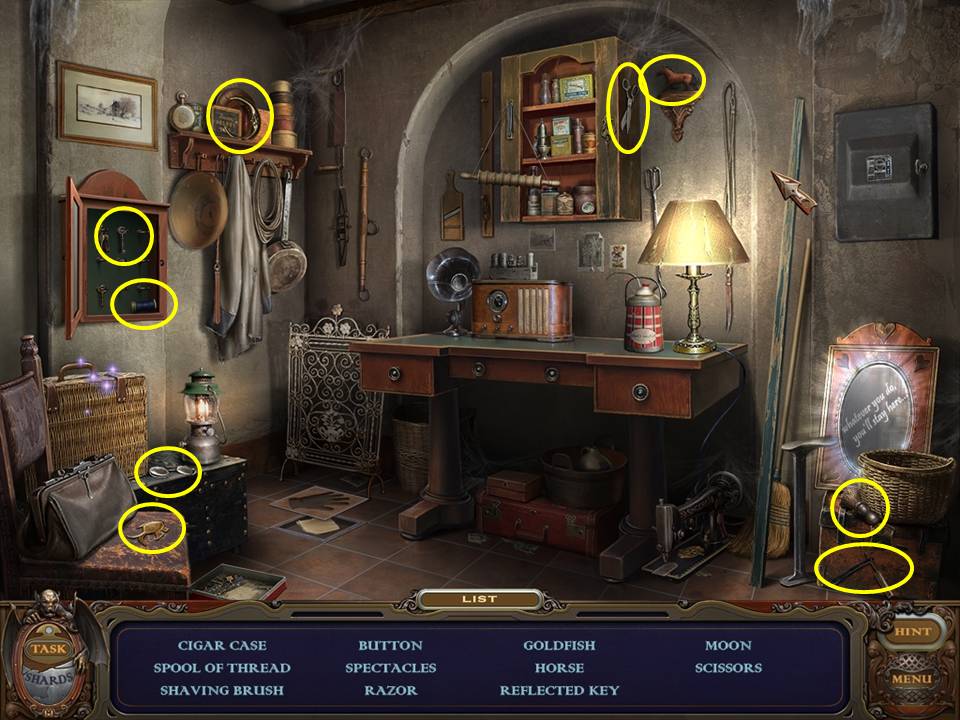
Within the room, locate the items listed. The cigar case is inside of the leather valise that is sitting on the chair. To find the button, you must play the Hidden Object Area within the suitcase a second time.

Find the items indicated.
Pick up the BUTTON.
Return to the Electrical Room and click on the mirror to place the items.
Drag and drop the items so they create a mirror reflection of the items on the opposite side. When properly completed, you will be returned to the Electrical Room.
Pick up the SHARD from behind the firescreen to the left of the desk.
Place the SHARD in the appropriate place in the mirror.
Return to the Electrical Room.
Use the BRUSH to brush the mirror.
Left-click and hold when you brush the mirror to remove all the dust. You must get the mirror totally clean. Your progress percentage is indicated on the top frame of the mirror. When the mirror is clean, you may proceed to the Living Room.
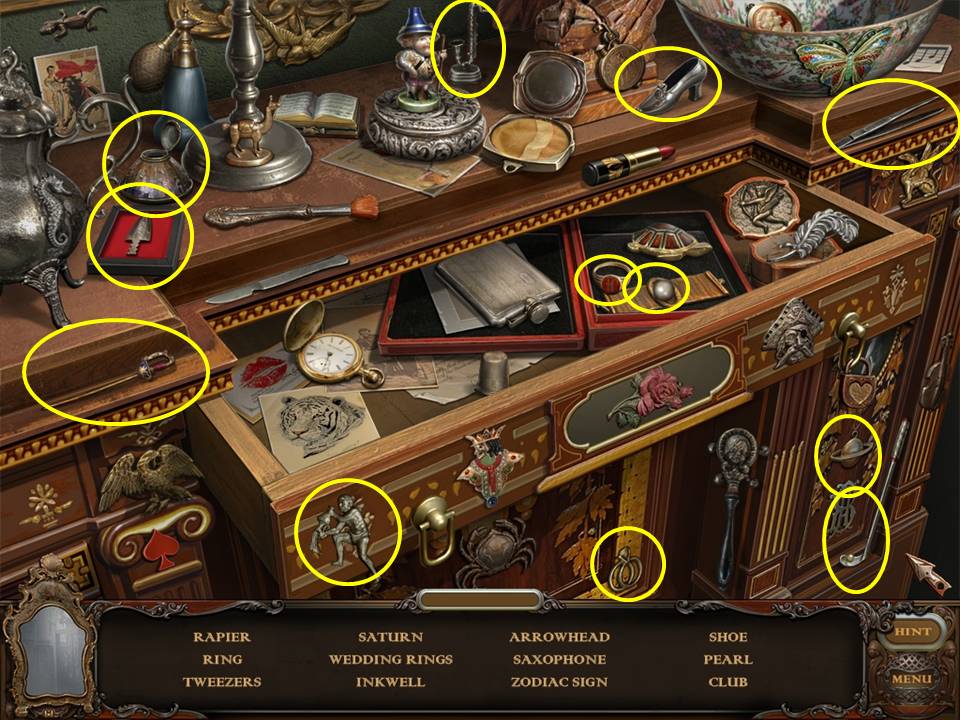
Play the Hidden Object Area by the desk.
Locate the items on the list. Receive the MATCHES.
Light the fireplace with the MATCHES.
The missing Nobleman informs you there is a SHARD in the fireplace. Attempt to take it. A metal grate appears blocking your way.
Locate 14 CANDLES. Ten are in the Living Room scene.
Three of the candles are in the drawer of the small table underneath the chandelier. The final candle is in the desk Hidden Object Area. Return there and play again.
Find the items listed. Receive the final candle.
Zoom in on the chandelier.
Insert the CANDLES into the chandelier.
Light the CANDLES with the MATCHES.
You will not be able to light all of the CANDLES with one MATCH. Use as many as necessary.
Return to the Living Room.
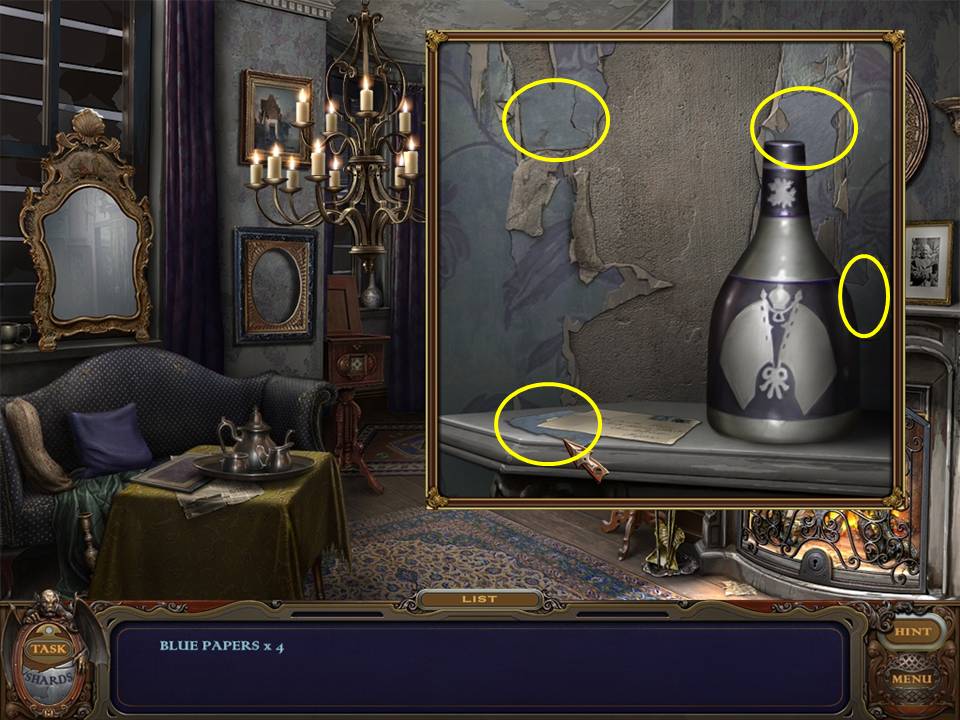
Click on the blue bottle on the left side of the fireplace mantle.
Pick up the 4 BLUE PAPERS.
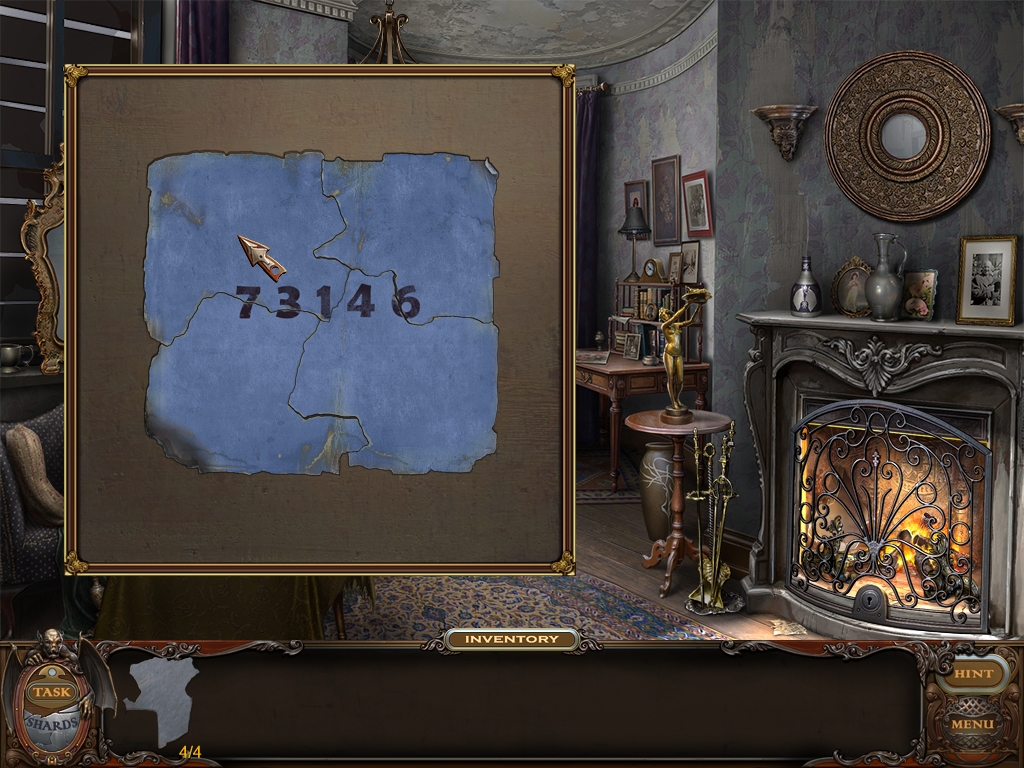
Assemble the papers to reveal a numerical code.
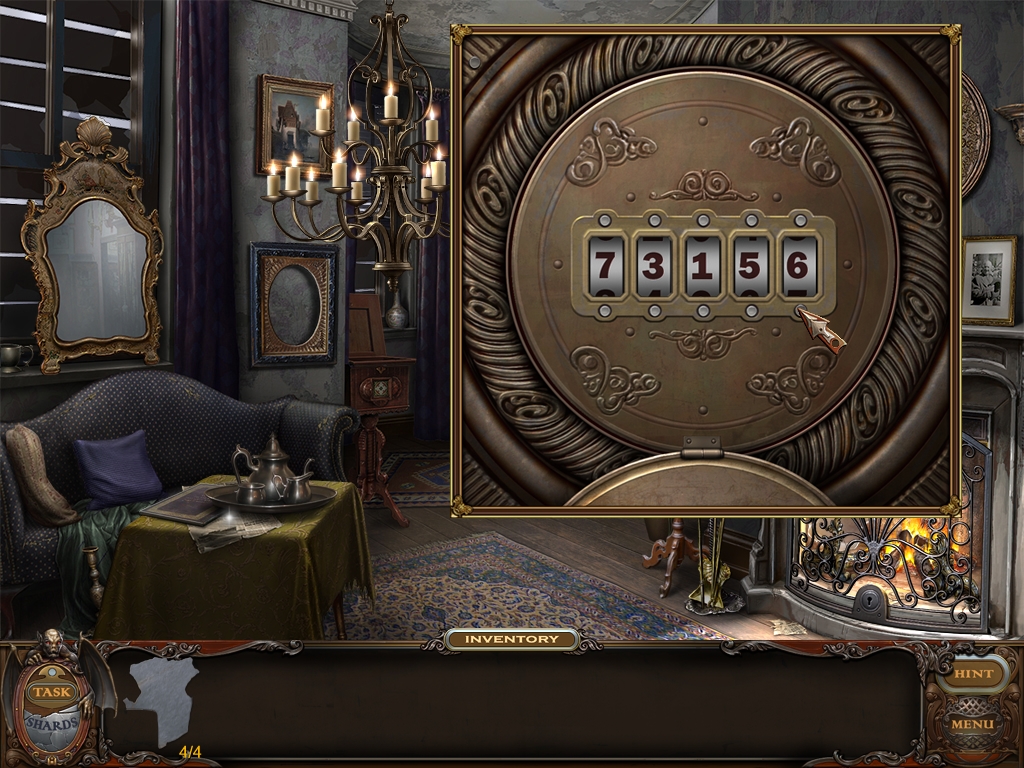
Zoom into the mirror over the fireplace to reveal a safe.
Enter the numerical code from the BLUE PAPERS, by clicking either above to decrease or below to increase the number. The numbers do not cycle around.
Read the news article on the table by the sofa.
Pick up the key from the safe and unlock the grate.
Take the SHARD and place it in its appropriate spot in the mirror.
Return to the Living Room.
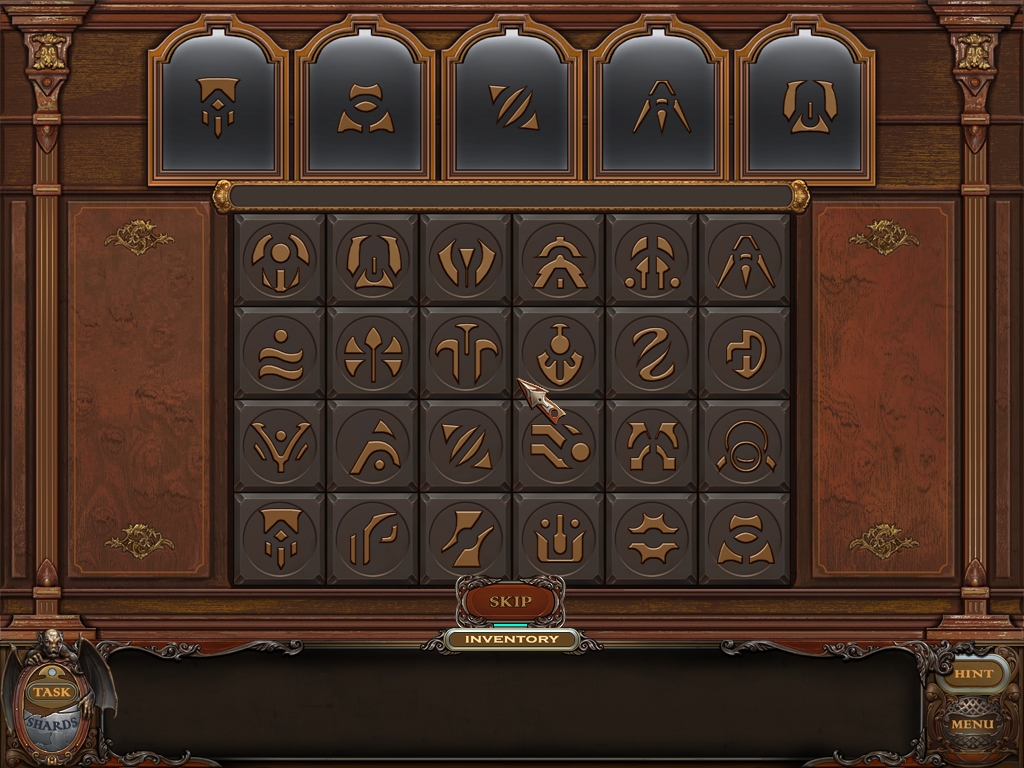
Click on the mirror to initiate a mini-game.
The bar across the top of the screen has a series of symbols. Moving from left to right find the matching symbol on the grid below. After you click on all of the matches (which may consist of several games), the message "Mansion is your destiny" will appear.
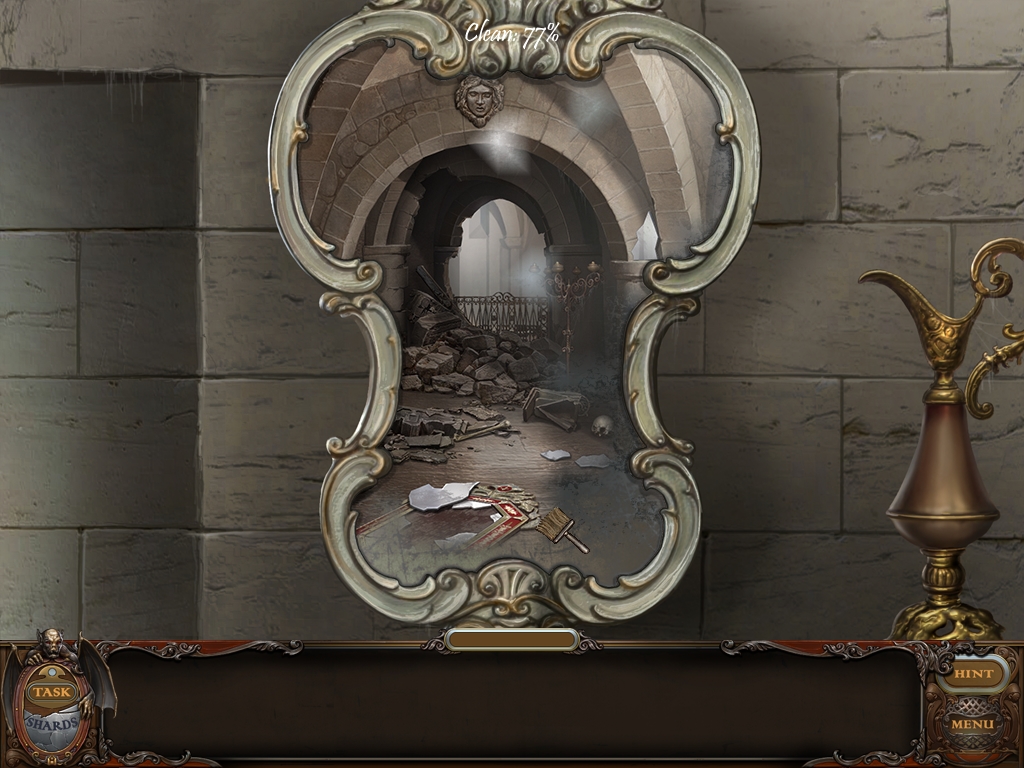
Click on the mirror. Left click and hold to brush the dust off the mirror.
You progress is reported in a percentage at the top of the mirror.
When completed, enter the Basement.
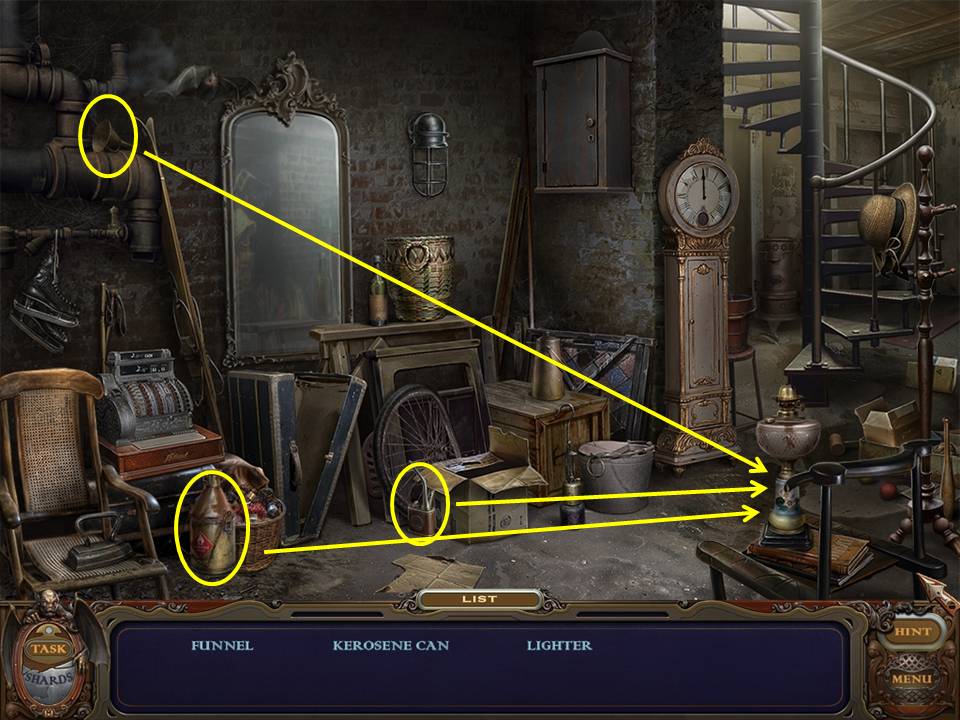
Pick up the FUNNEL, KEROSENE CAN, and LIGHTER.
Zoom into the lamp.
Pour KEROSENE into the lamp with the FUNNEL.
Use the LIGHTER to light the lamp.
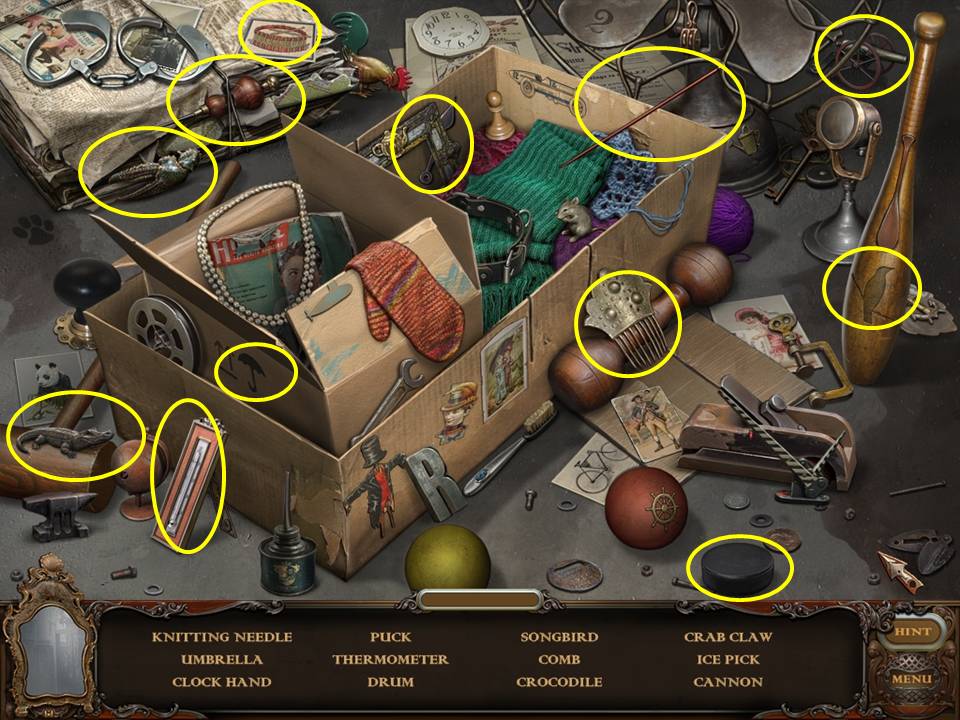
Click on the sparkling area on the right near the hat stand.
Locate the items listed.
Pick up the CLOCK HAND.
Return to the Basement.
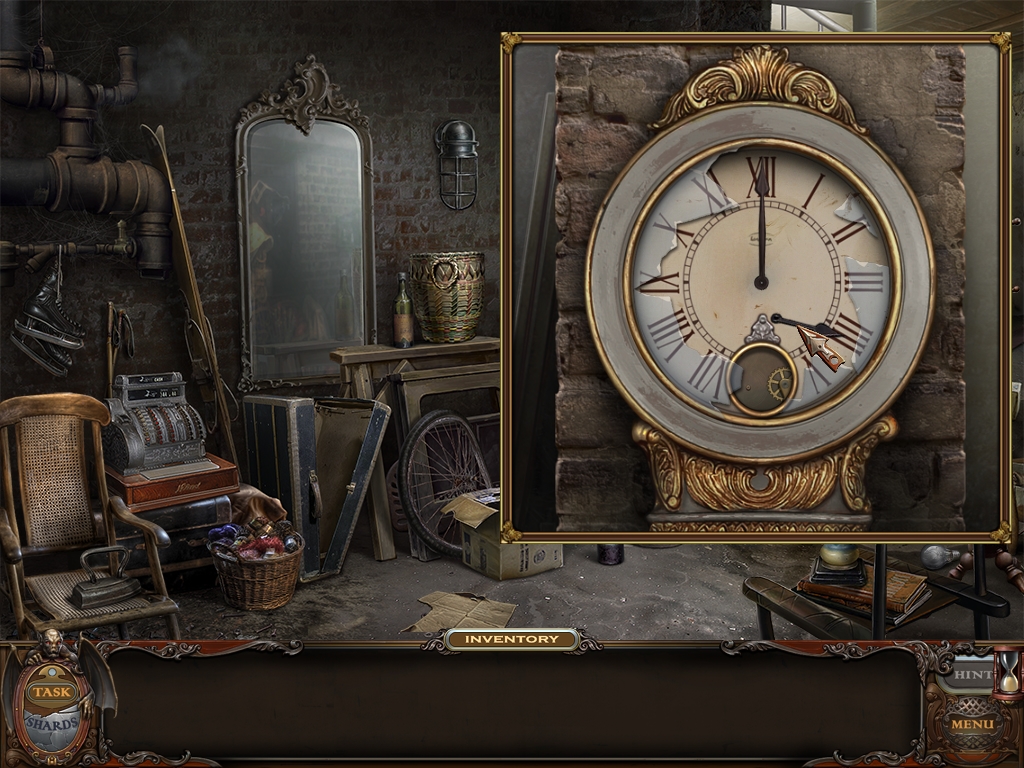
Zoom into the clock.
Place the CLOCK HAND on the clock.
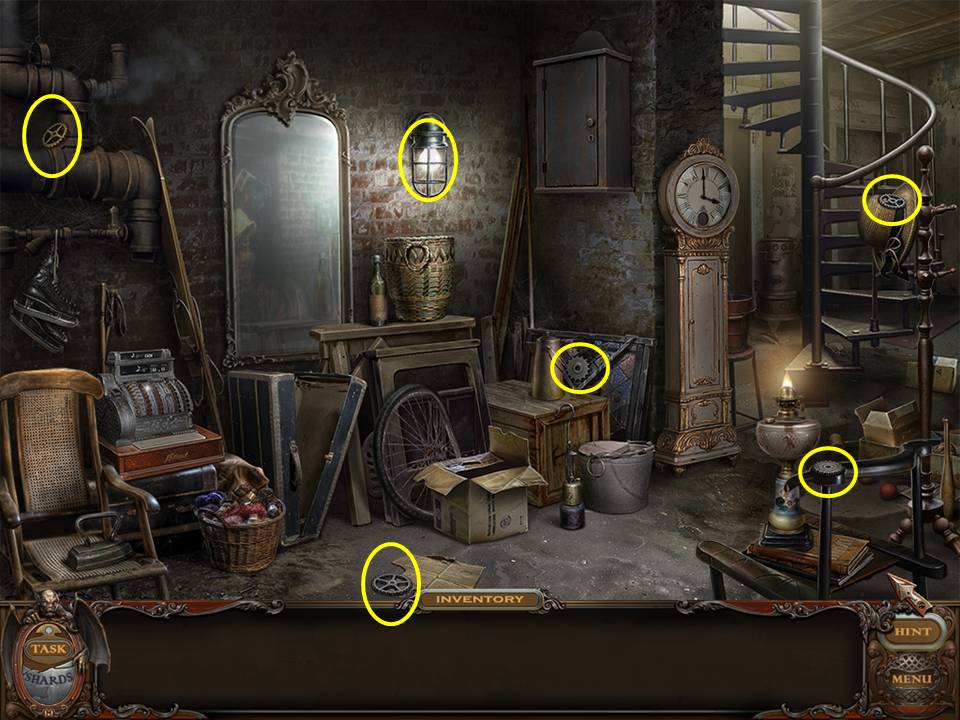
Find the BULB and place it in the wall light to illuminate the room. You will now be able to see and locate 5 GEARS.
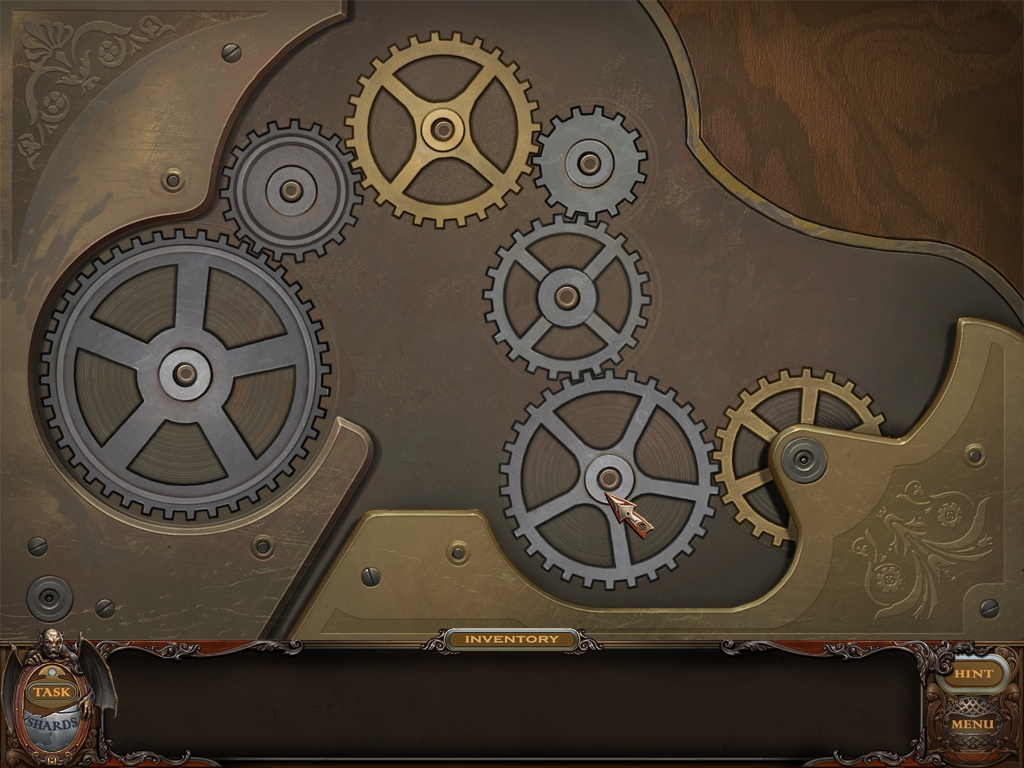
Zoom into the clock.
Drag and drop the GEARS into the clock to initiate a mini game.
Place the GEARS so that all move correctly.
Return to the Basement.
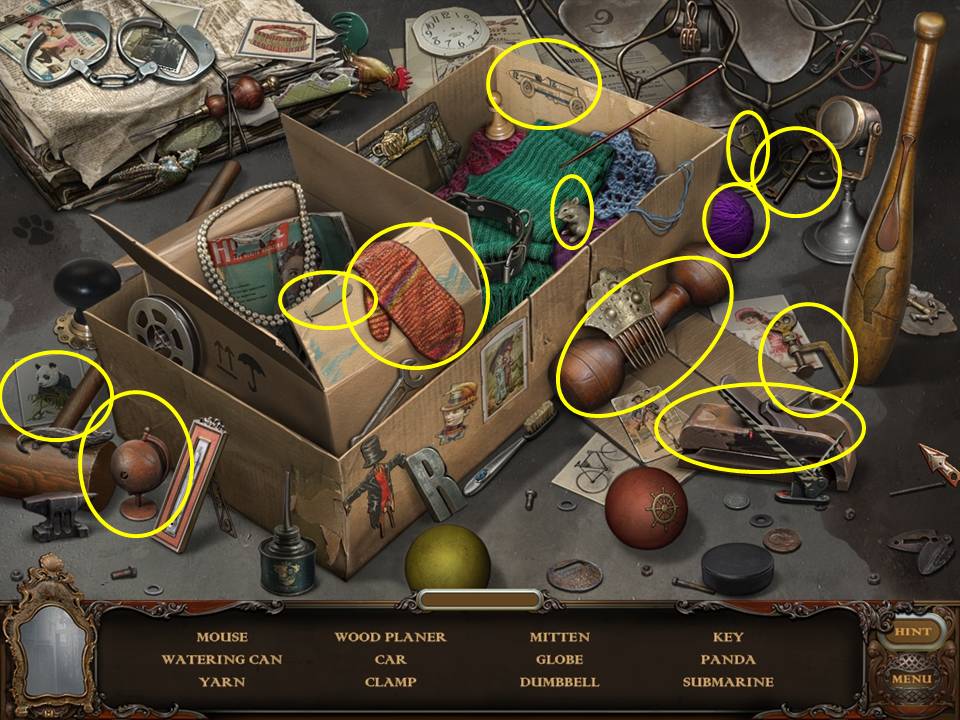
Play the Hidden Object Area.
Locate the hidden objects as listed.
Pick up the KEY.
Return to the Basement.
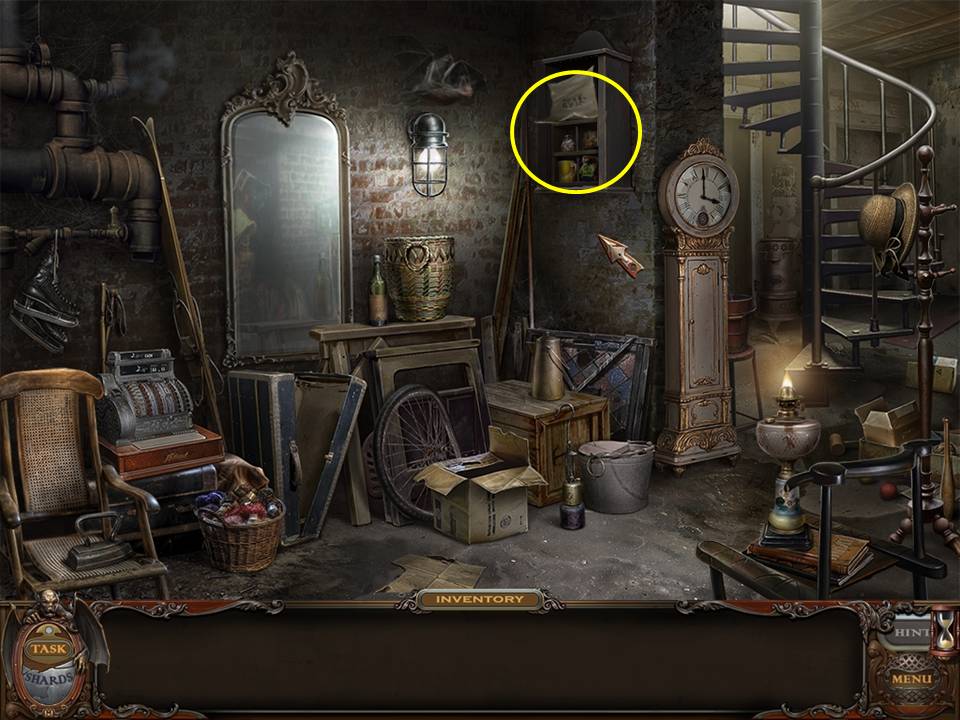
Open the cabinet with the KEY.
Zoom into the paper to see the correct time of 11:55.
Zoom back into the clock.
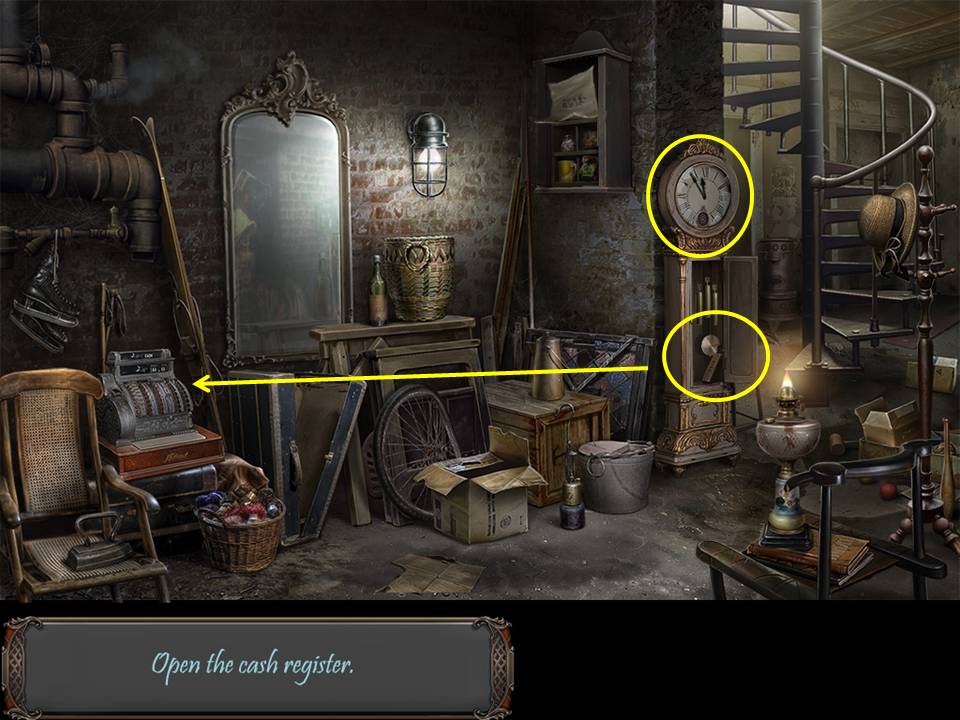
Move the clock hands to 11:55.
Look inside the bottom of the clock to find the code 8917 on a PIECE OF WOOD.
Zoom into the cash register.
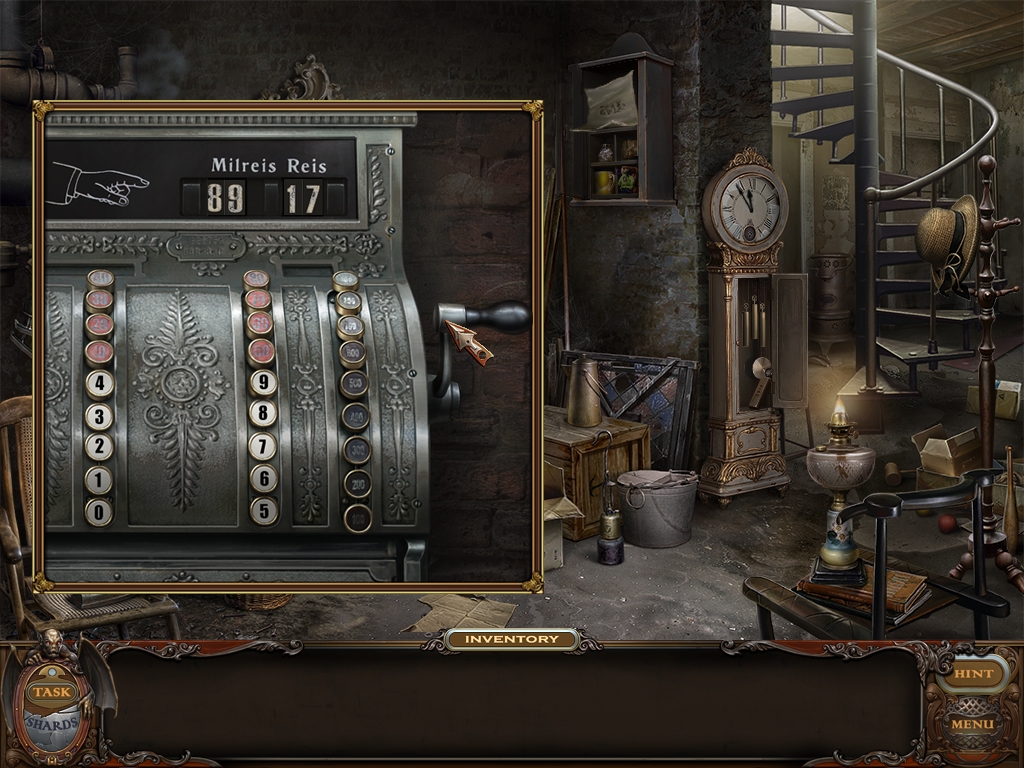
Press the code numbers, 8917. Pull the lever on the right. Sometimes the cash register malfunctions and the numbers you enter appear in incorrect positions. You may need to transpose the numbers to 1789. Pull the lever again.
Pick up the SHARD from the till.
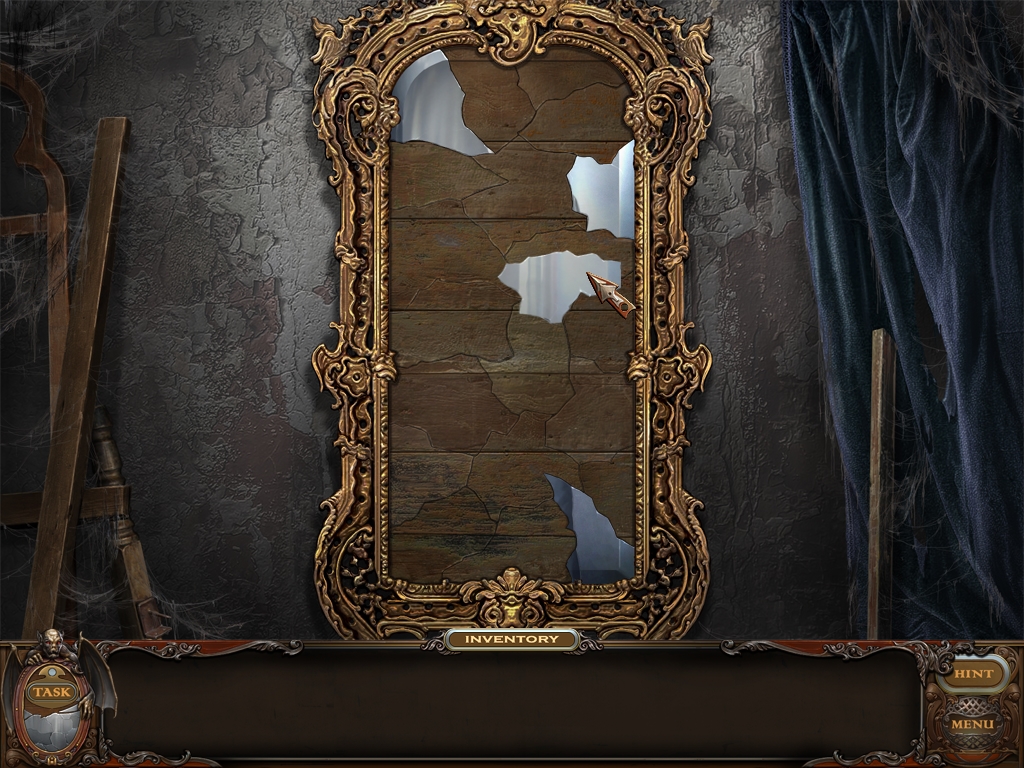
Place the SHARD into the appropriate space in the mirror.
Return to the Basement.
Click on the mirror. Left click and hold to brush the dust off the mirror.
You progress is reported in a percentage at the top of the mirror.
When completed, enter the Cellar.
Pick up the WICK and the GLASS CHIMNEY.
Zoom into the gasoline lamp.
Place the WICK in the top center of the lamp. Place the GLASS CHIMNEY on top.
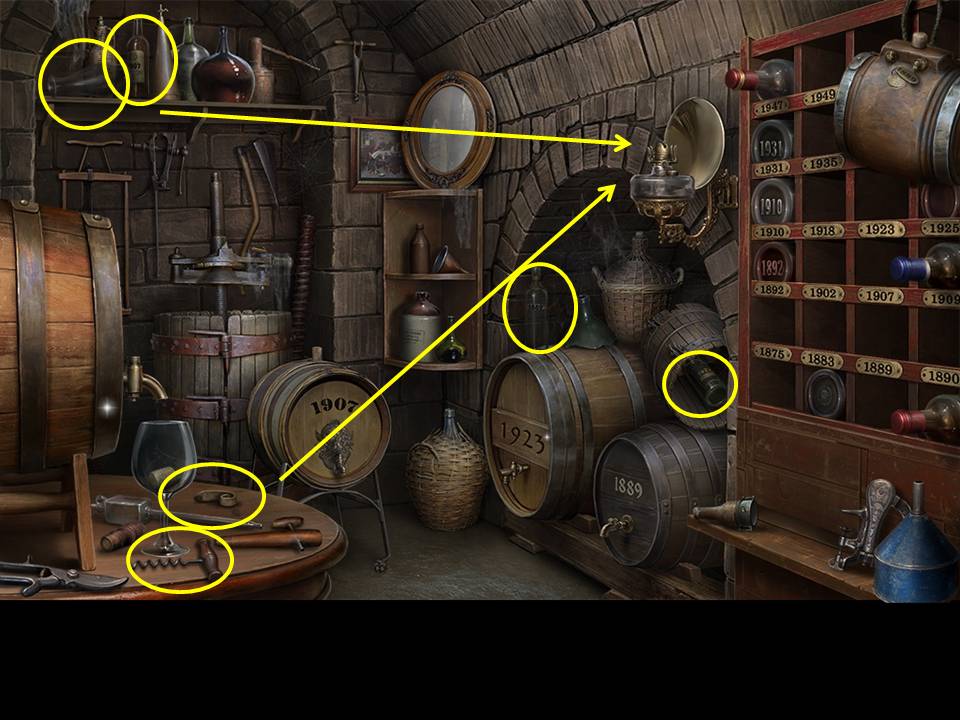
Pick up 3 BOTTLES and a CORKSCREW.
Go to Hidden Object Area located in the top left corner of the screen.
Locate the items on the list.
Find and receive the VALVE.

Zoom into the barrel on the left.
Place the VALVE in the top of the spout.
Remove the 1923 CORK from the filled wine glass.
Zoom into the hanging barrel on the upper right of the screen.
Loosen the 1889 CORK with the CORKSCREW.
Take the 1889 CORK.
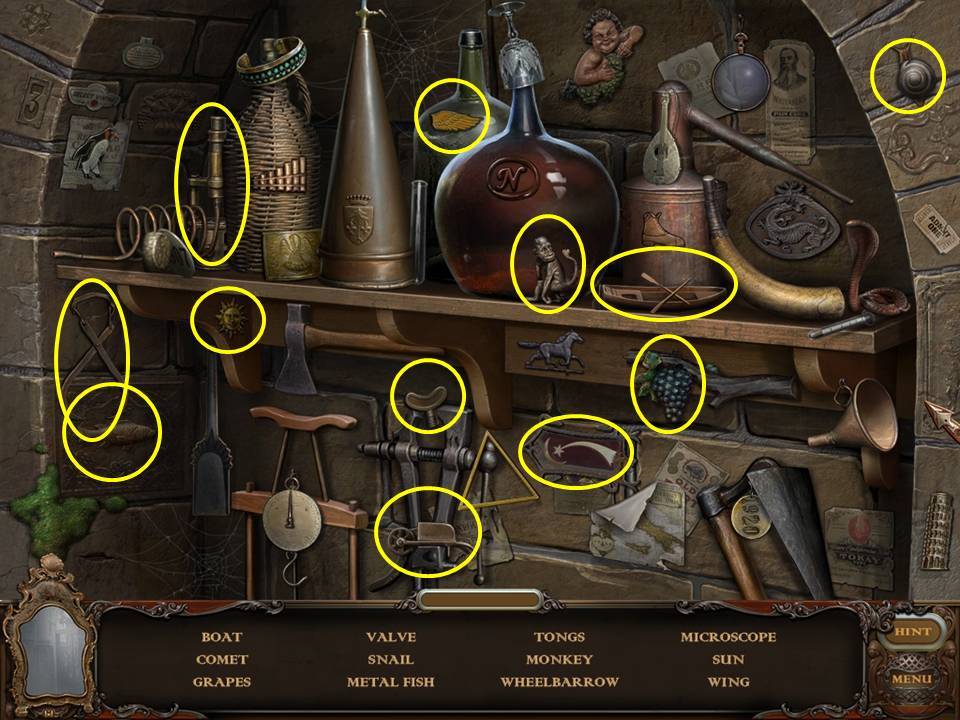
Play the Hidden Object Area.
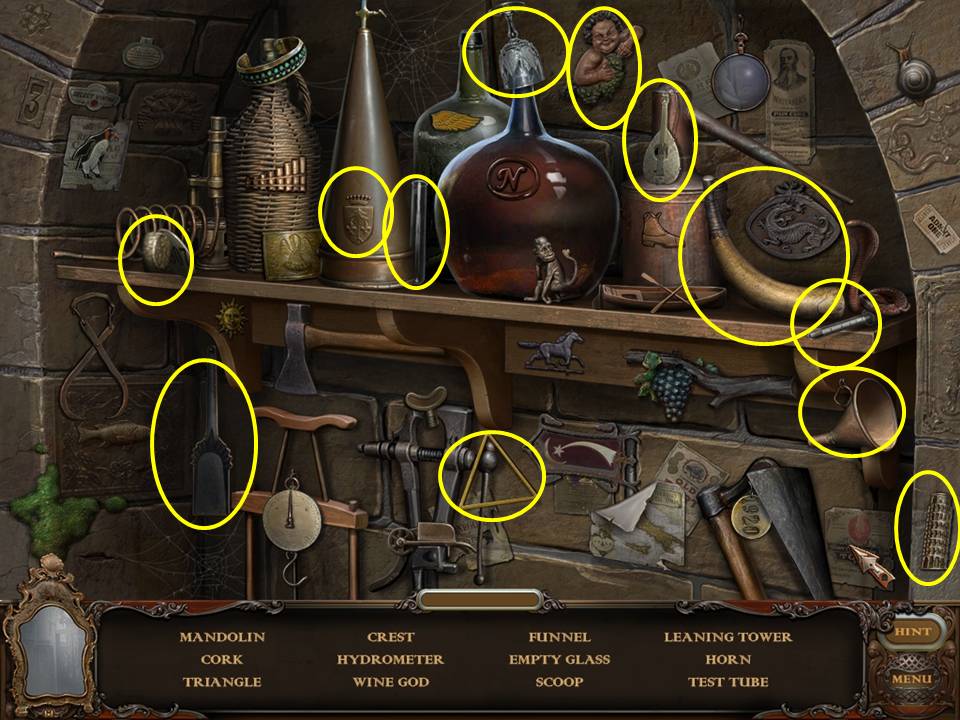
Locate the items on the list.
Find and receive the 1907 CORK.
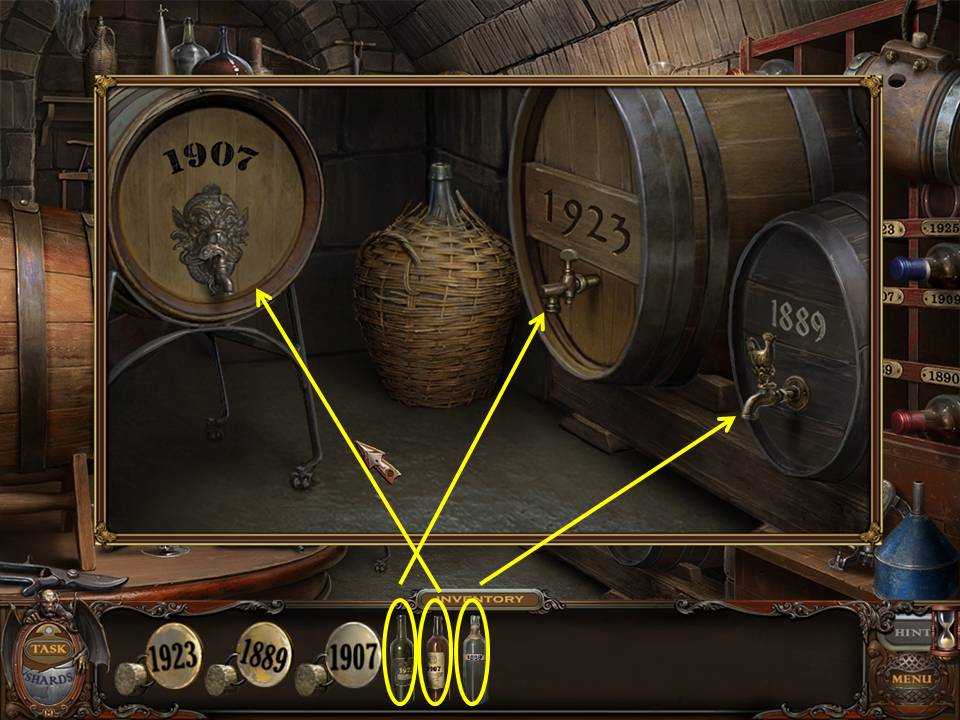
Zoom into the wine casks in the center of the room.
Place the 1923 BOTTLE under the tap on the 1923 cask. Turn the tap.
Place the other bottles under their matching taps. Turn those taps to fill the bottles with wine.
Insert the CORKS with the matching years on each bottle to return them to inventory in the space with the corresponding year on the wine rack on the right. When you do a compartment will open beneath the bottles, which contains a SHARD.
Pick up the SHARD.
Place the SHARD into the appropriate space in the mirror.
Return to the Cellar.
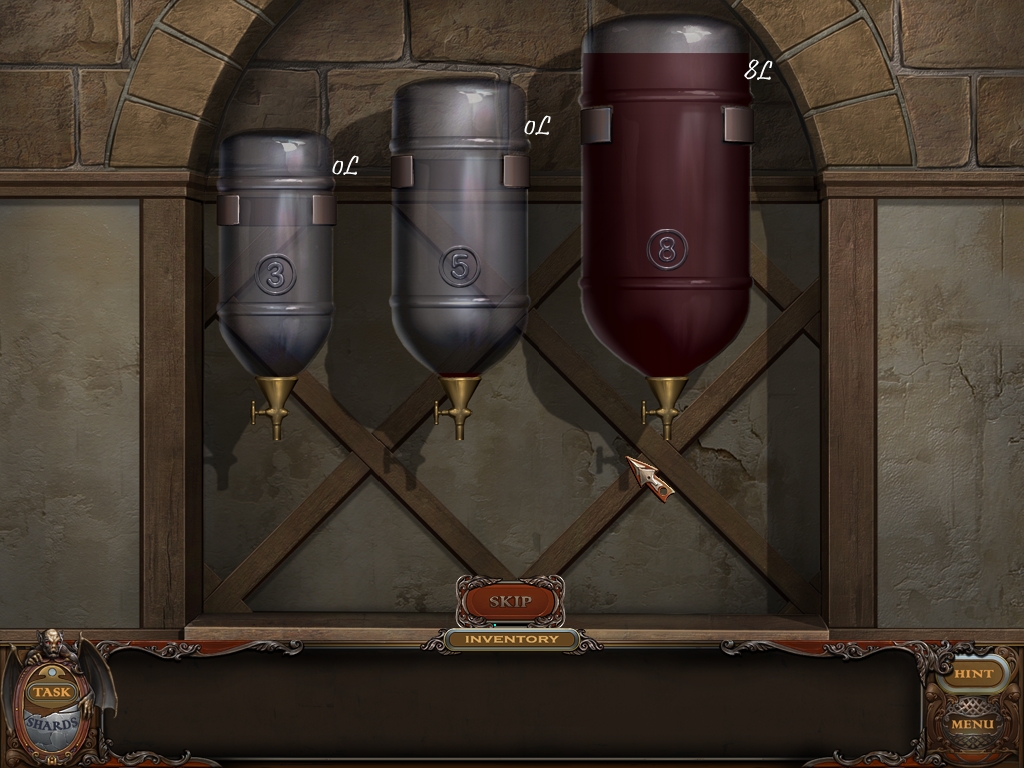
Click on the mirror to initiate mini-game.
The object of the game is to pour the wine from bottle to bottle until you have two four liter quantities.
The bottles are labeled 3L, 5L, and 8L. From left to right, pour 3 into 2. Pour 2 into 1. Pour 1 into 3. Pour 2 into 1. Pour 3 into 2. Pour 2 into 1. Pour 1 into 3.
Click on the mirror. Left click and hold to brush the dust off the mirror.
You progress is reported in a percentage at the top of the mirror.
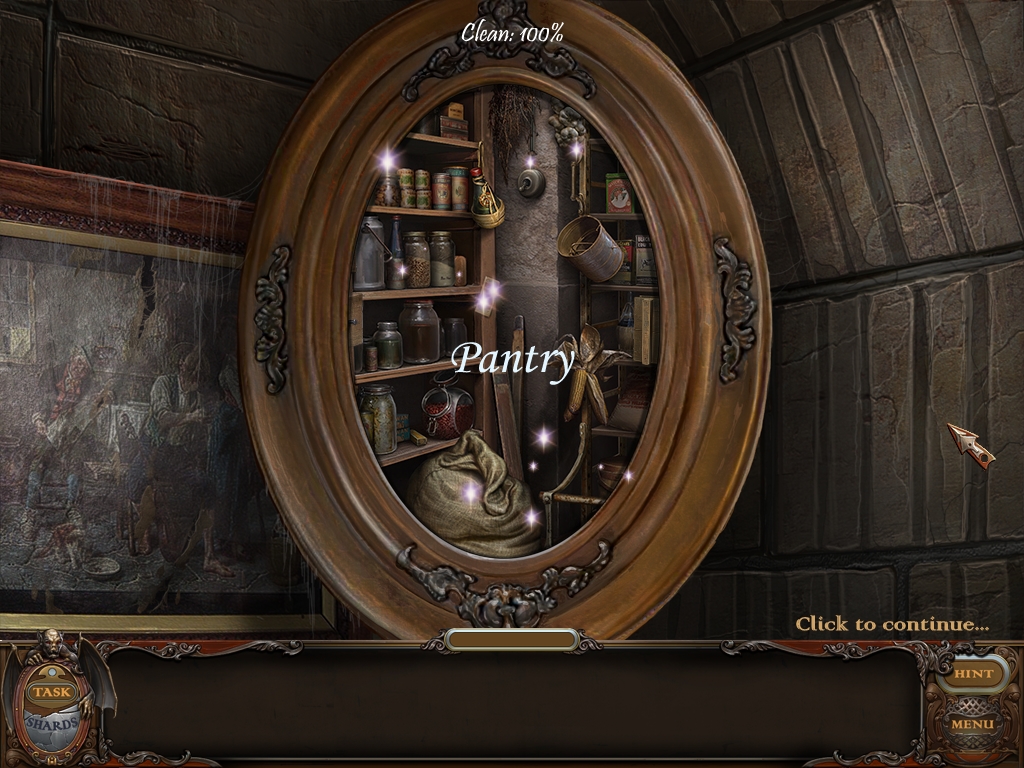
When completed, enter the Pantry. Try to turn on the light switch. When you can't, a Hidden Object Area will sparkle. Play the Hidden Object Area.
Find the objects listed.
Find and receive the BRUSH.
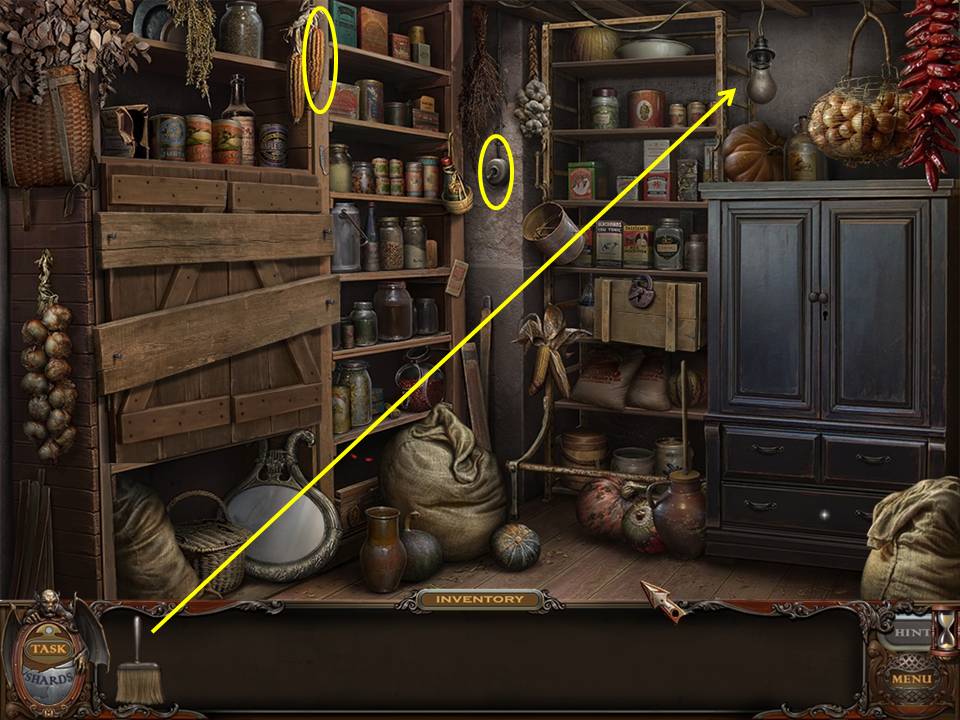
Use the BRUSH to clean the lightbulb.
Zoom into the light switch and turn on the light.
Pick up the PLIERS.
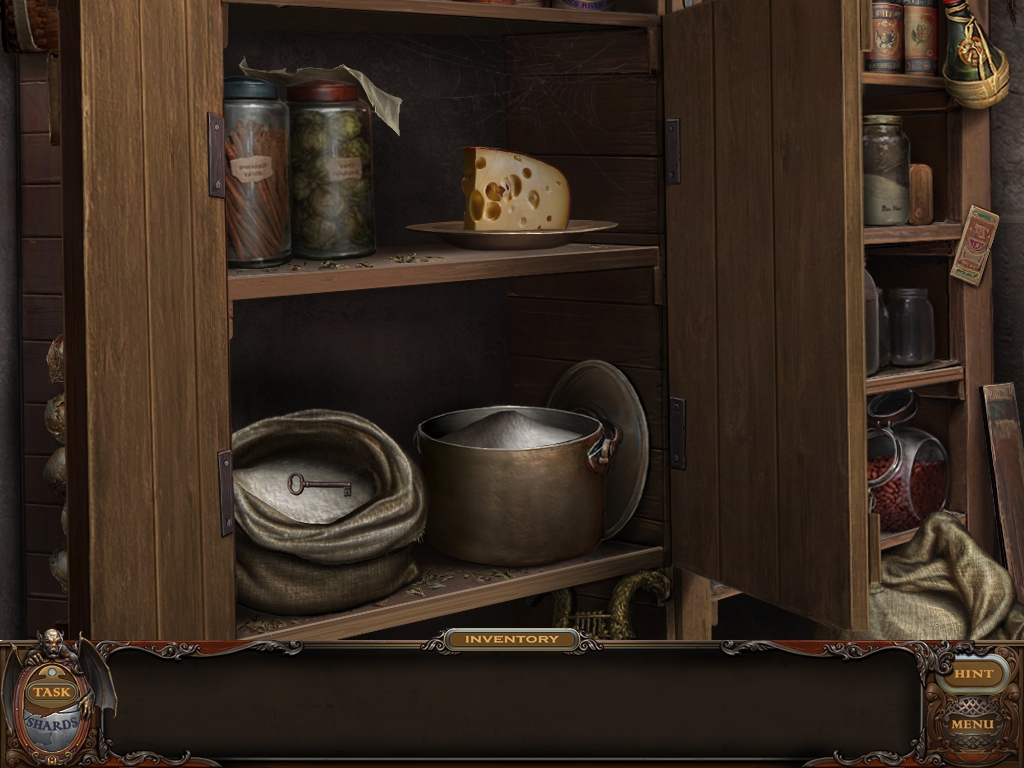
Zoom into the boarded cupboard.
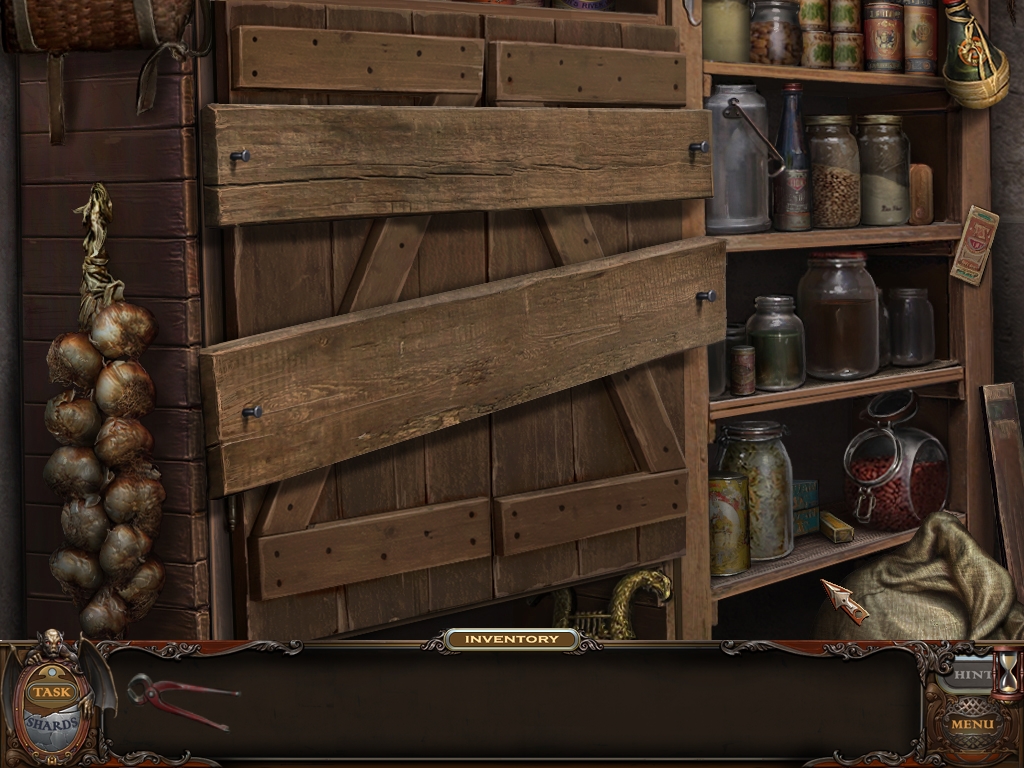
Remove 4 nails with the PLIERS.
Open the Cupboard.
Read the note that says the mouse stole the CUPBOARD KEY.
Remove the pot lid.
Zoom back out to the Pantry and pick up the SCISSORS that are on top of the basket under the cupboard. Return to the cupboard.
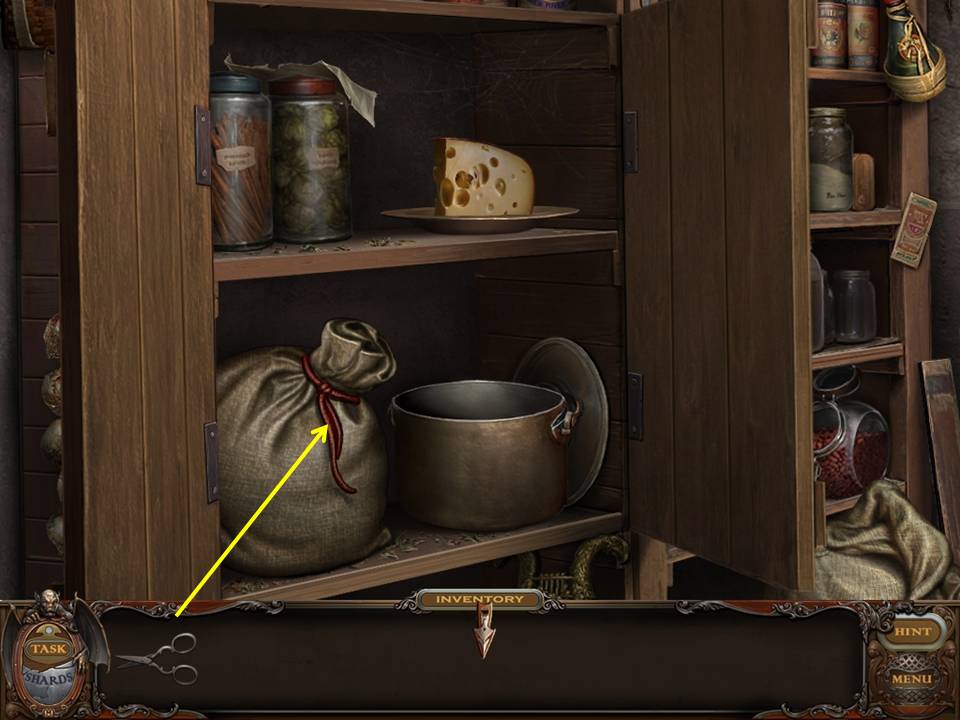
Use the Scissors to cut open the bag.
Return to the Pantry.
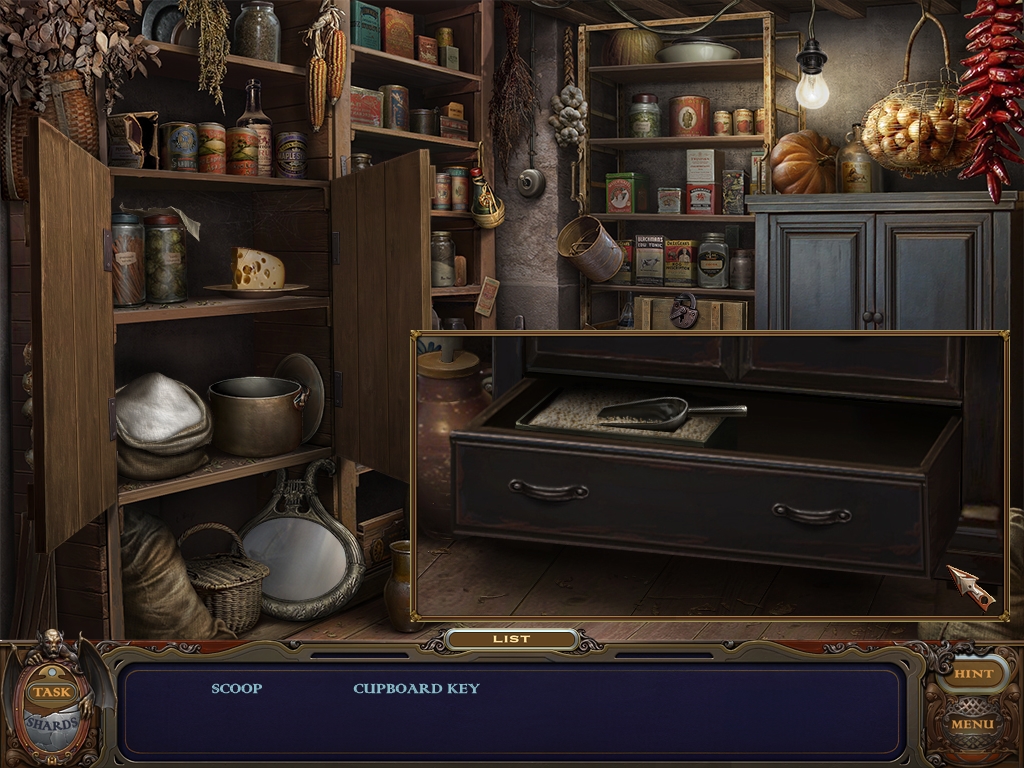
Open the bottom drawer on the cabinet located on the far right.
Pick up the SCOOP.
Zoom back into the cupboard on the left.
SCOOP out sugar until you find the CUPBOARD KEY.
Pick up the CUPBOARD KEY.
Return to the Pantry and zoom into the cabinet on the right where you originally found the SCOOP.
Unlock the door with the CUPBOARD KEY.
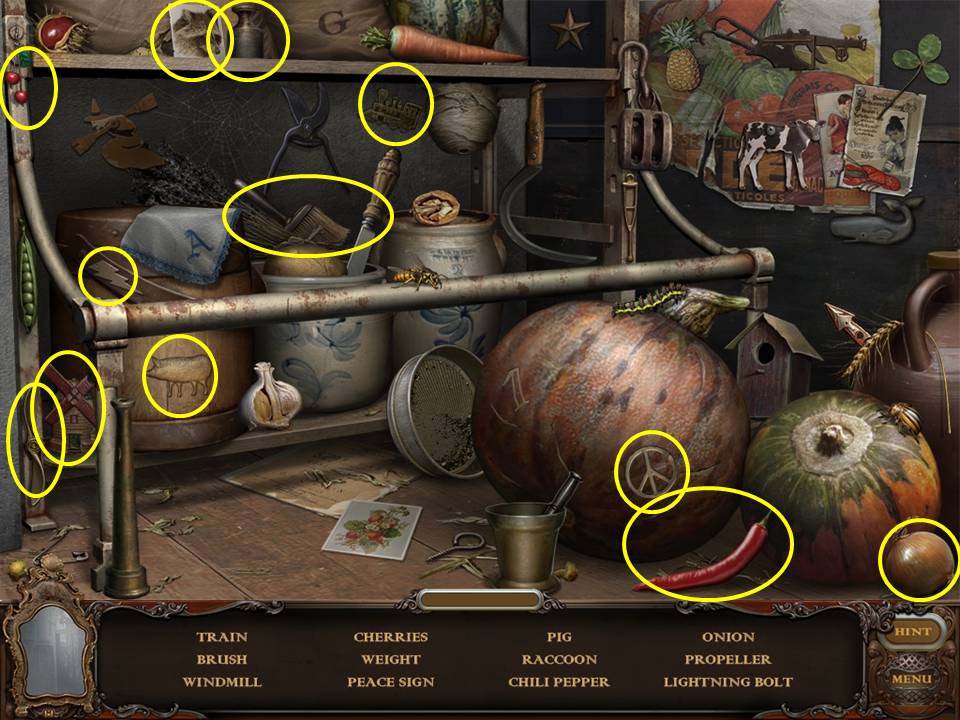
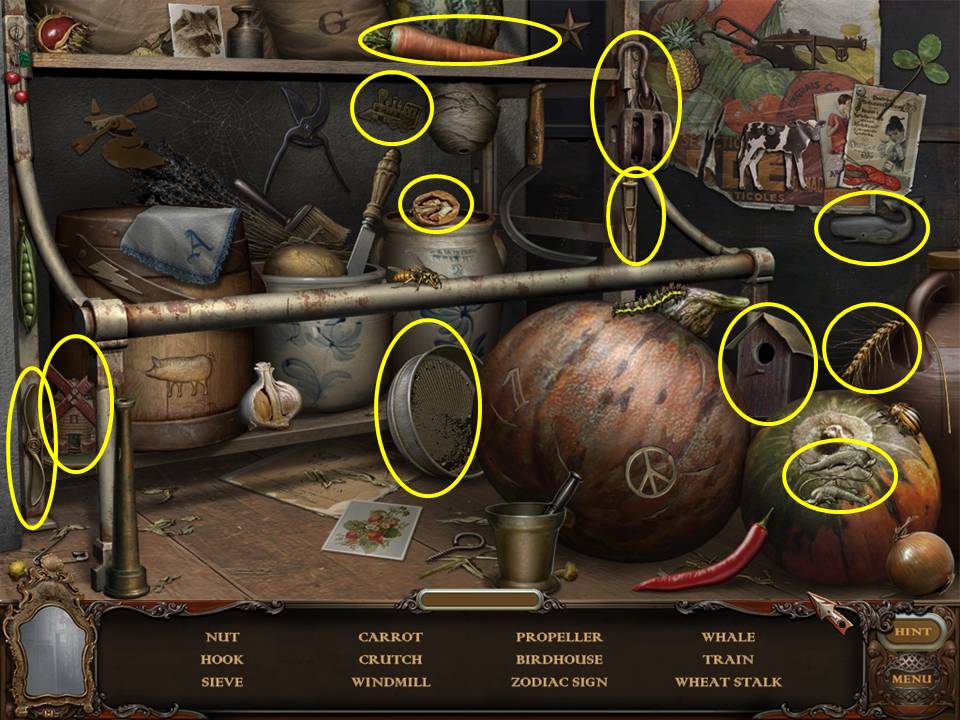
Play the Hidden Object Area located near the shelves in the center of the room.
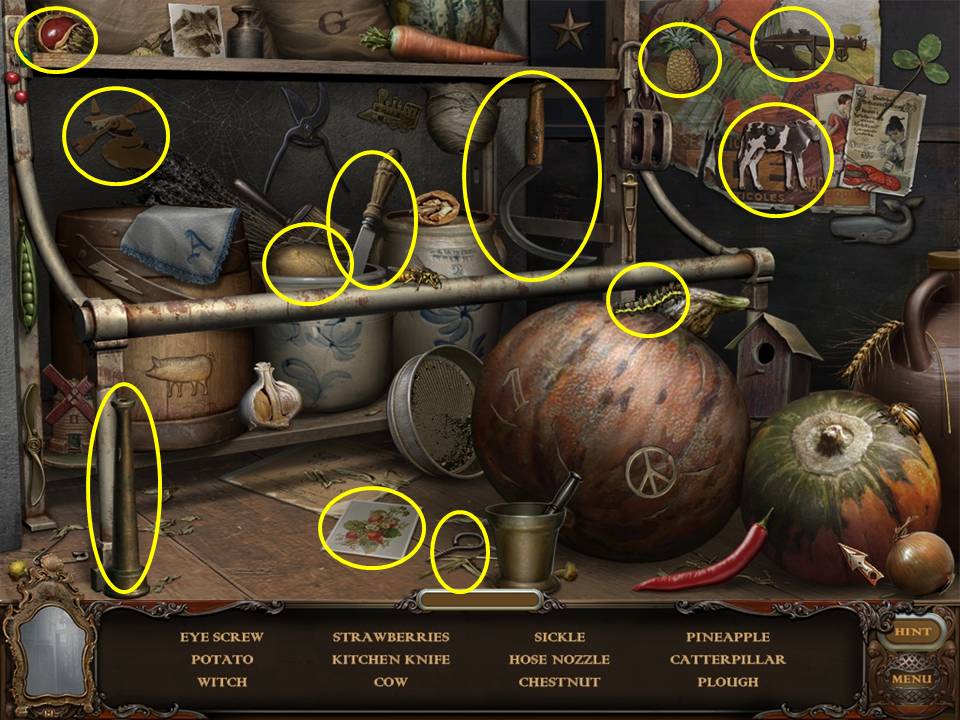
Find the objects listed. Find and receive the KITCHEN KNIFE.
Zoom back into the cupboard on the left.
Cut a piece of CHEESE with the KITCHEN KNIFE.
Zoom into the cage inside the cabinet on the right.
Place the CHEESE on the hook to set the mousetrap.
Take the CUPBOARD KEY from the mouse.
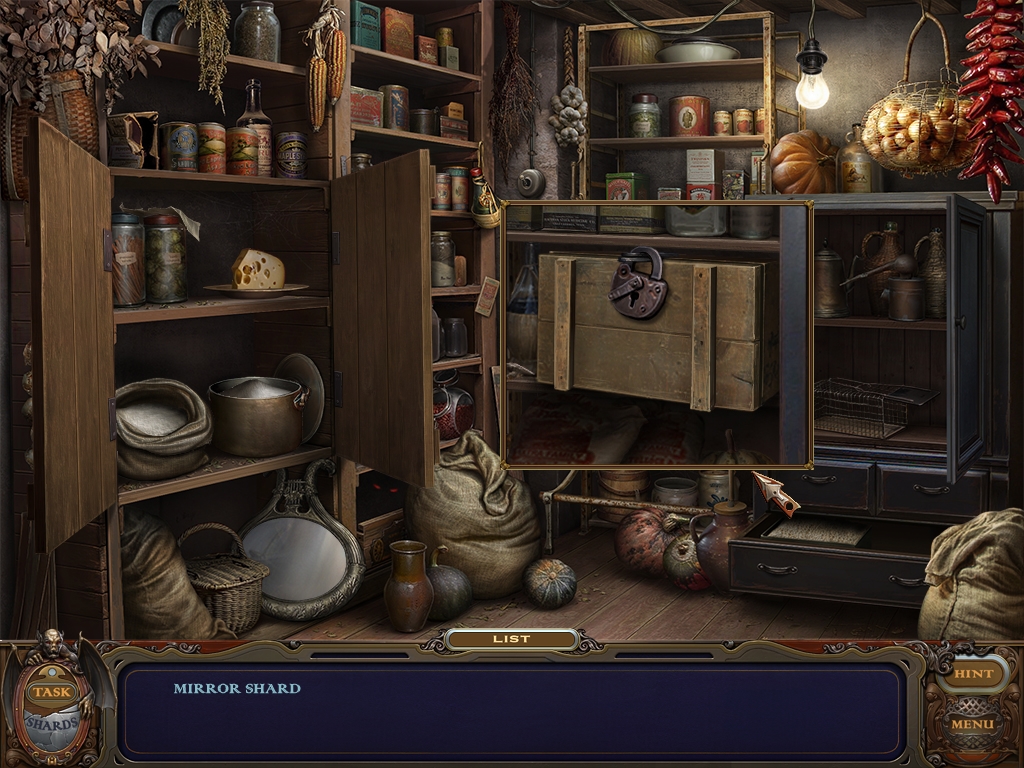
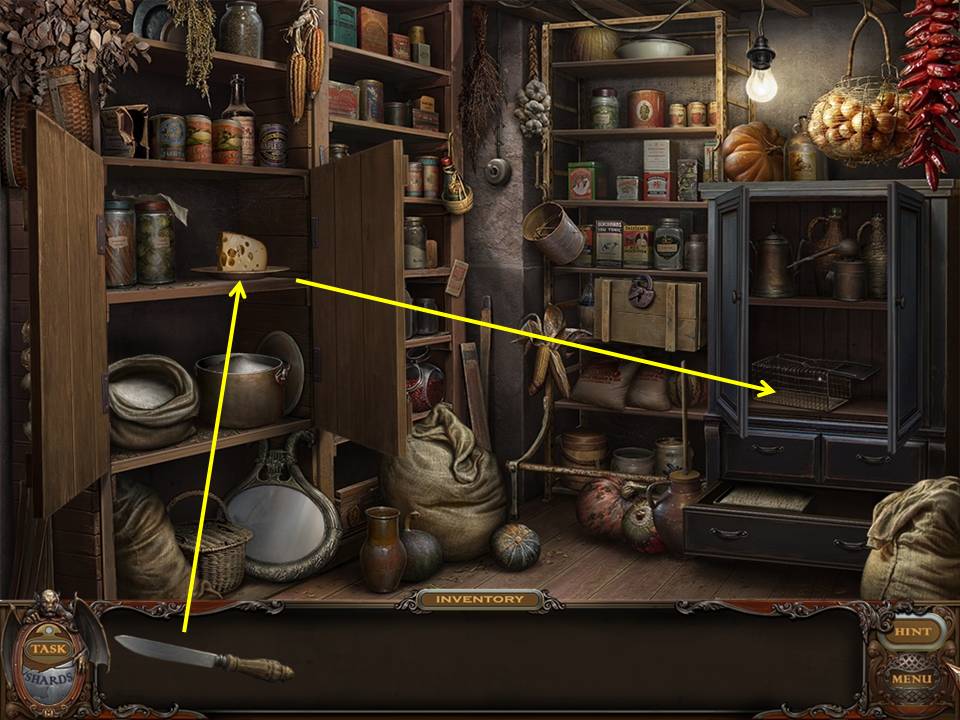
Zoom into the chest located on the shelving between the cupboard and the cabinet.
Open the padlock with the CUPBOARD KEY.
Receive the SHARD.
Place the SHARD into the appropriate space in the mirror.
Return to the Pantry.
Click on the mirror. Left click and hold to brush the dust off the mirror and the frame.
You progress is reported in a percentage at the top of the mirror.
When completed, enter the Dining Room.
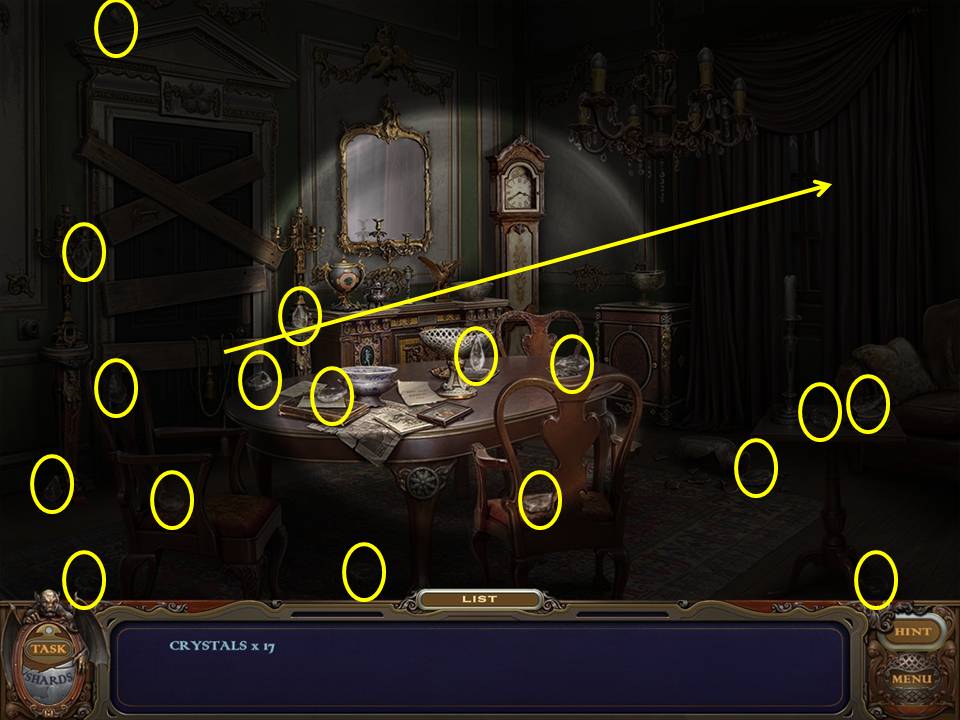
Locate 17 CRYSTALS in this room.
Hang the CRYSTALS on the chandelier.
Take the CORD that is hanging on one of the boards on the boarded up door.
Tie back the right drape with the CORD to reveal a safe.
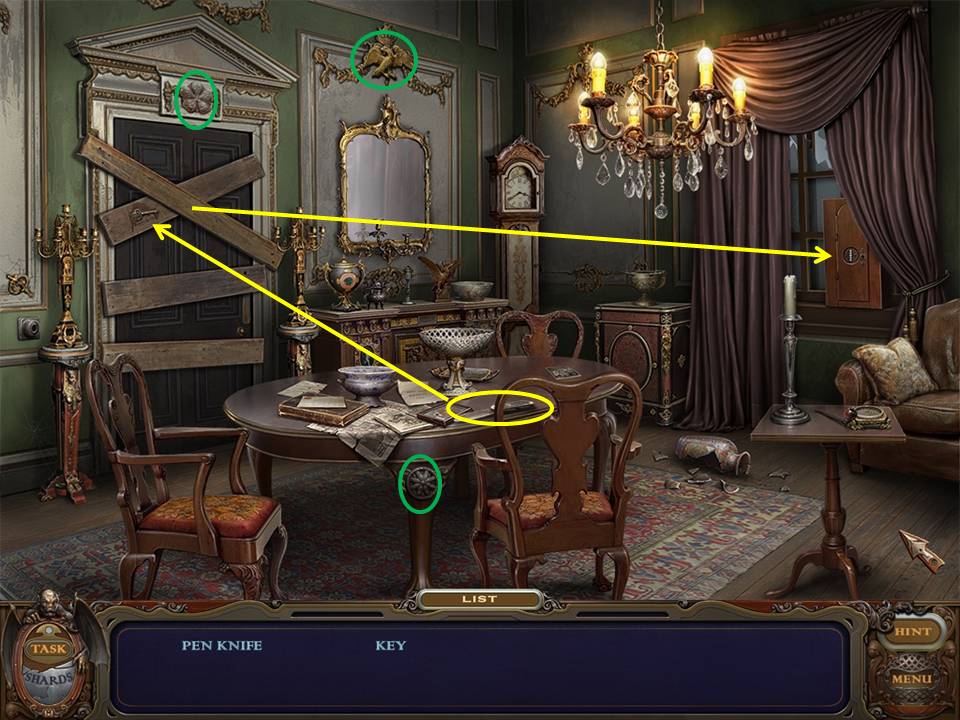
Pick up the PEN KNIFE from the table.
Zoom into the KEY.
Use the PEN KNIFE to extract the KEY.
Zoom into the safe.
Unlock the safe with the KEY.
Pick up the CLOVER, FLOWER, and EAGLE LEFT.
Play the Hidden Object area beneath the mirror that is hanging over the sideboard.
Find the objects listed. Find and receive the EAGLE RIGHT.
Zoom into the safe and place the CLOVER, FLOWER, and EAGLES where indicated.
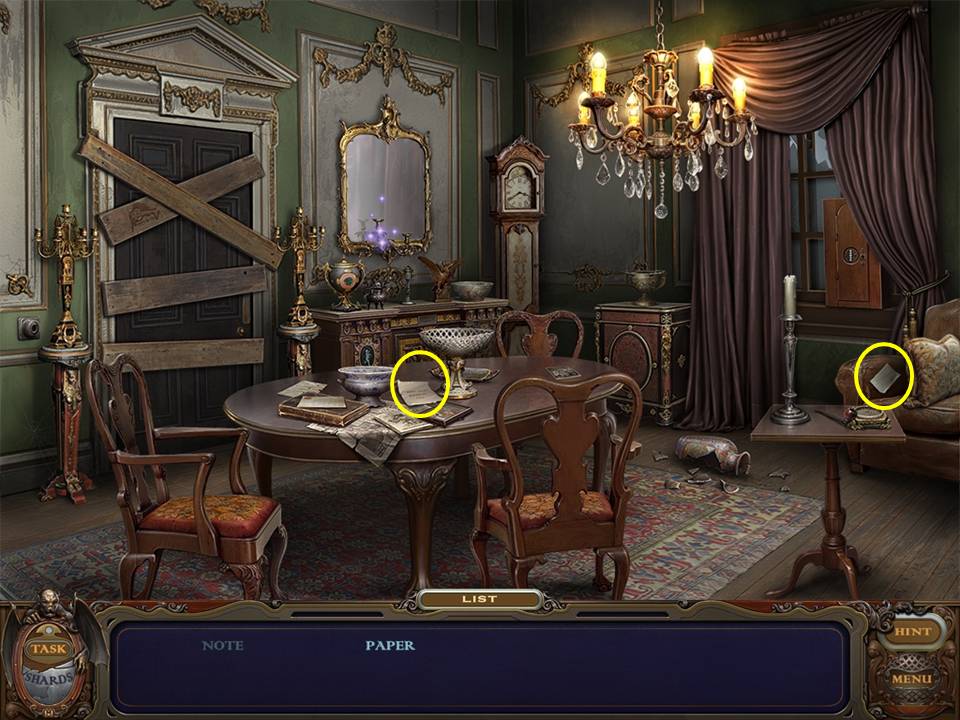
Read the note on the dining table.
Move the pillow to find the PAPER.
Play the Hidden Object area again.
Find the objects listed. Find and receive the LIGHTER.
Return to the Dining Room.
Zoom into the Candle. Light the Candle with the LIGHTER.
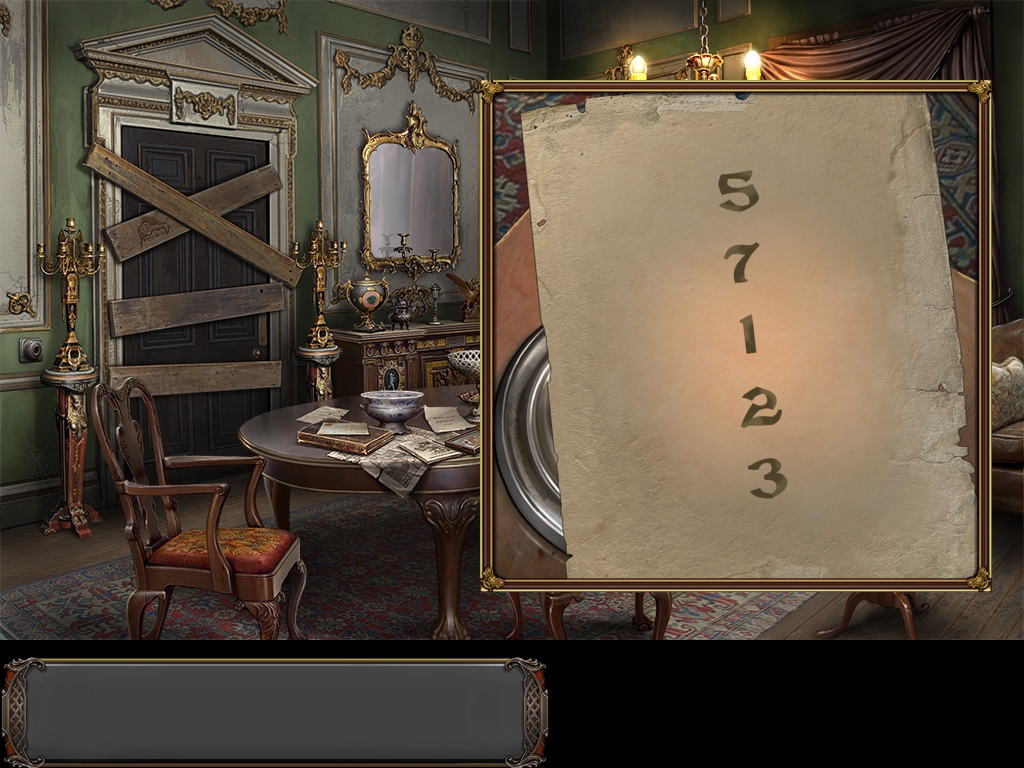
Hold the PAPER over the flame to reveal code 57123. Zoom into the safe. Enter the code 57123. You can use the buttons on the left and right to increase or decrease the numbers as needed.
When the safe opens, take the SHARD.
Place the SHARD into the appropriate space in the mirror.
Return to the Dining Room.
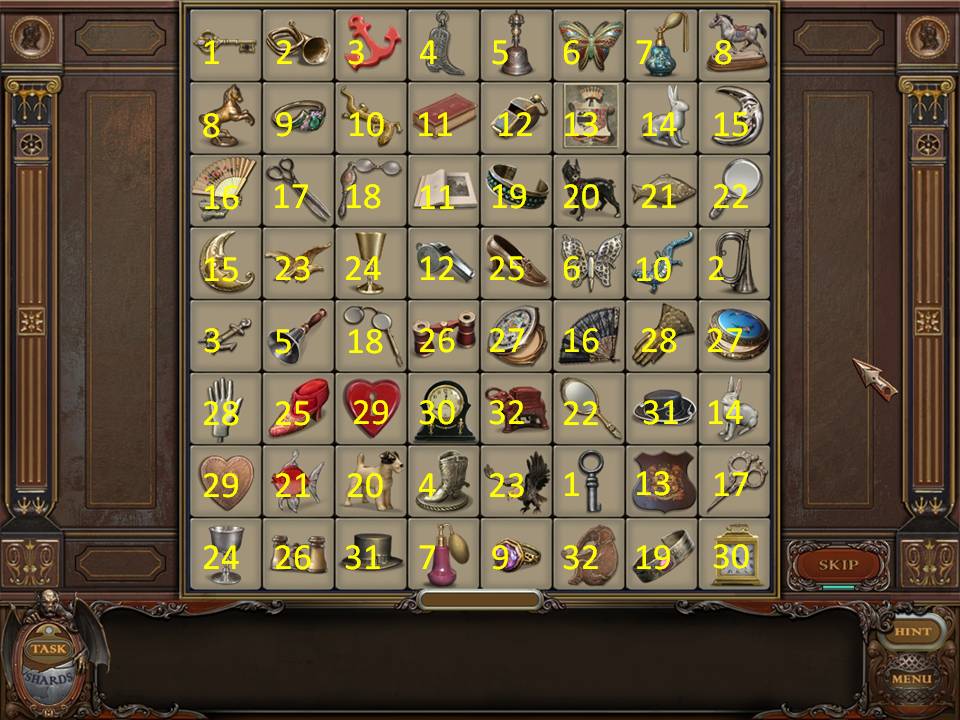
Click on the mirror to initiate a mini-game.
The object of the game is to match similar items or items of the same "category." In other words, rabbit and rabbit or fish and fish. These are not identical items. As you click on proper pairs, they are removed from the screen.
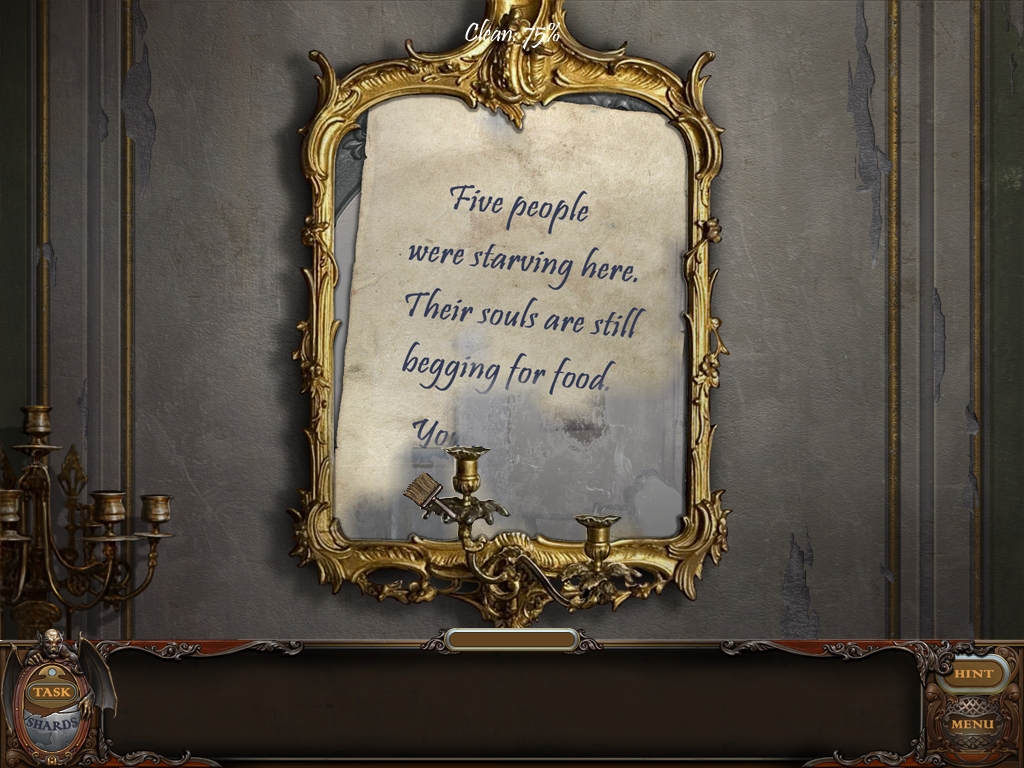
Click on the mirror. Left click and hold to brush the dust off the mirror and the frame.
You progress is reported in a percentage at the top of the mirror.
When completed, enter the Kitchen.
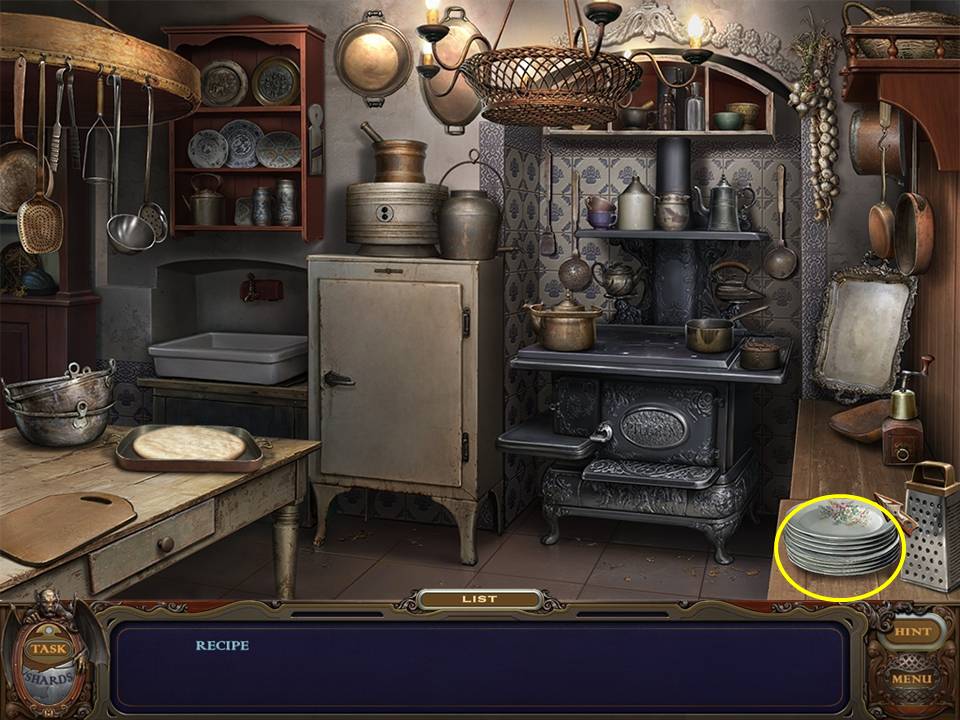
Click on the plates three times to remove them.
Take the RECIPE found underneath.
Click on the upper left cabinet to play a Hidden Object Area.
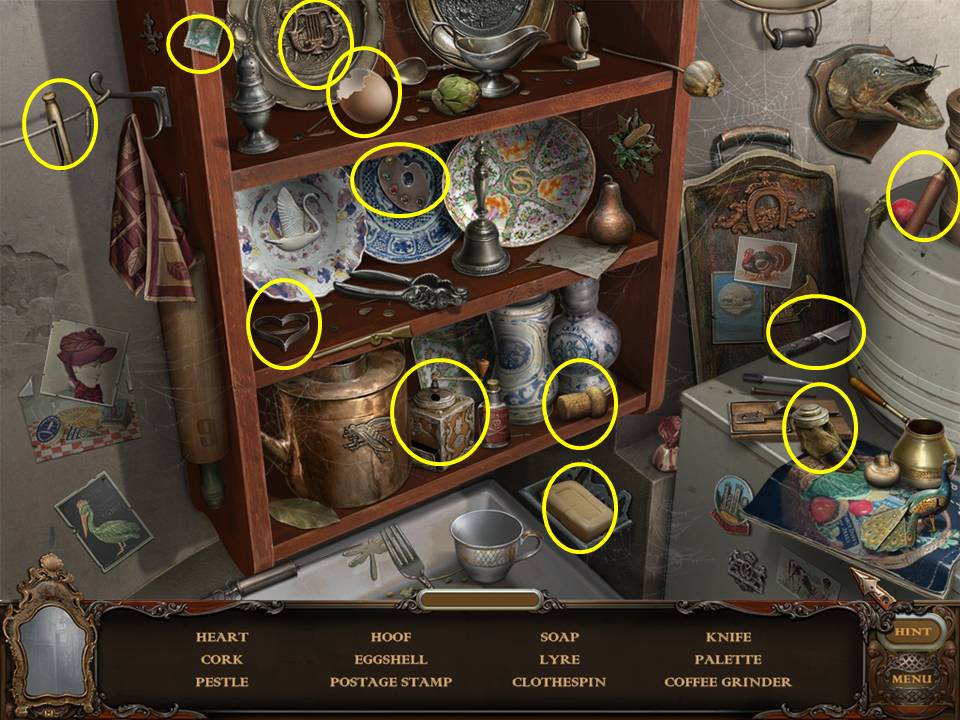
Find the objects listed.
Find and receive the KNIFE.
Return to the Kitchen and then replay the Hidden Object Area.
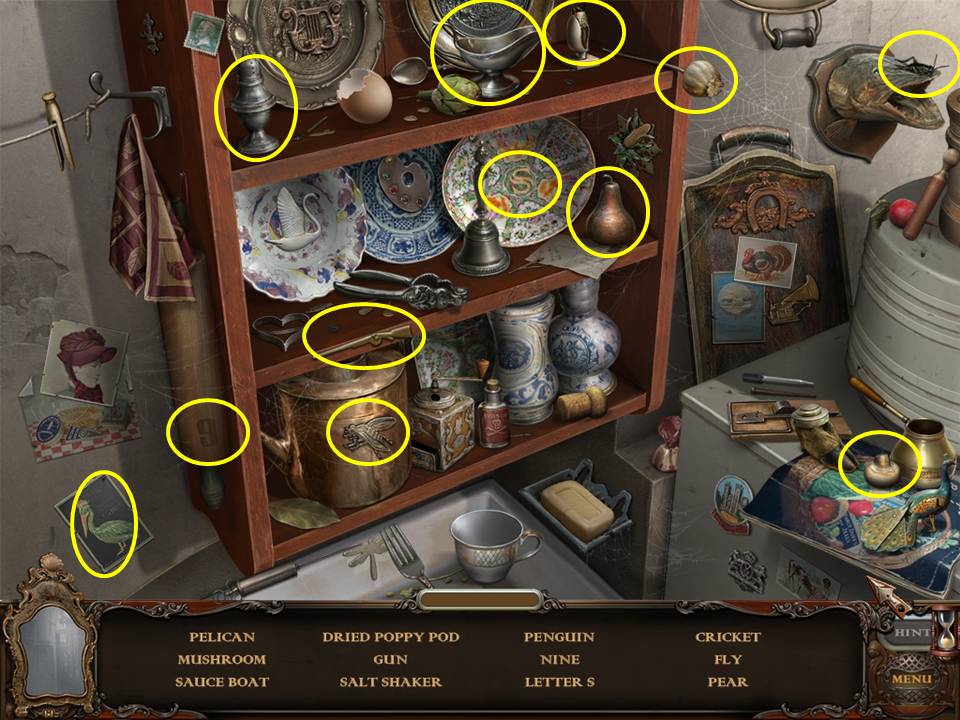
Find the objects listed.
Find and receive the MUSHROOM.
Return to the Kitchen.
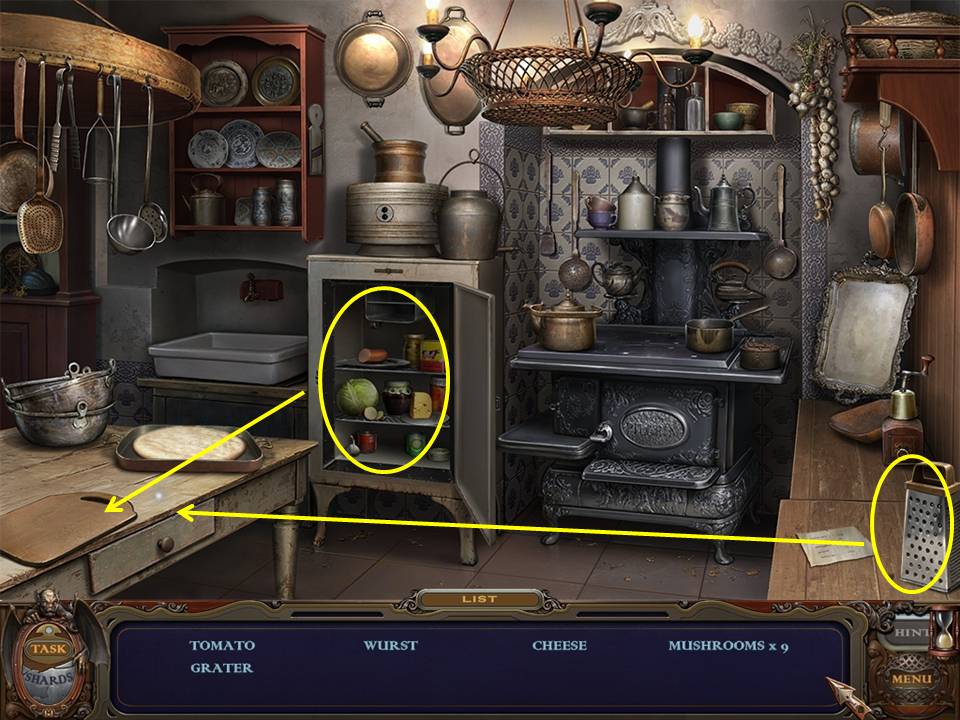
Pick up the GRATER from the counter.
Open the icebox.
Pick up the TOMATO, MUSHROOMS, a slice of WURST, and a slice of CHEESE. Use the KNIFE to pick up one slice of each of the last two items.
Place the TOMATO on the cutting board. Use KNIFE to cut it.
Place the MUSHROOMS on the cutting board. Use KNIFE to cut them.
Place the WURST on the cutting board. Use KNIFE to cut it.
Place the GRATER on the cutting board. Grate CHEESE.
Put all the ingredients on the PIZZA PIE. Place it in the oven.
Close the oven door to initiate a mini game.
The object of this game is to repair the oven to allow gas to flow to all four burners.
Click on each of the disks to rotate until a path of free access flows from each burner to the center. The best way to approach this puzzle is to begin with the outer ring closest to the burners. Rotate that one until paths line up to all burners, then move inward, each time making sure that you've created a free flowing path.
When completed return to the Kitchen and remove the PIZZA from the oven.
Collect the SHARD from the drawer in the kitchen table.
Place the SHARD into the appropriate space in the mirror.
Return to the Kitchen.
Click on the silver platter on the right side of the screen. This serves as the "mirror" in this scene.
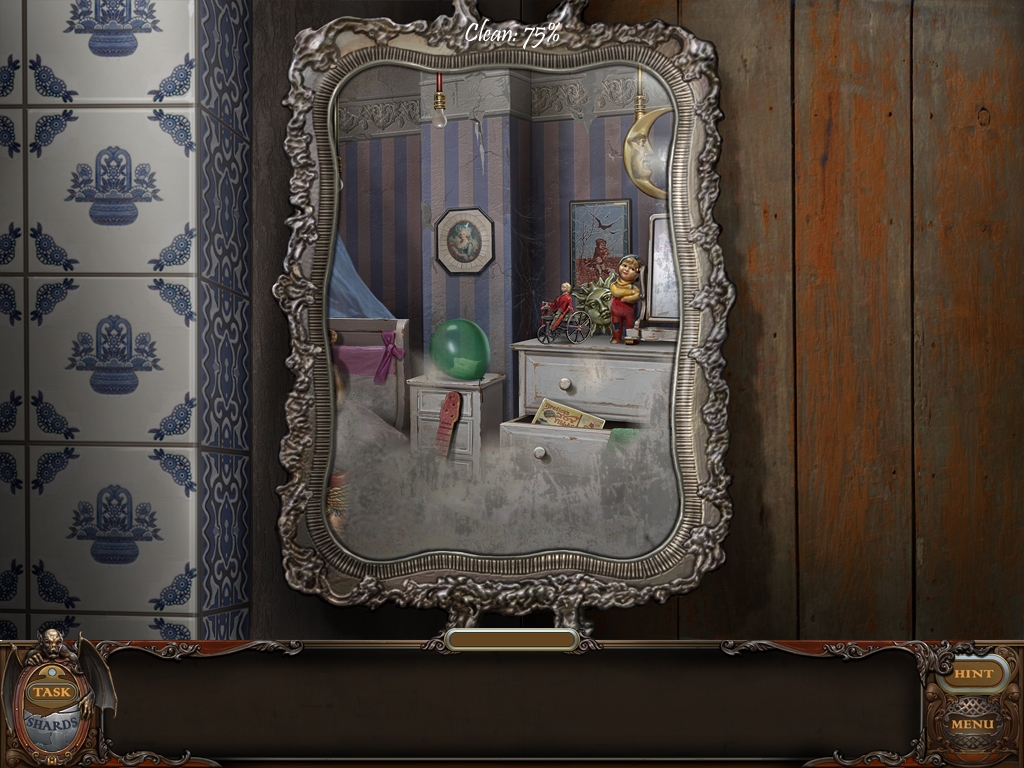
Click on the mirror. Left click and hold to brush the dust off the mirror and the frame.
You progress is reported in a percentage at the top of the mirror.
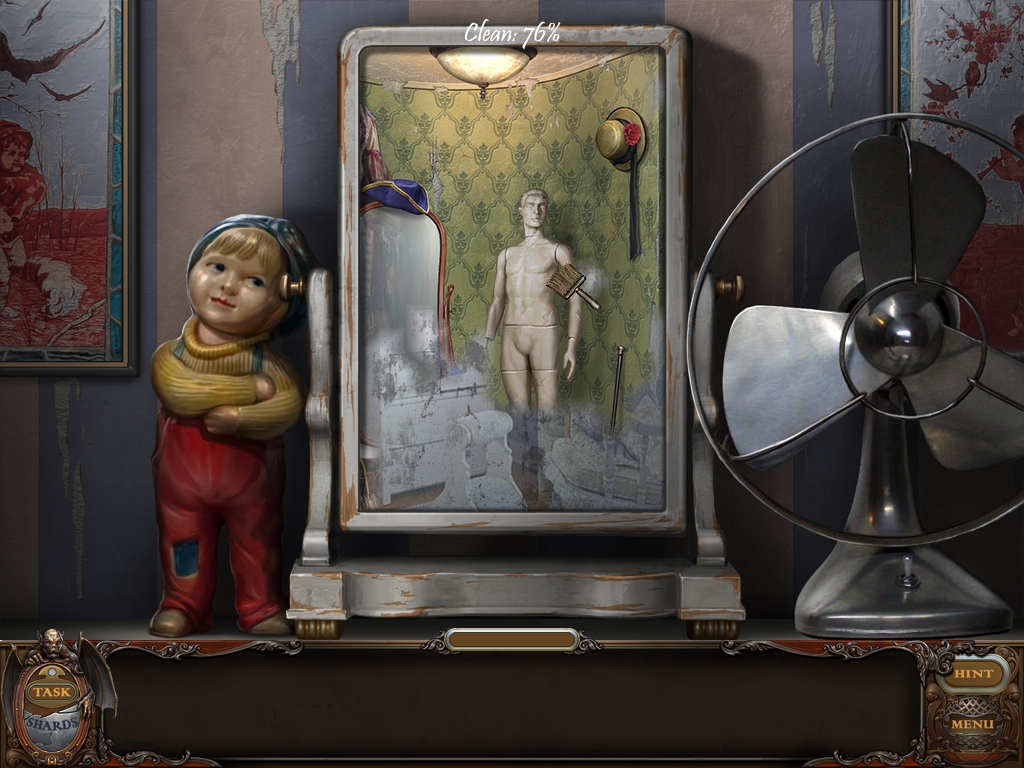
When completed, enter the Nursery.
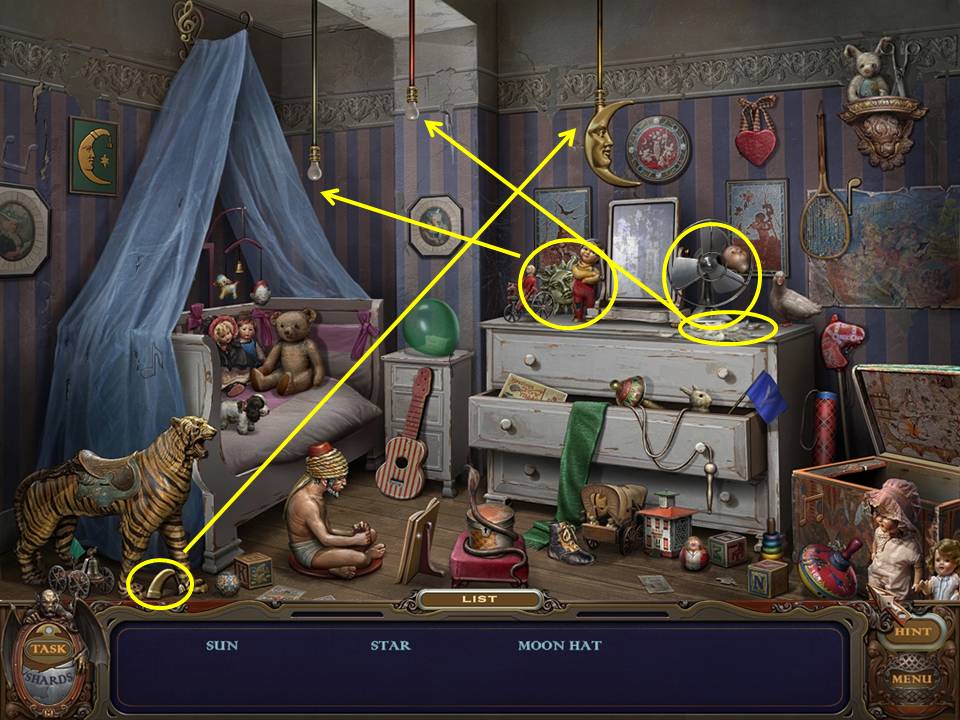
Zoom into the fan. Remove the doll's head from the fan blades.
Pick up the SUN, STAR, and MOON HAT.
Place them on the hanging light swags.
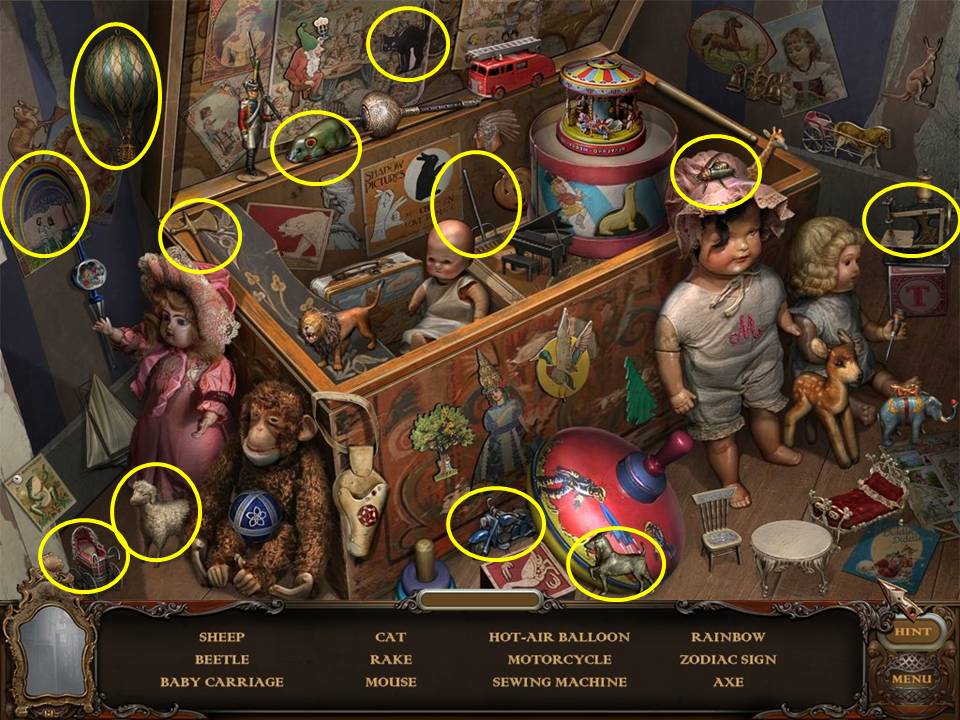
Click on the toy chest to play a Hidden Object Area.
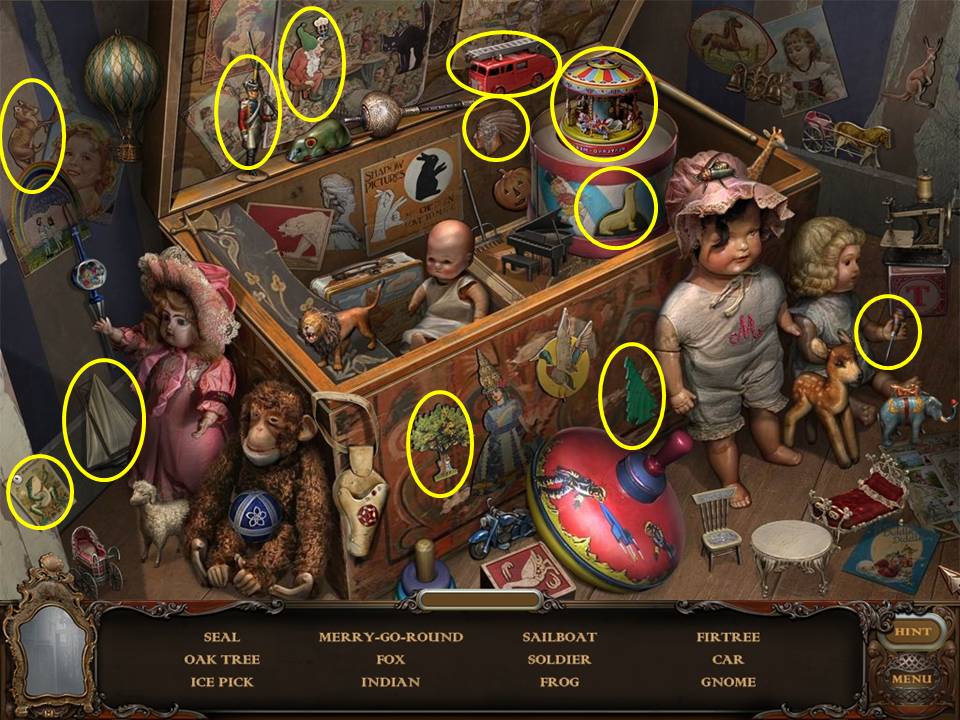
Find the items listed.
Find and receive the ICE PICK.
Return to the Nursery.
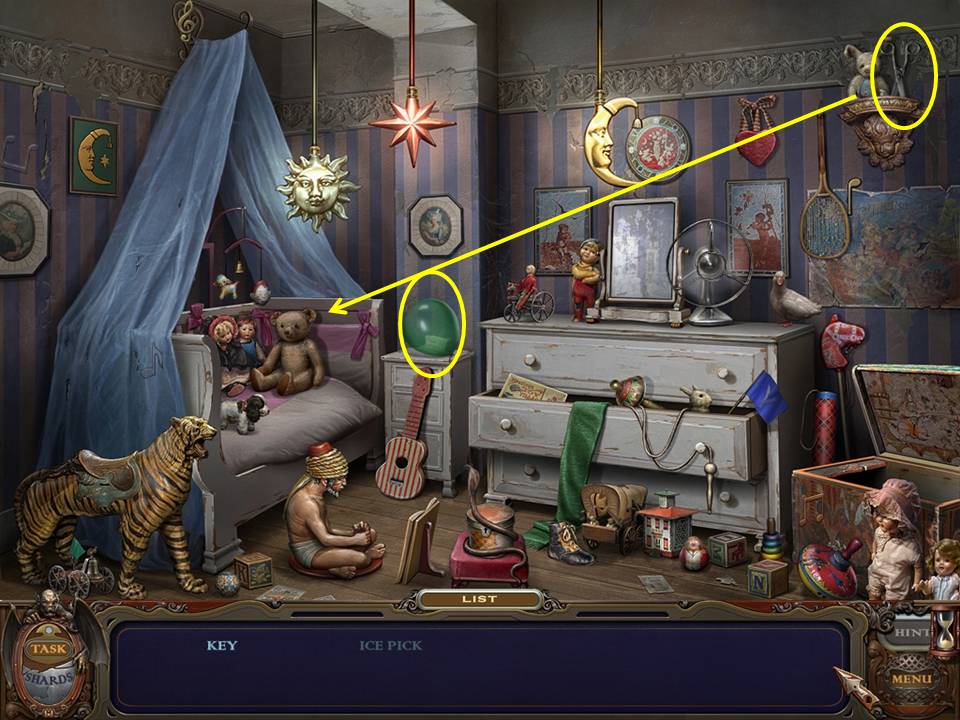
Pop the balloon with the ICE PICK.
Read the note telling you the teddy bear has the KEY.
Zoom into the teddy bear.
Return to the Nursery and pick up the SCISSORS.
Cut open the bear with the SCISSORS. Take the KEY.
Play the toy chest Hidden Object Area again.
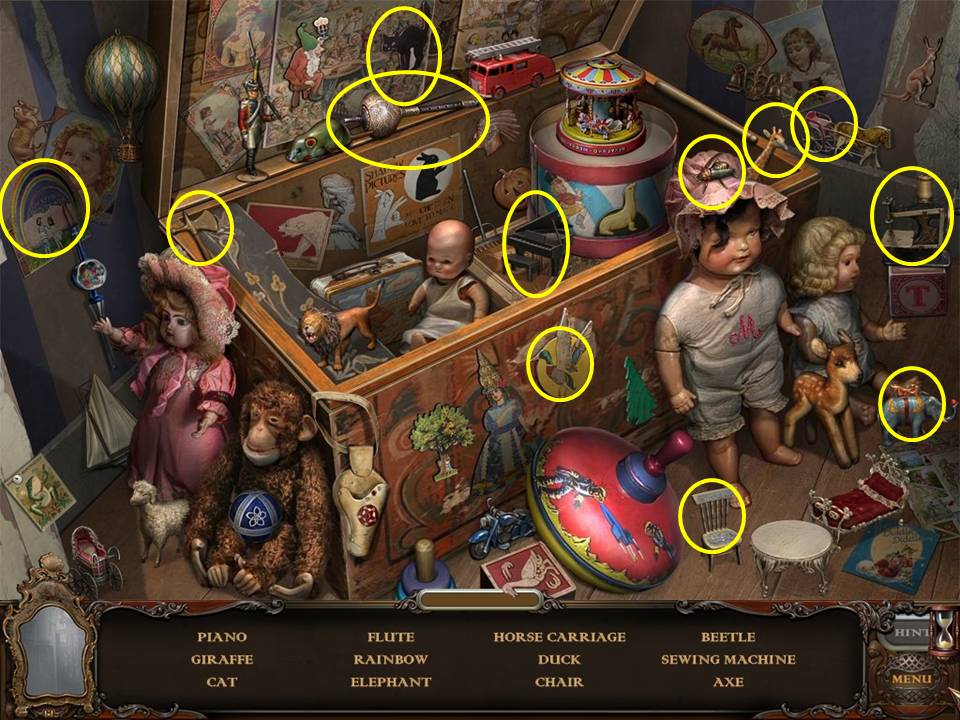
Find the items listed.
Find and receive the FLUTE.
Return to the Nursery.
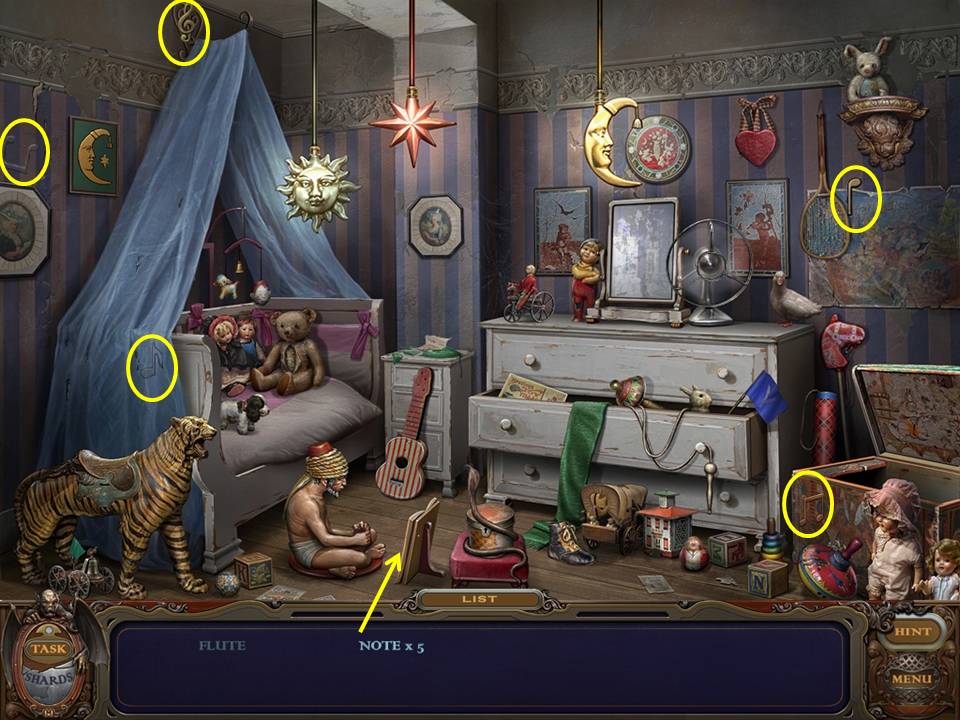
Locate five NOTES (one is a treble clef).
Zoom into the snake charmer to look at his book.
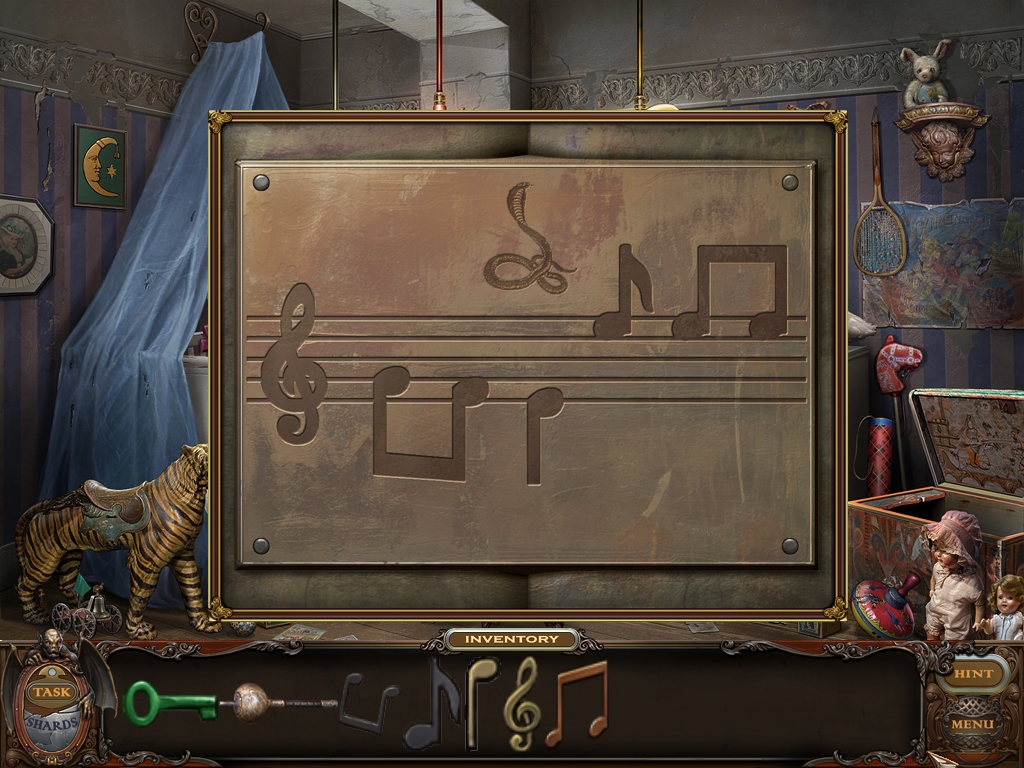
Insert the NOTES into the matching spaces in the book.
Return to the Nursery.

Give the charmer the FLUTE.
When the snake is asleep, open the box with the KEY.
Take the MONOCLE from the box. Use it to find the SHARD.
Take the SHARD.
Place the SHARD into the appropriate space in the mirror.
Return to the Nursery.
Click on the mirror to initiate a mini-game.
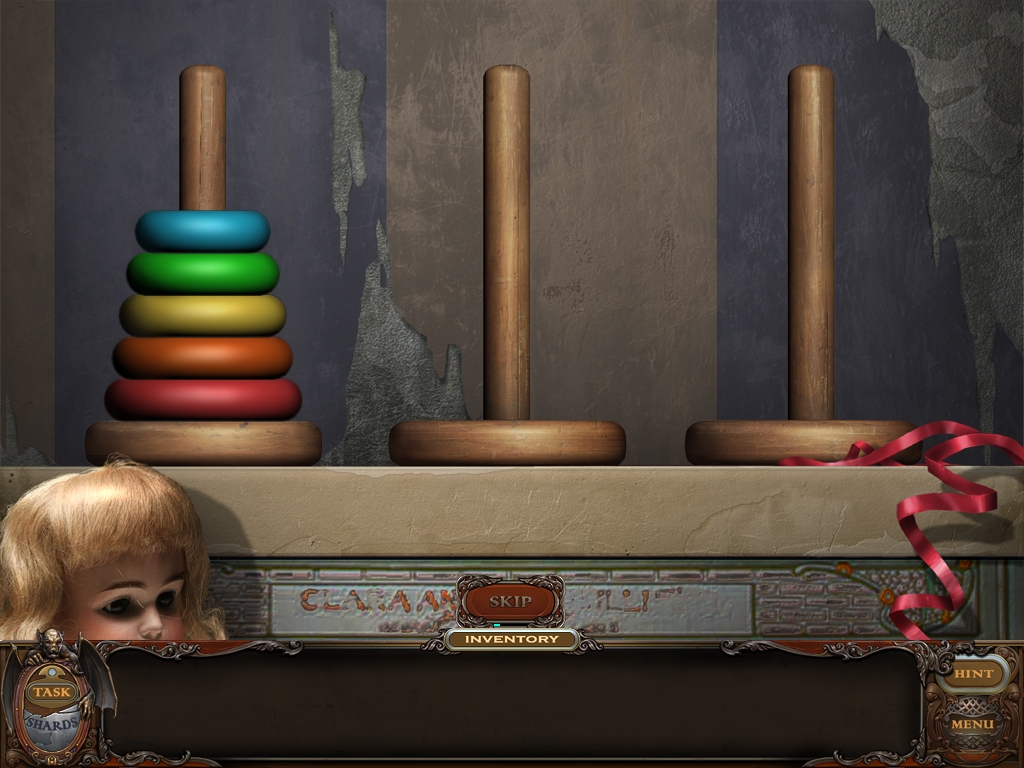
The object of the game is to move the rings from the pole on the far left to the pole on the far right with the largest ring at the bottom, moving in a graduated pattern to the smallest on top. Assuming the poles are labeled, left to right, A, B, and C and the rings are 1 to 5 from smallest to largest. Here is the movement procedure you will follow:
1 to C
2 to B
1 to B
3 to C
1 to A
2 to C
1 to C
4 to B
1 to B
2 to A
1 to A
3 to B
1 to C
2 to B
1 to B
5 to C
1 to A
2 to C
1 to C
3 to A
1 to B
2 to A
1 to A
4 to C
1 to C
2 to B
1 to B
3 to C
1 to A
2 to C
1 to C.
Click on the mirror. Left click and hold to brush the dust off the mirror and the frame.
You progress is reported in a percentage at the top of the mirror.
When completed, enter the Wardrobe Room.
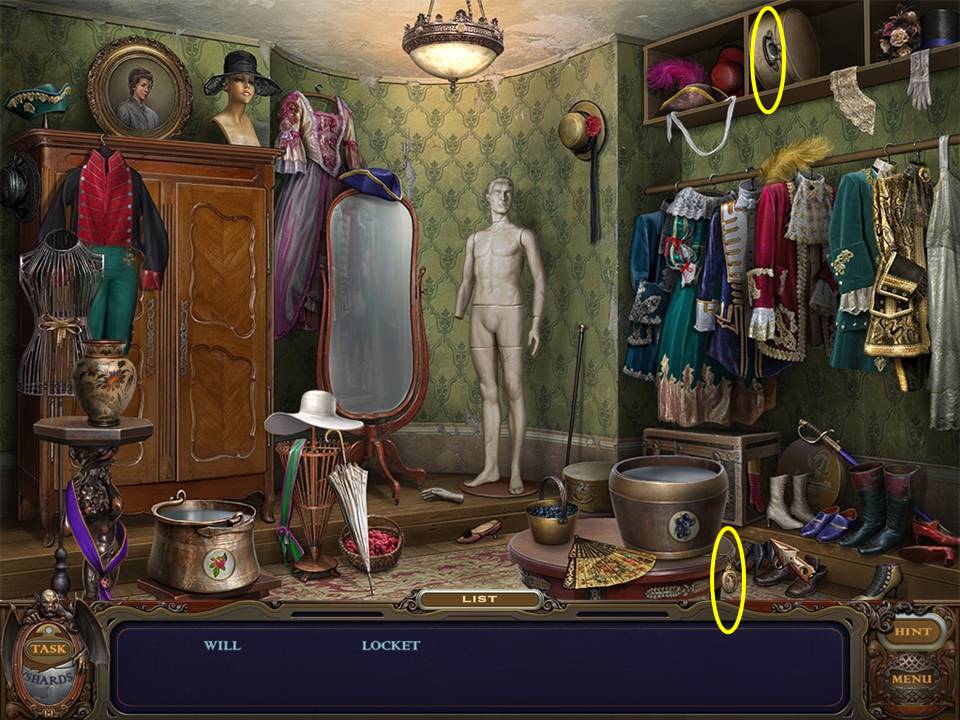
Zoom into table on the right.
Take the LOCKET.
Zoom into the hat box.
Place the LOCKET into the space on the hat box.
Take and read the will.
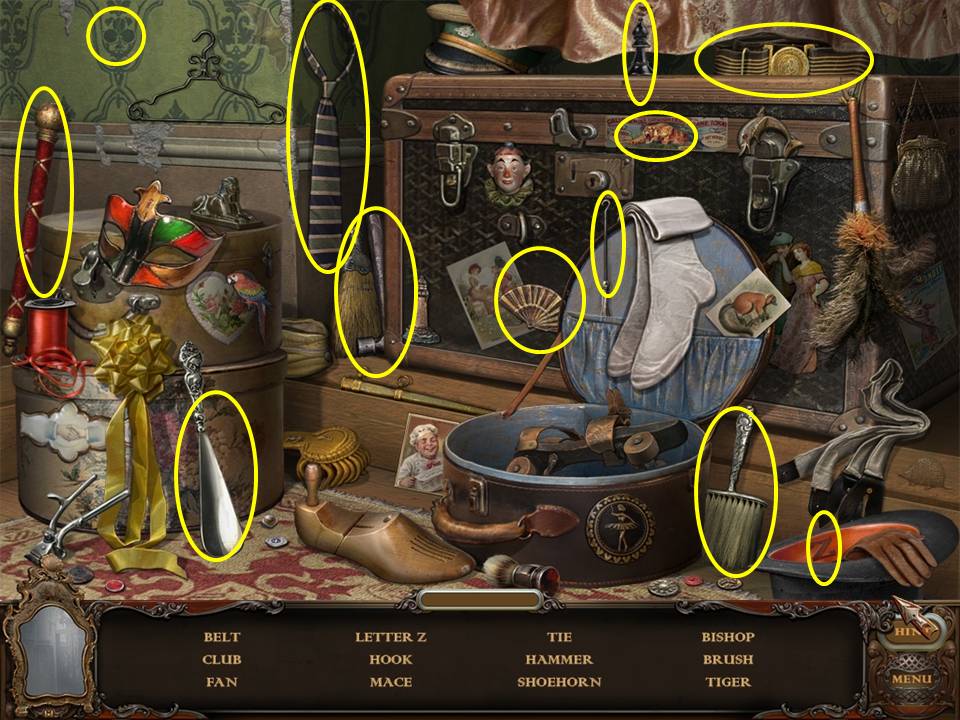
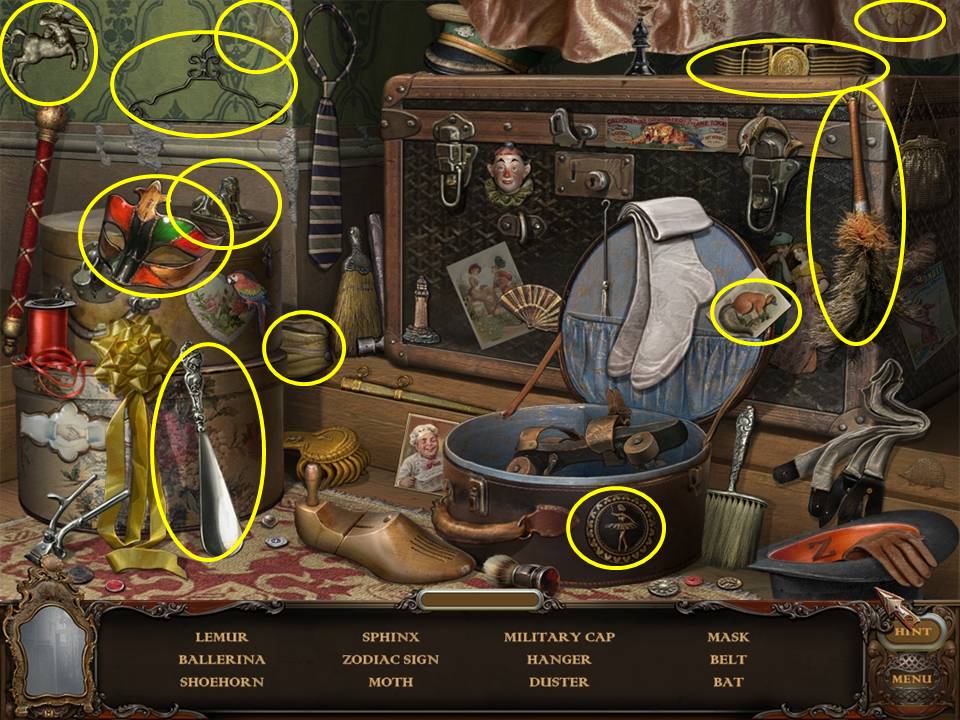
Click on the shoes for a Hidden Object area.
Find the items listed.
Find and receive the HAMMER.
Return to the Wardrobe
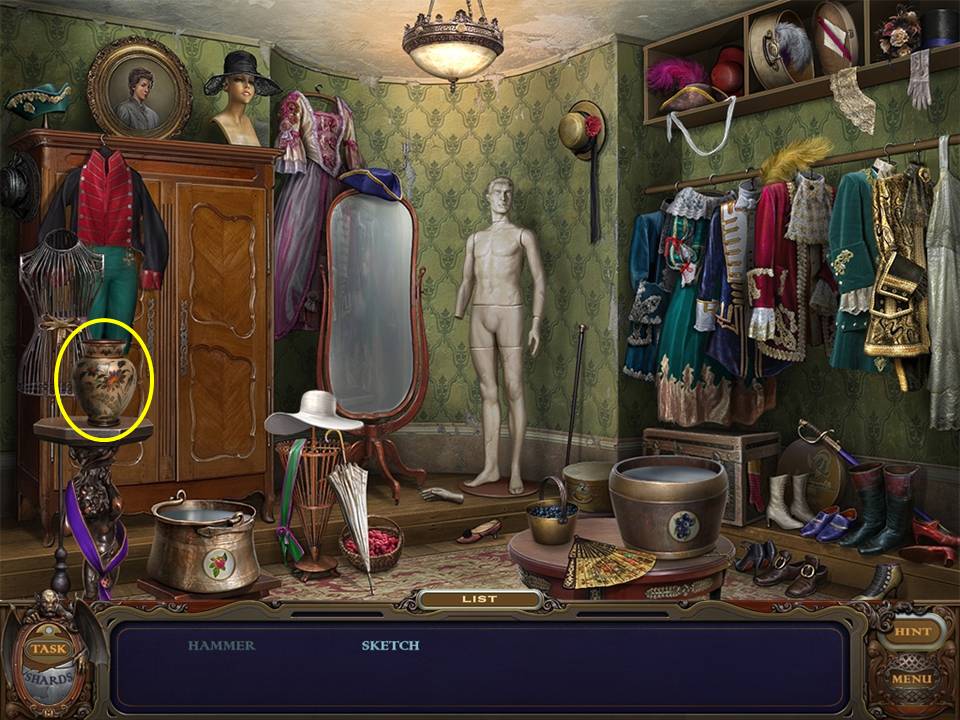
Zoom into the vase.
Break the vase with the HAMMER.
See the sketch of the Duke.
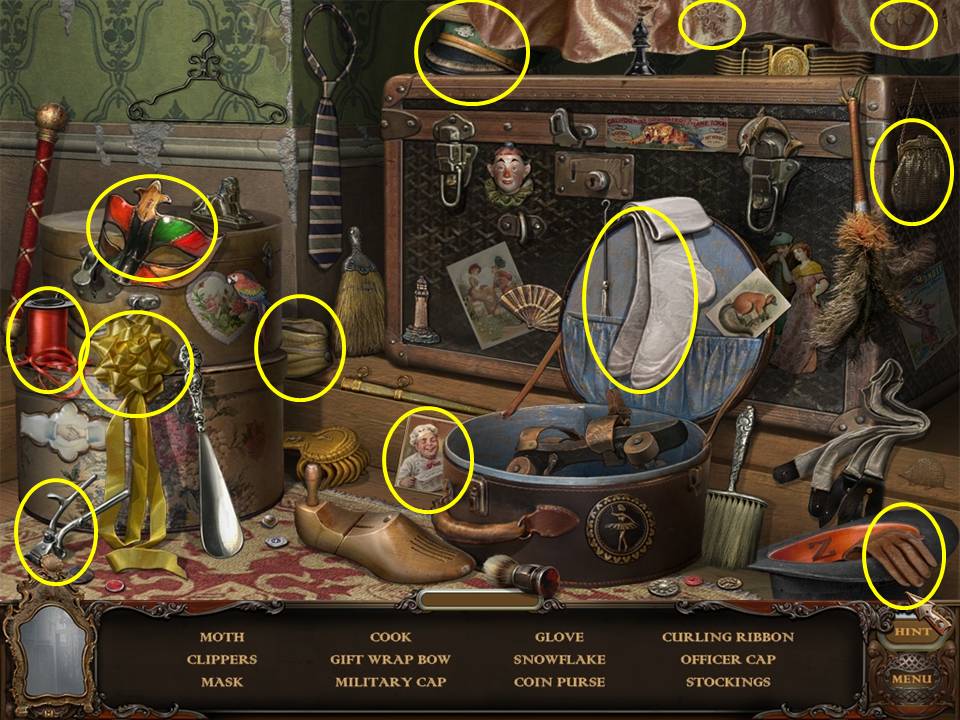
Click on the shoes for a Hidden Object area.
Find the items listed.
Find and receive the STOCKINGS.
Return to the Wardrobe.
Place the stockings on the mannequin.
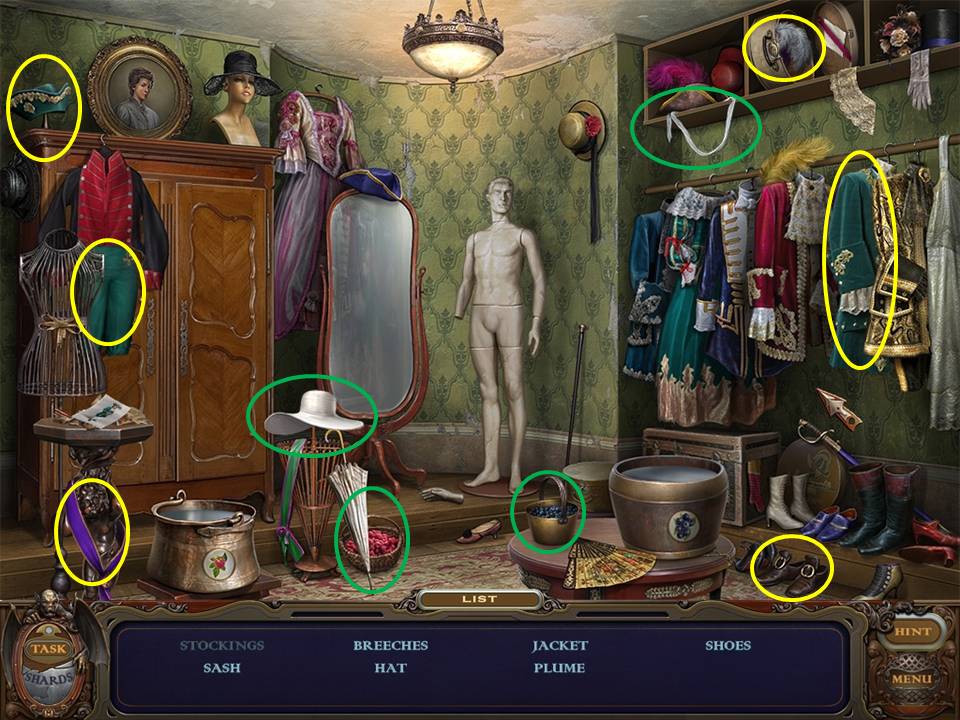
Locate the remaining articles of clothing to dress the mannequin to match the sketch of the Duke.
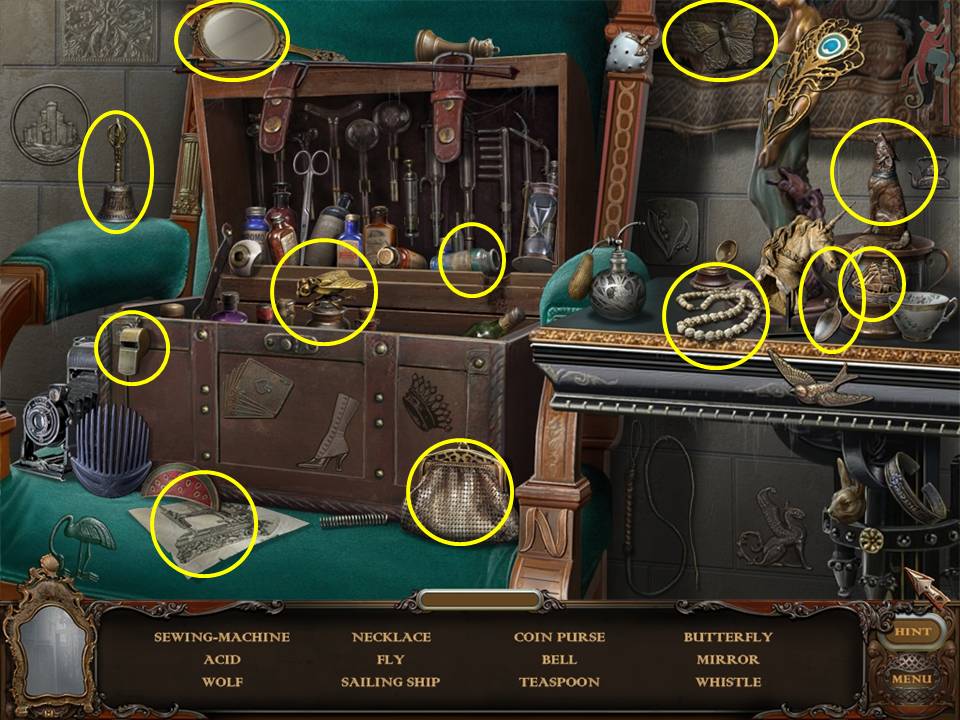
These are indicated in the yellow circles. Place the clothing items on the mannequin. You may refer to the sketch if necessary.
Now you will help the portrait atop the wardrobe cabinet get dressed. These items are indicated by the green circles.
Pick up the RASPBERRIES. Put them in the bucket on the left.
Pick up the WHITE HAT. Put it in the same bucket to dye the hat pink. Receive the PINK HAT.
Pick up the BLUEBERRIES. Put them into the bucket on the right.
Pick up the WHITE RIBBON. Put it in the bucket on the right to dye the ribbon blue. Receive the BLUE RIBBON.
Examine the portrait over the cabinet.
Place the PINK HAT and BLUE RIBBON on the portrait to receive the KEY.
Open the cabinet with the KEY.
Remove the RAPIER. Place it on the mannequin.
Receive a SHARD on the left side of the wardrobe cabinet.
Place the SHARD into the appropriate space in the mirror.
Return to the Wardrobe.
Click on the mirror to initiate a mini-game.
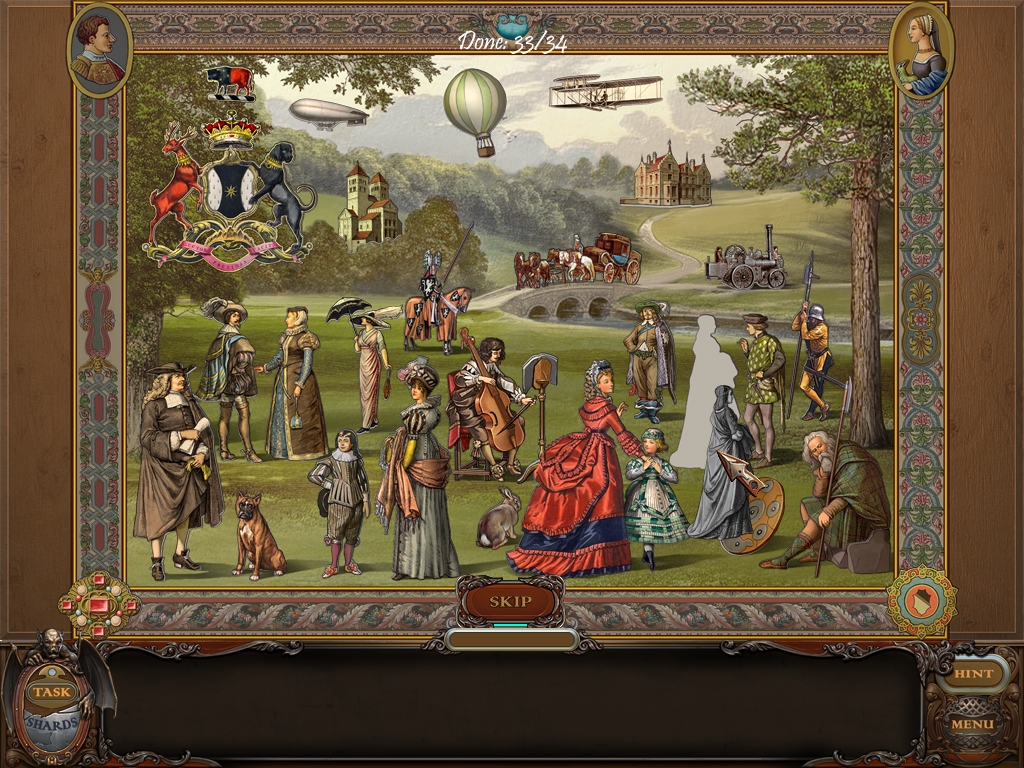
Reassemble the painting by placing the elements into their properly outlined silhouettes. When placed correctly, the black and white items will take on their full color. Monitor your progress with the meter at the top center of the screen.
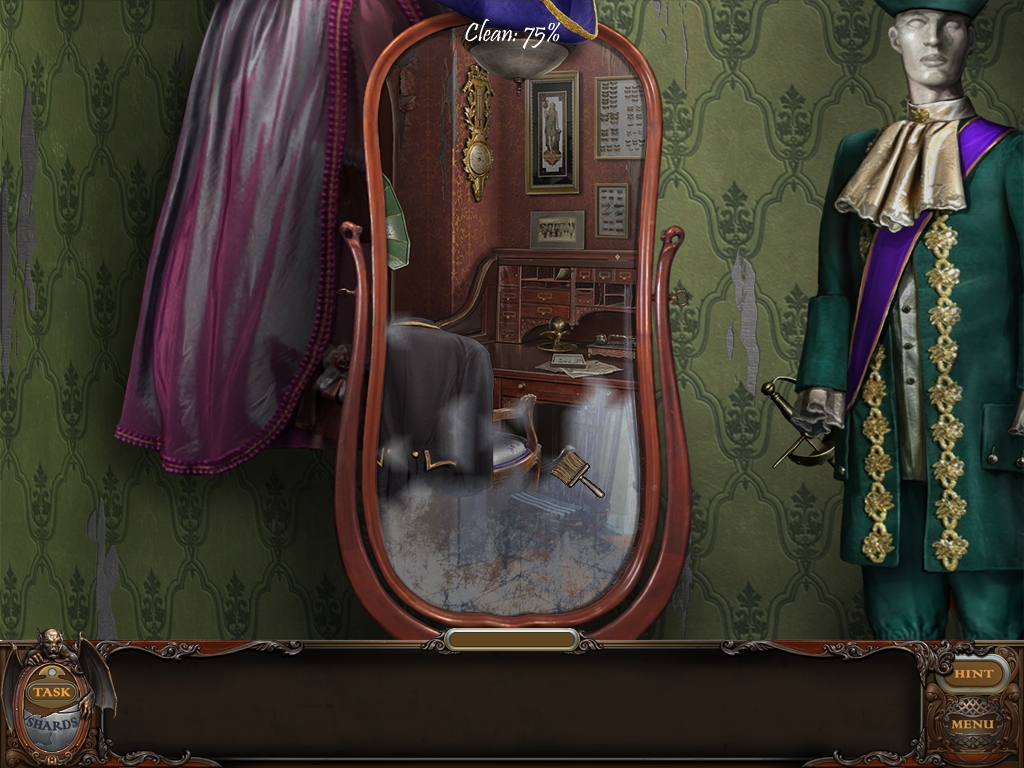
Click on the mirror. Left click and hold to brush the dust off the mirror and the frame.
You progress is reported in a percentage at the top of the mirror.
When completed, enter the Study.
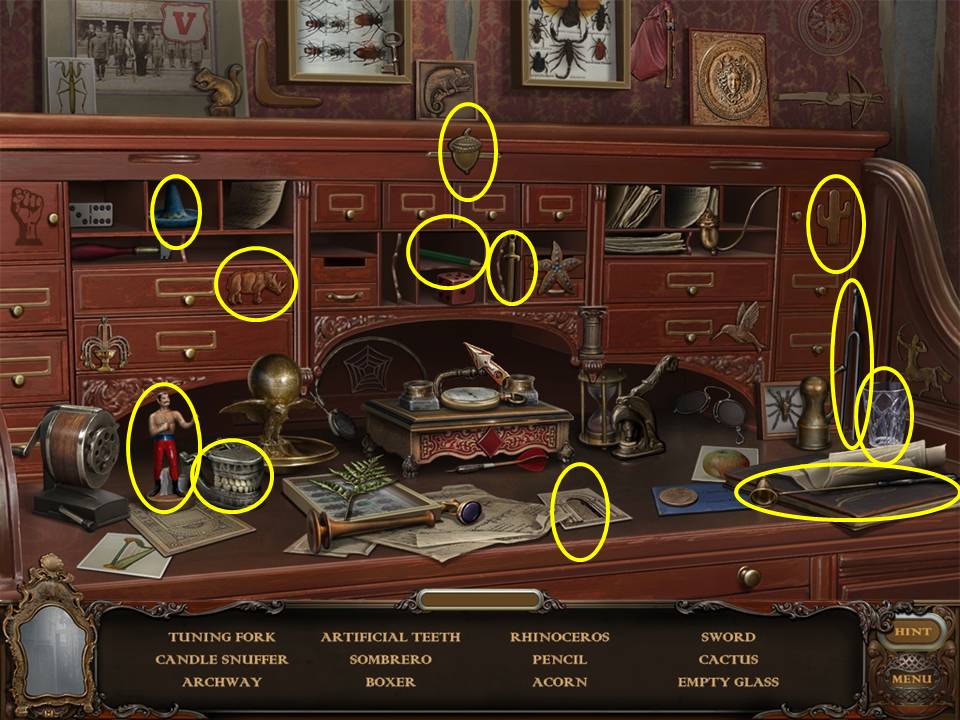
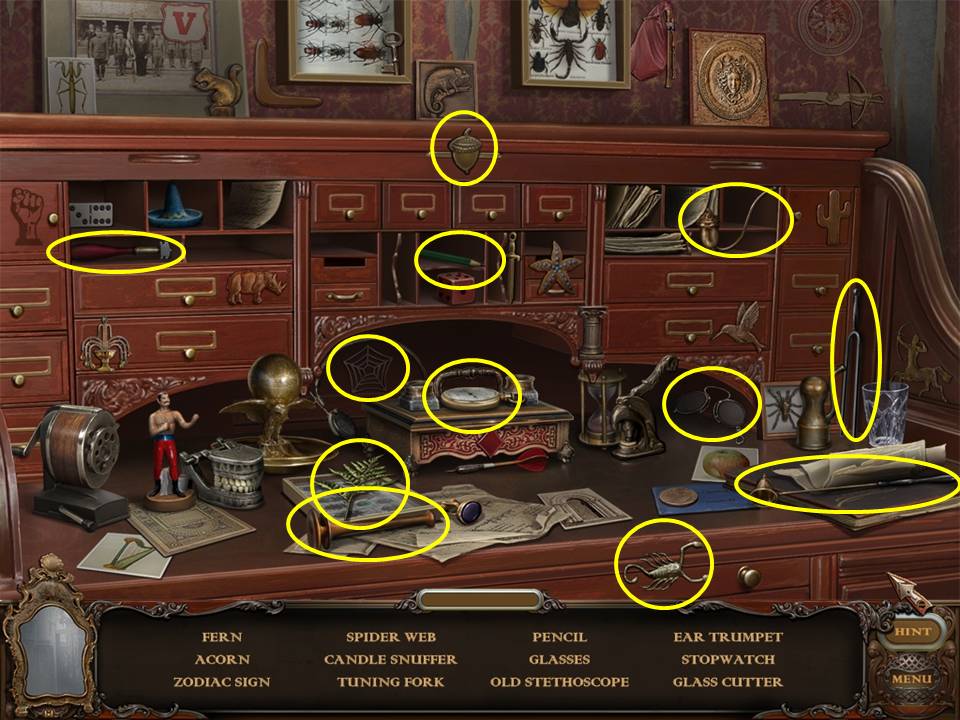
Click on the desk to play a Hidden Object Area.
Find the items listed.
Find and receive the EMPTY GLASS.
Return to the Study.
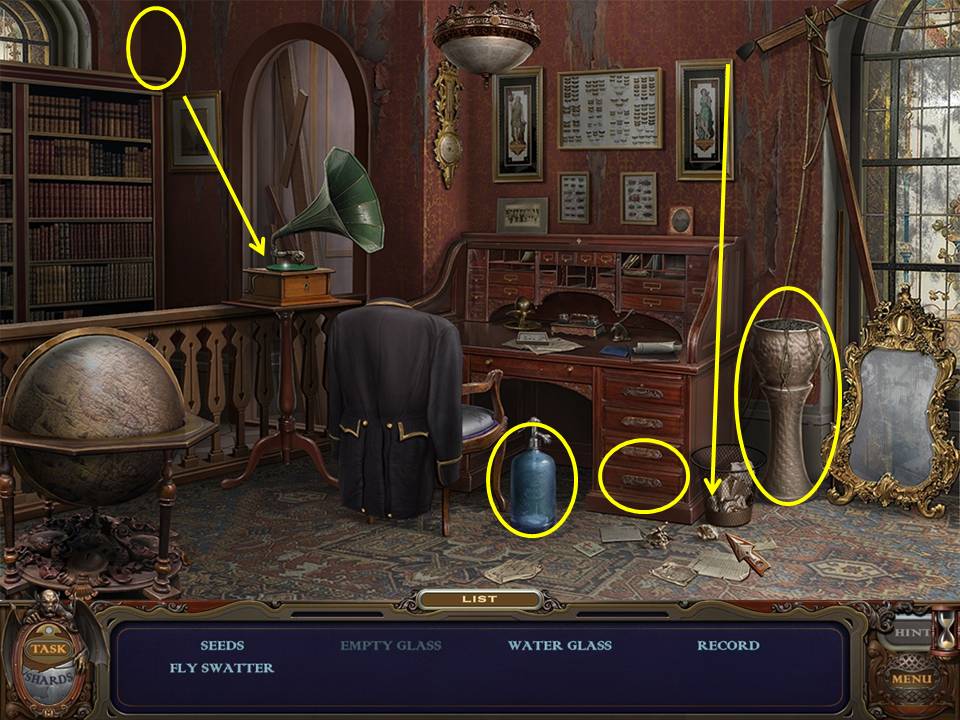
Open the bottom right desk drawer to find the SEEDS.
Place the EMPTY GLASS under the water bottle to receive the WATER GLASS.
Place the seeds in the planter. Water the planter with the WATER GLASS.
Take the RECORD from on top of the left bookcase.
Zoom into the phonograph.
Place the RECORD on the phonograph turntable.
Crank the handle.
Click on the needle arm to play the RECORD.
The music grows the plant and knocks the FLYSWATTER from the wooden beam.
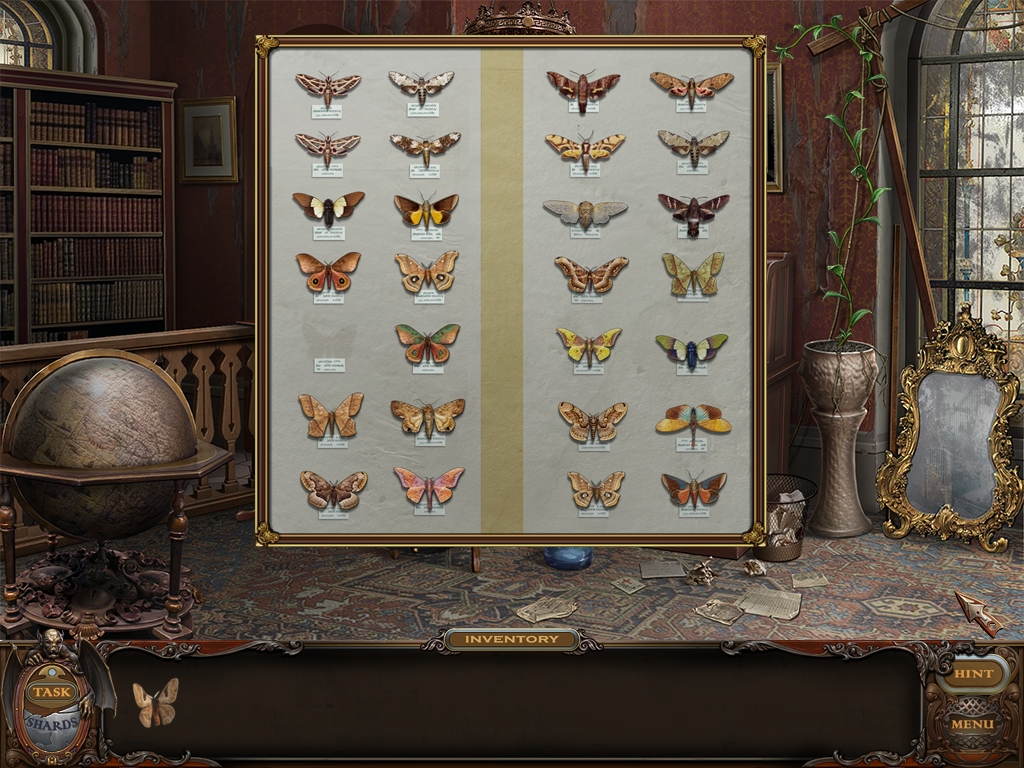
Use the FLYSWATTER to beat the dusty coat hanging on the back of the chair. A MOTH will appear. Take the MOTH. Zoom into the moth collection on the wall above the desk.
Place the MOTH in the empty spot in the collection.
The moth collection moves to reveal a window that highlights a keyhole at the base of the globe.
Play the Hidden Object Area on the desk again.
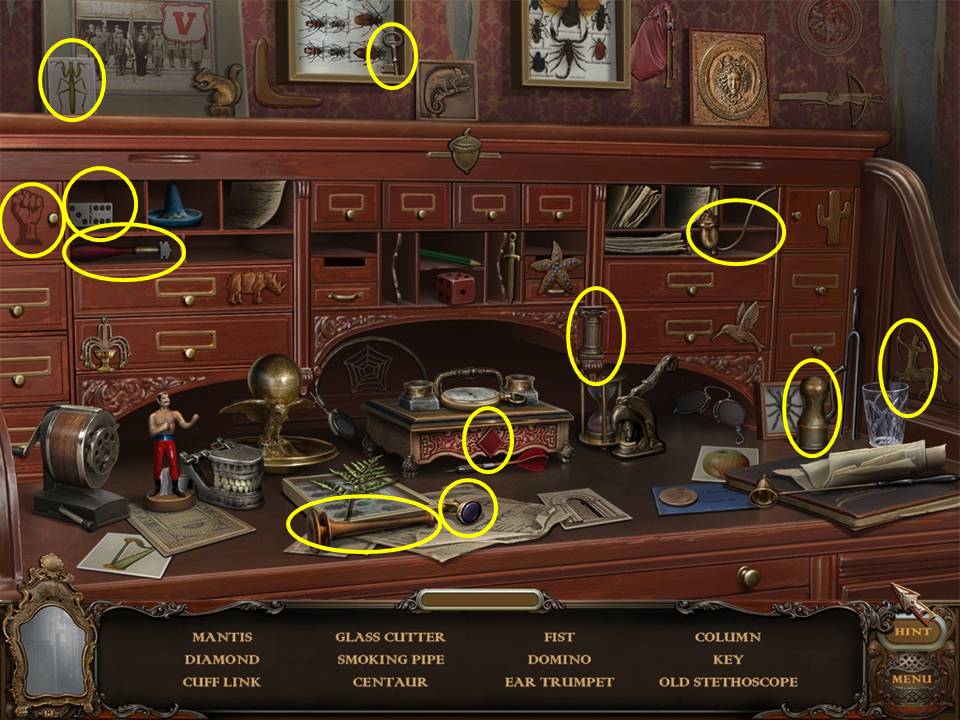
Find the items listed.
Find and take the KEY.
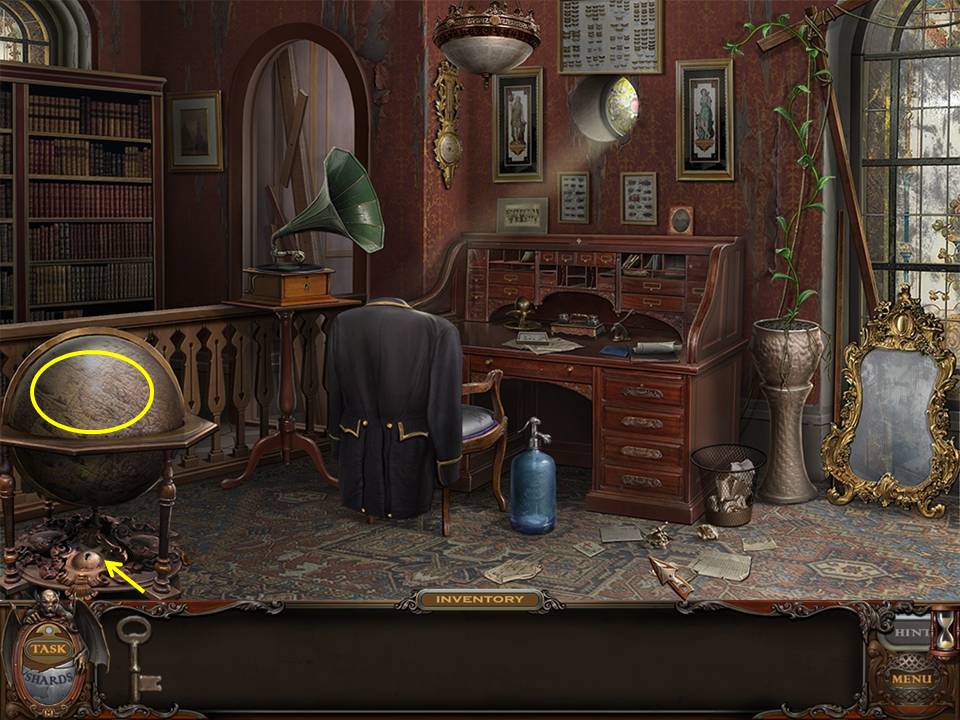
Zoom into the globe.
Use the KEY on the keyhole on the globe.
Globe opens to reveal a SHARD.
Take the SHARD.
Place the SHARD into the appropriate space in the mirror.
Return to the Study.
Click on the mirror to initiate a mini-game.
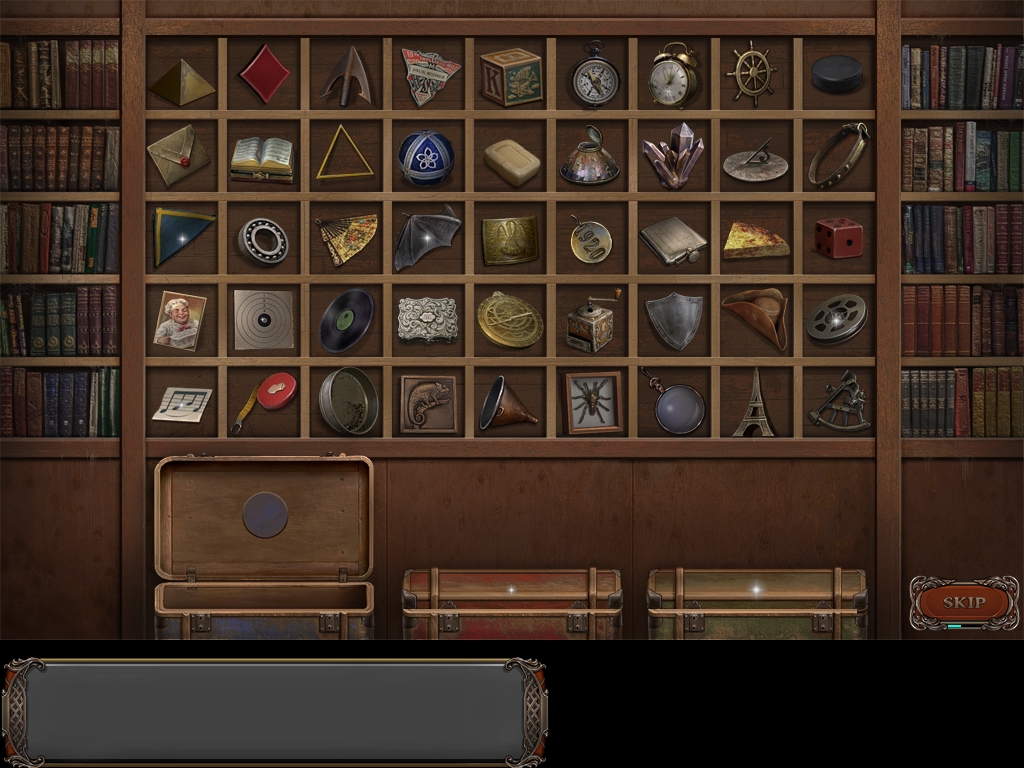
The object of the game is to place the items shown on the grid into the chest that corresponds with their general shape (circular, square, and triangular). Place all circular items into the chest with the circle symbol (left). Place all the square items into the chest with the square symbol (center). Place all the triangular items into the chest with the triangle symbol (right). You may only have one chest open at a time.
Click on the mirror. Left click and hold to brush the dust off the mirror and the frame.
You progress is reported in a percentage at the top of the mirror.
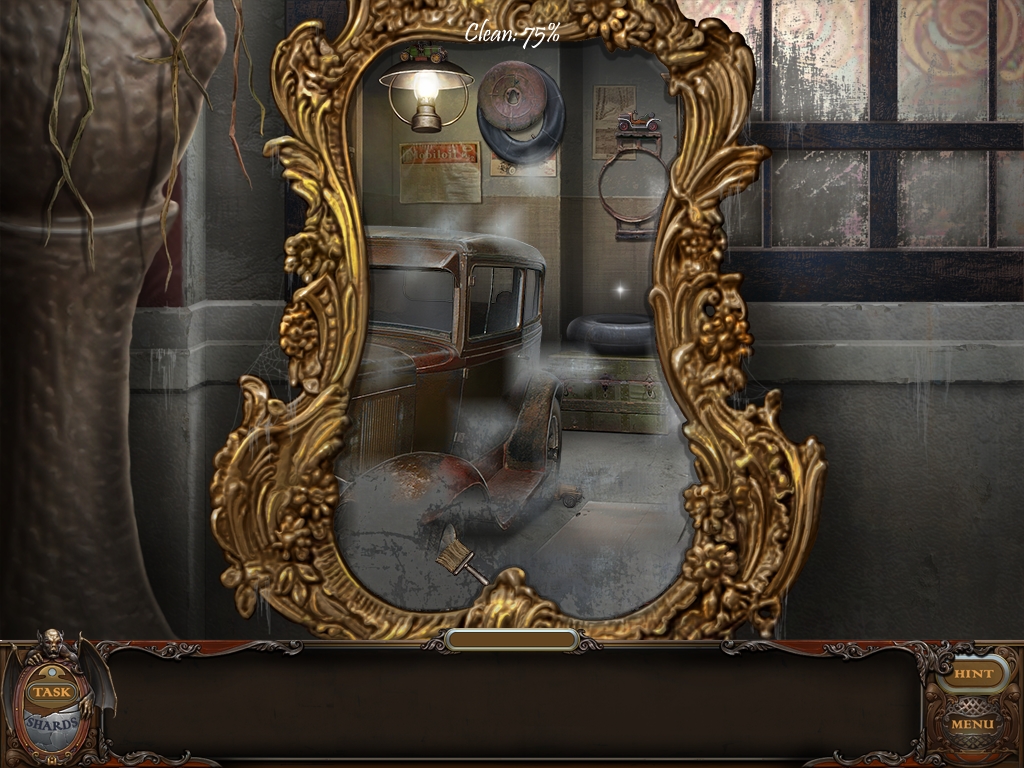
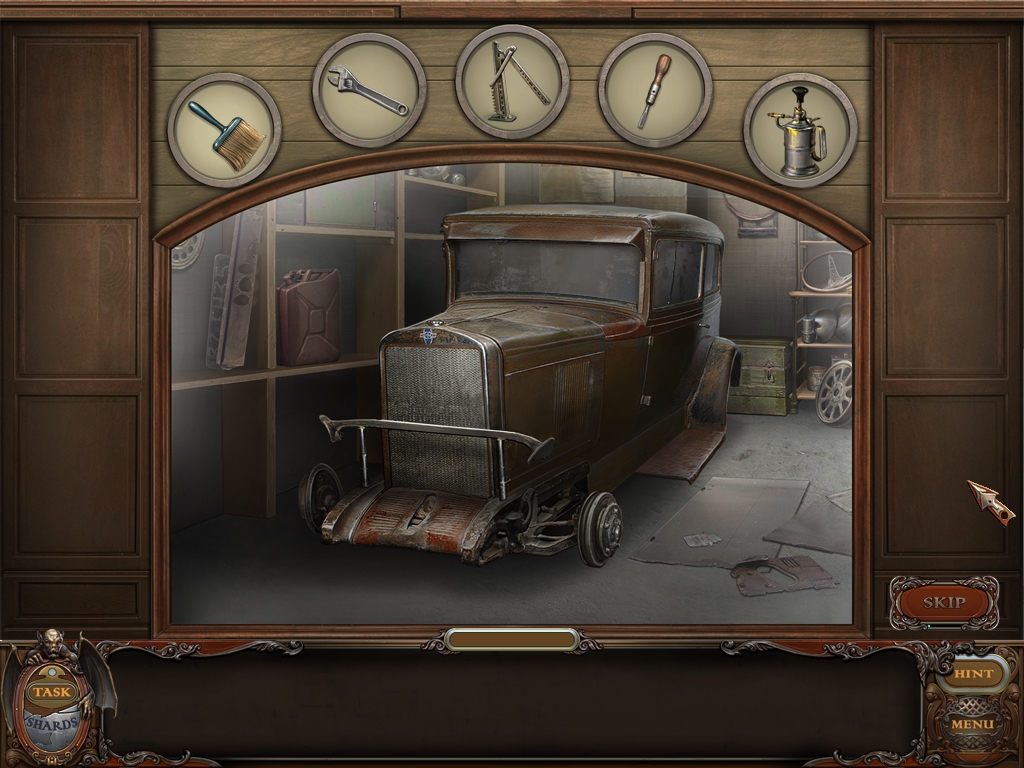
When completed, enter the Garage.
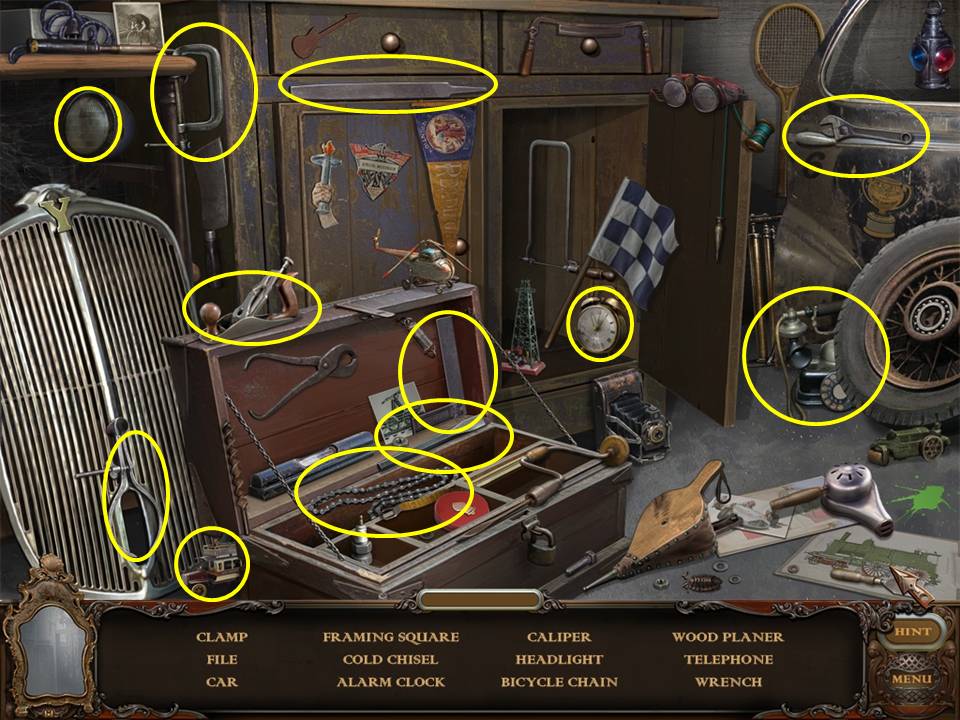
Play the Hidden Object Area on the right.
Find the items listed.
Find and receive the CAR.
Return to the Garage.
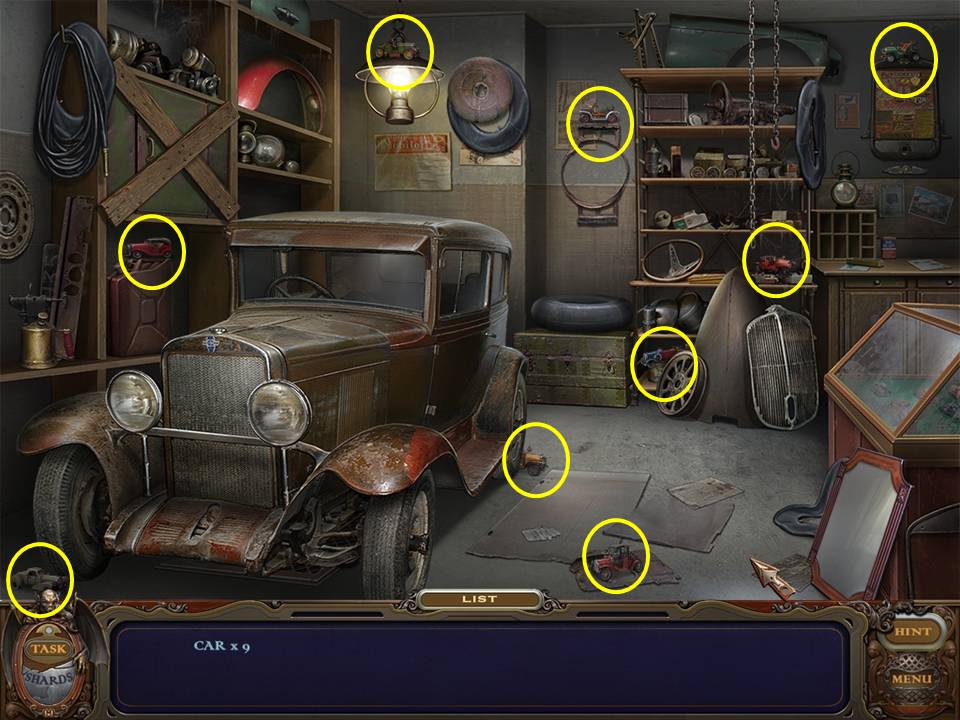
Find the remaining 9 CARS.
Zoom into the display case located on the right.
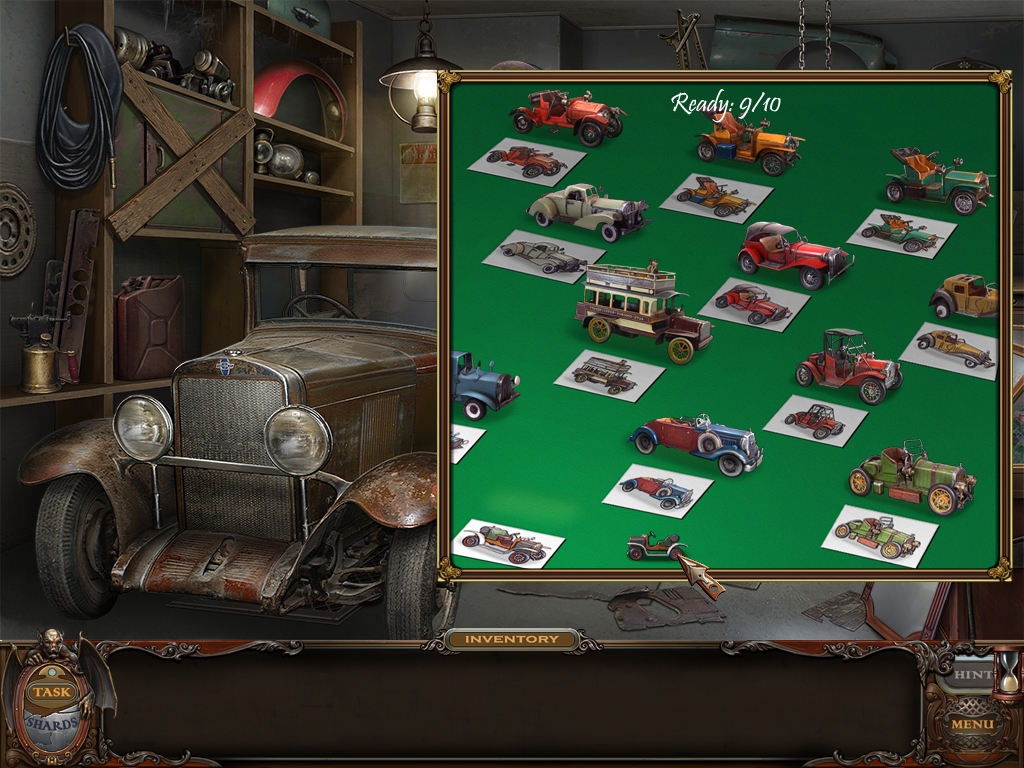
Place the cars above their matching pictures in the display case.
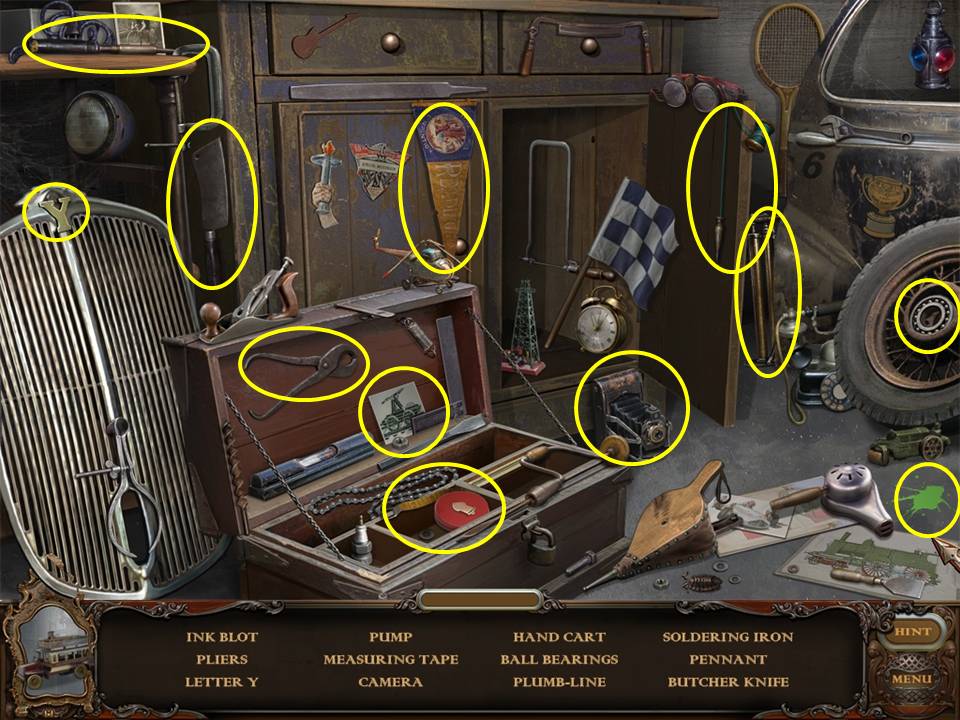
Play the Hidden Object Area on the right.
Find the items listed.
Find and receive the PUMP.
Return to the Garage.
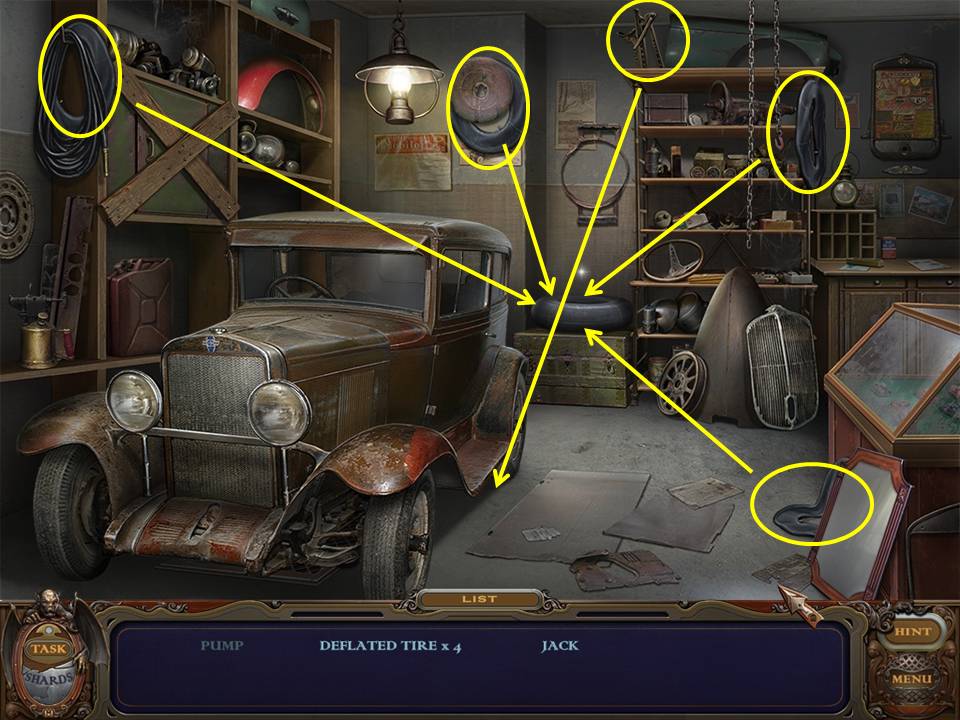
Find 4 TIRES.
Zoom into the inflated tire along the back wall.
Place a TIRE on the pile. Inflate the TIRE with the PUMP. Repeat for remaining 3 TIRES.
Pick up the JACK. Place it under the car.
Click on the lever to raise the car.
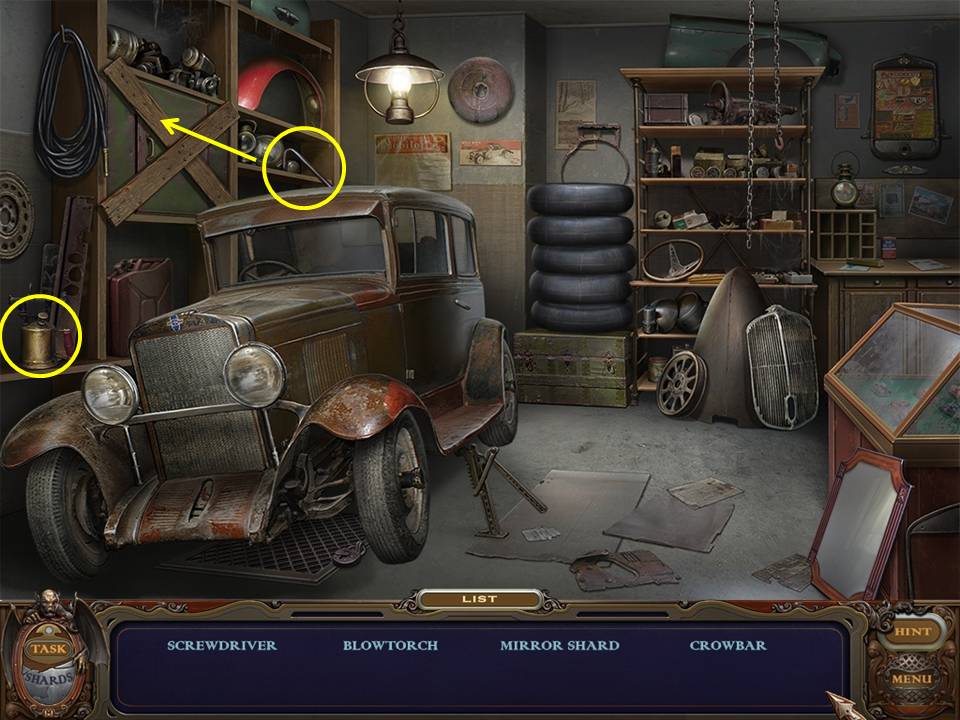
Pick up the CROWBAR. Pry up the boards on the boarded cabinet to get the SCREWDRIVER.
Find the BLOWTORCH.
Zoom into the grate beneath the car.
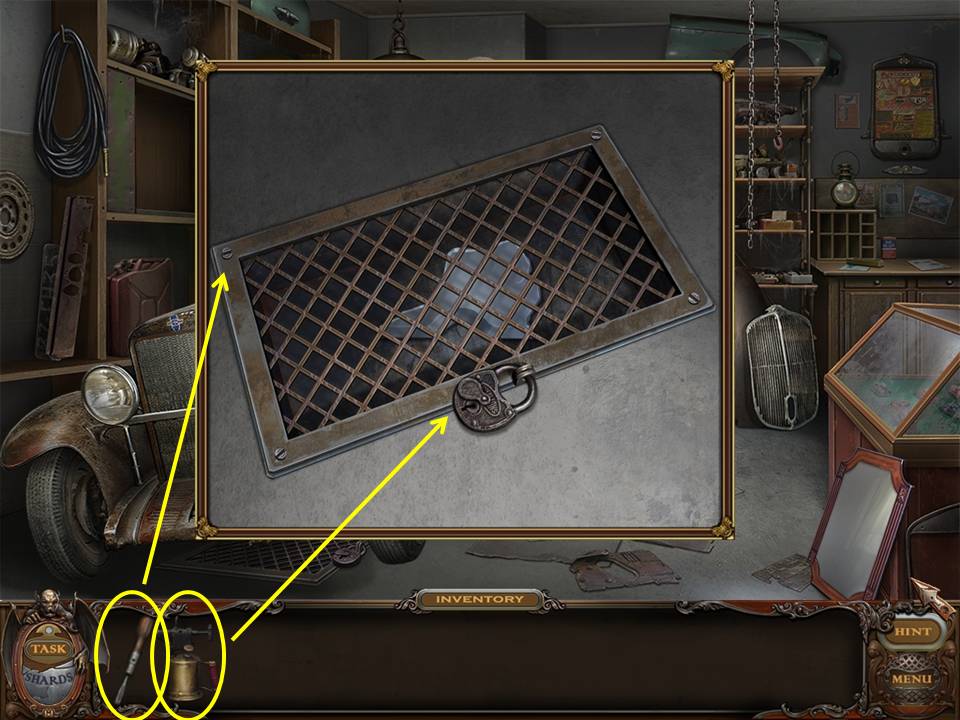
Remove 4 screws with the SCREWDRIVER.
BLOWTORCH the padlock to remove.
Click on the lock and the grate to remove them.
Take the SHARD.
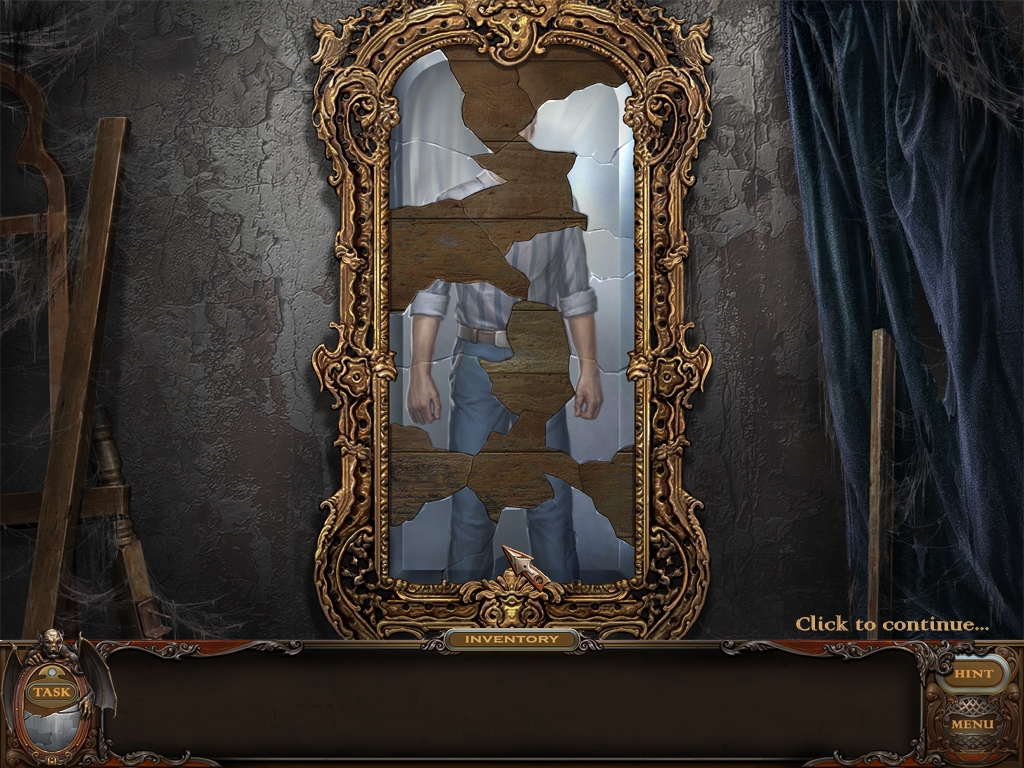
Place the SHARD into the appropriate space in the mirror.
Return to the Garage.
Click on the mirror to initiate a mini-game.
This is a memory game in which you are expected to repeat the pattern flashed by the tools on the top of the screen. Click anywhere to begin. Watch the lighting sequence of the tools. Click on the tools to repeat the same sequence. If done correctly, a portion of the car will be restored. You may need to experience several sequences to completely restore the car.
Click on the mirror. Left click and hold to brush the dust off the mirror and the frame.
You progress is reported in a percentage at the top of the mirror.
When completed, enter the Greenhouse.
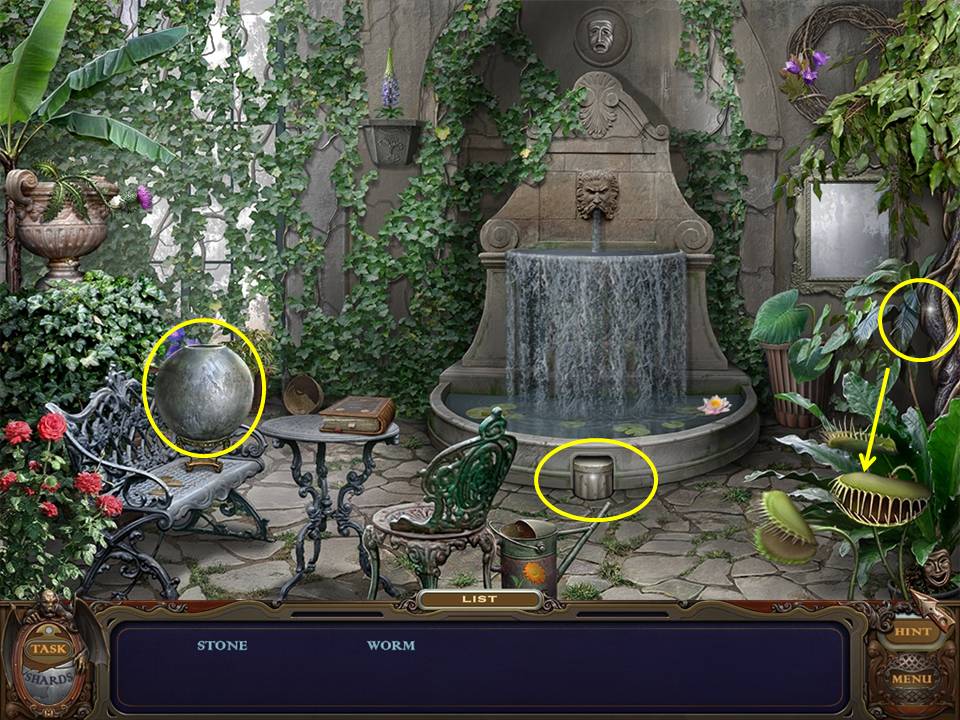
Zoom into the tree trunk on the right.
Pick up the WORM.
Zoom into the Venus Flytrap.
Feed the WORM to the plant.
Take the STONE.
Break the aquarium bowl on the bench with the STONE. Read the note in the broken aquarium.
Pick up the CHIMERA statue from the table.
Zoom into the front of the fountain.
Place the CHIMERA on the pedestal to stop the fountain.
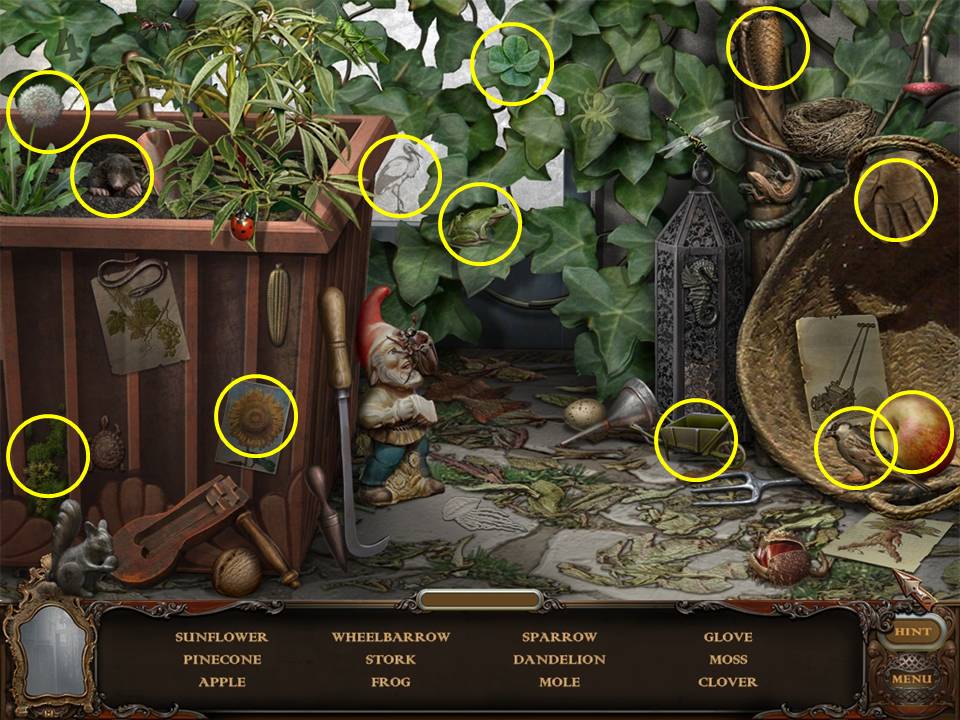
Play the Hidden Object Area on the left side of the fountain.
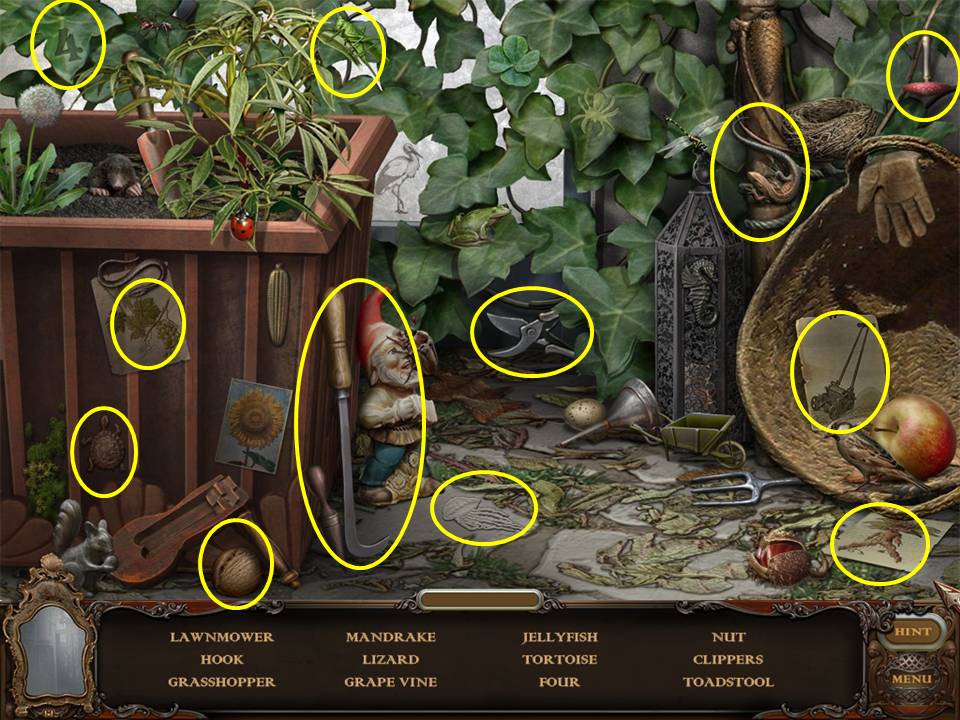
Find the items listed.
Find and receive the CLIPPERS.
Return to the Greenhouse.
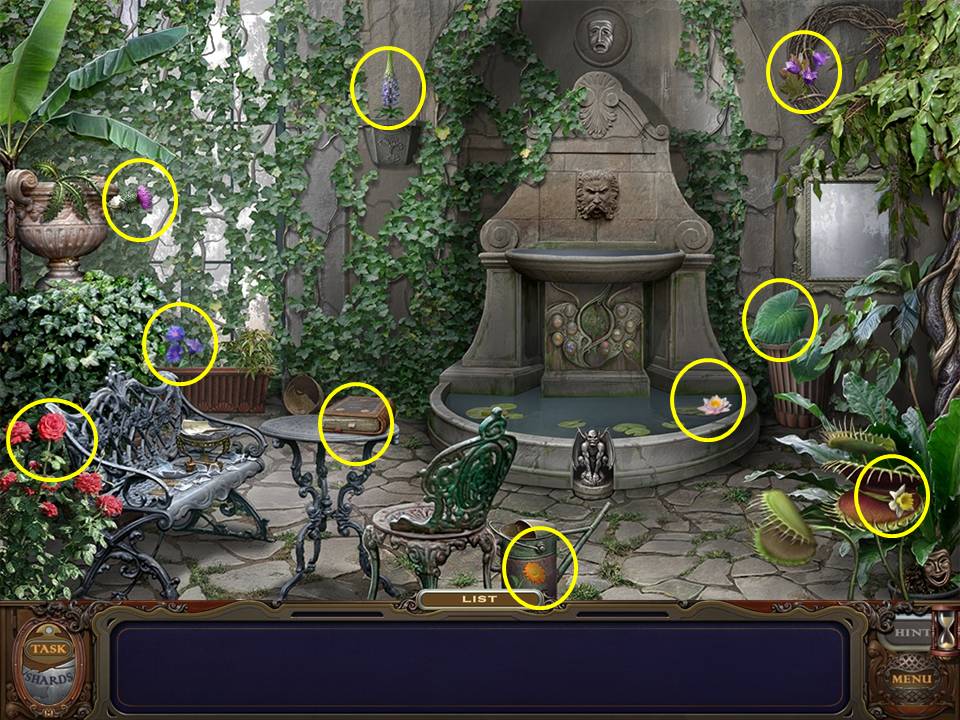
Find and pick up 10 FLOWERS. Some may be hidden so you may have to move or open items within the scene. For example, the book on the table must be opened to find one FLOWER. Move the large leaf to the right of the fountain to find another FLOWER. Clip the rose with the CLIPPERS. When you have located 9 FLOWERS, a Hidden Object Area will appear.
Find the items listed.
Find and receive the GLOVE.
Return to the Greenhouse.
Use the GLOVE to take the purple thistle FLOWER on the left.
Click on the center of the fountain to initiate a puzzle.
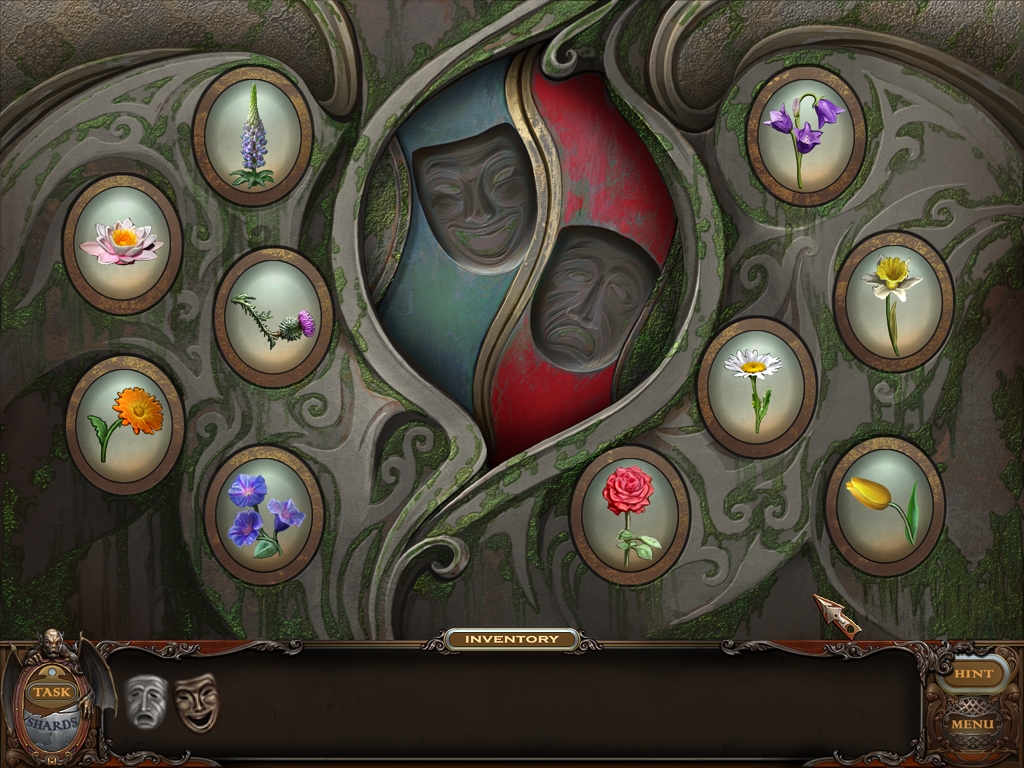
Place the flowers on their matching pictures. When complete the center of the puzzle will open.
Return to the Greenhouse and collect the comedy and tragedy MASKS. One hangs over the top of the fountain. The other is in the bottom right corner near the venus flytrap. Return to the flower puzzle and place the masks in their appropriate spaces. When the MASKS are in place, the center will open a second time to reveal a SHARD. Take the SHARD.
Place the SHARD into the appropriate space in the mirror.
Return to the Greenhouse.
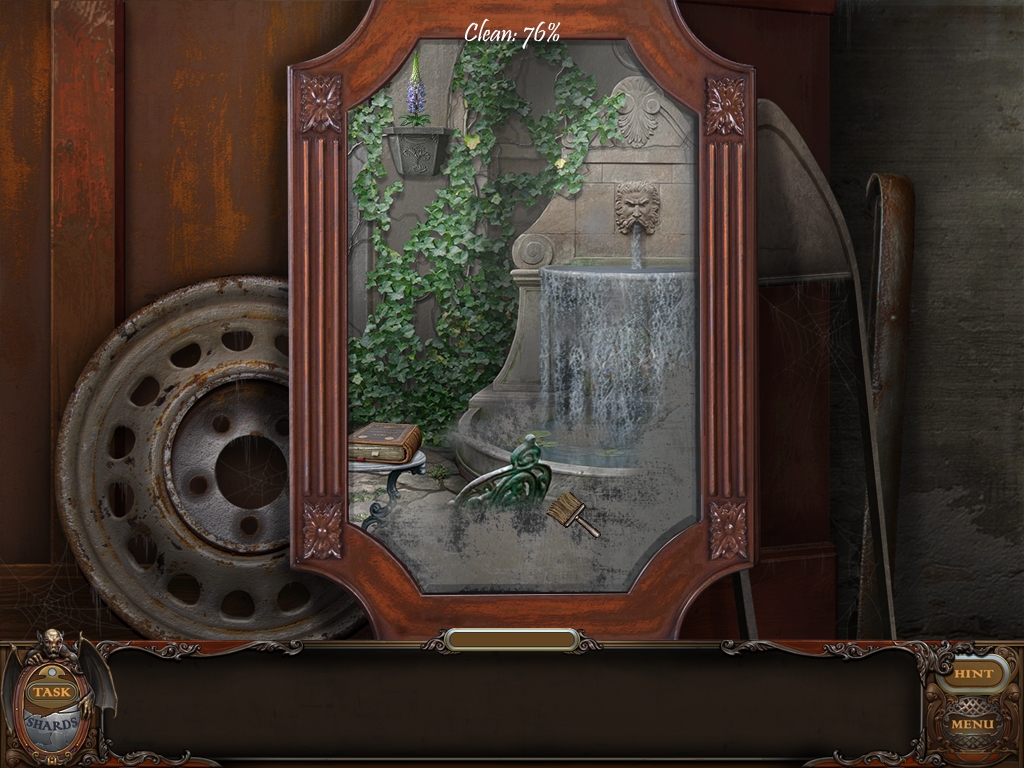
Click on the mirror. Left click and hold to brush the dust off the mirror and the frame.
You progress is reported in a percentage at the top of the mirror.
When completed, enter the Armory.
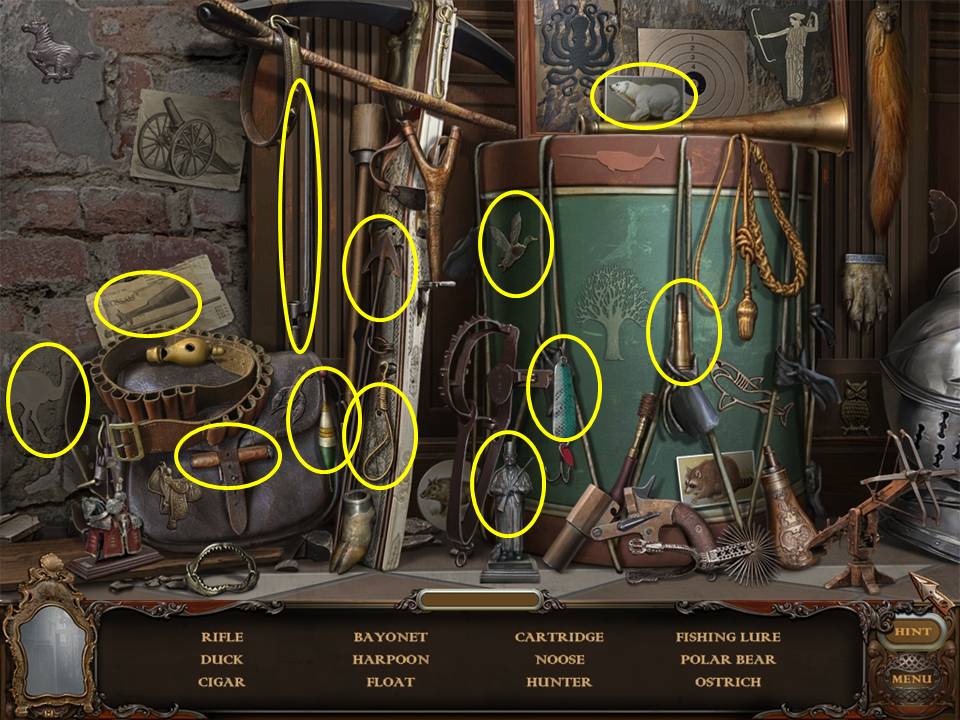
Click on the drum in the Armory to play a Hidden Object Area.
Find the items listed.
Find and receive the CARTRIDGE.
Return to the Armory.
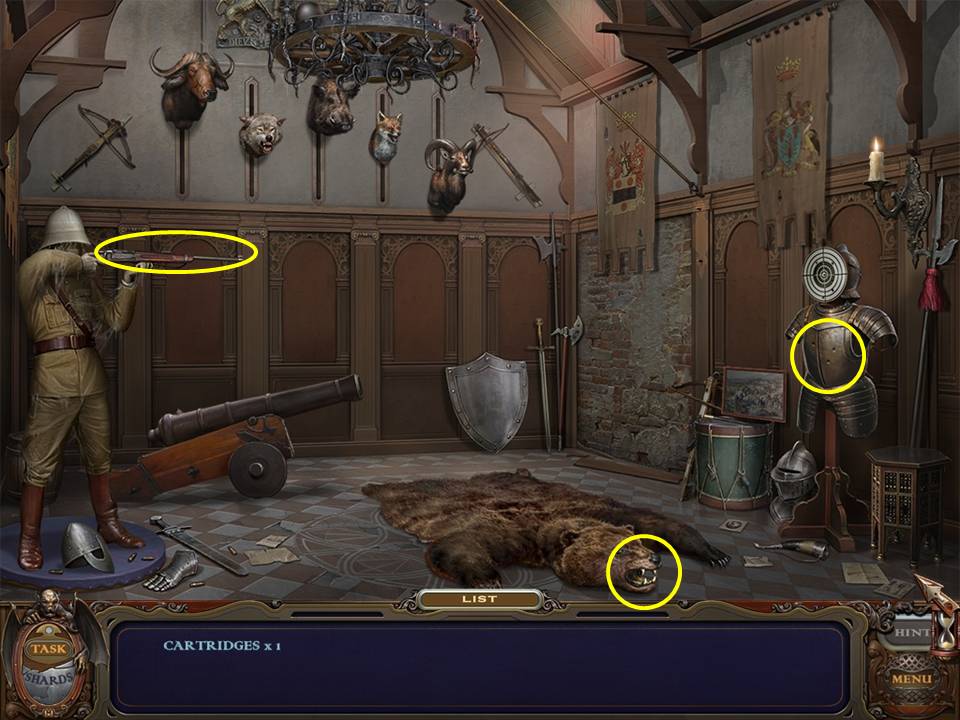
Zoom in on the bear rug. Pick up a second CARTRIDGE.
Zoom into the hunter on the left.
Place the 2 CARTRIDGES in the rifle.
After the CARTRIDGES are in place, the chest piece on the suit of armor will open revealing the correct positions for the animal heads. Moving from left to right, move the water buffalo to a bottom position. Move the wolf to a top position. Move the warthog to a center position. Move the fox to a bottom position. Move the gazelle to a top position. When the animal heads are in the proper place, a compartment beneath the heads will open.
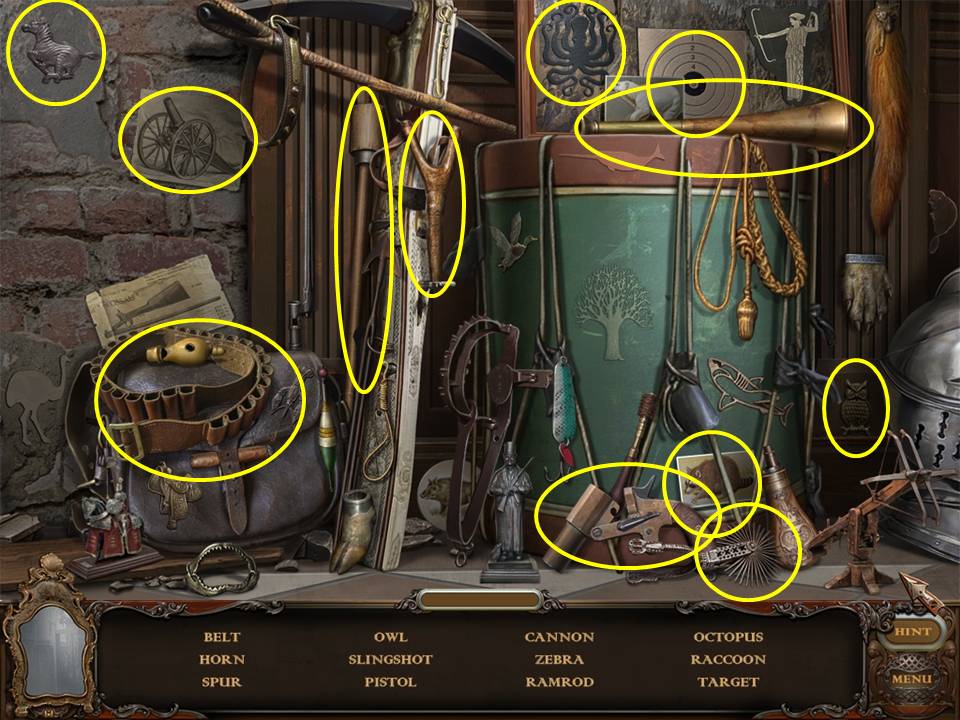
Click on the drum in the Armory to play a Hidden Object Area.
Find the items listed.
Find and receive the RAMROD.
Return to the Armory.
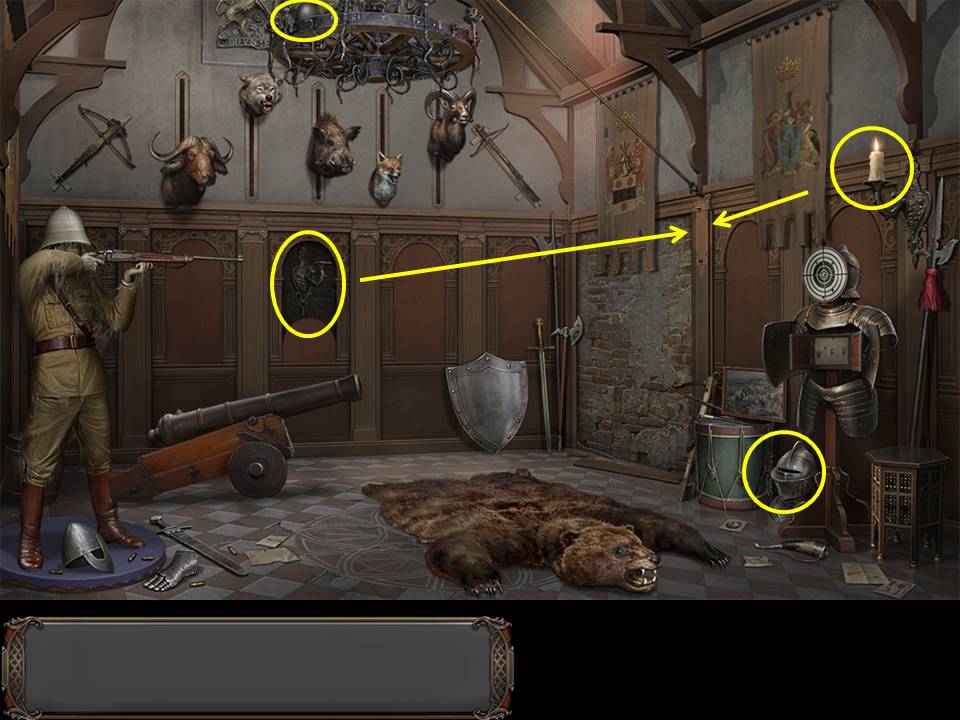
Open the knight's helmet to find the POWDER.
Pick up the CANDLESTICK that's on the CANDLESTICK on the right sconce and place it in the left sconce on the right wall under the rope holding the chandelier.
Place the CANDLE in the CANDLESTICK.
Take the CANNONBALL from the fallen chandelier.
Zoom into the cannon.
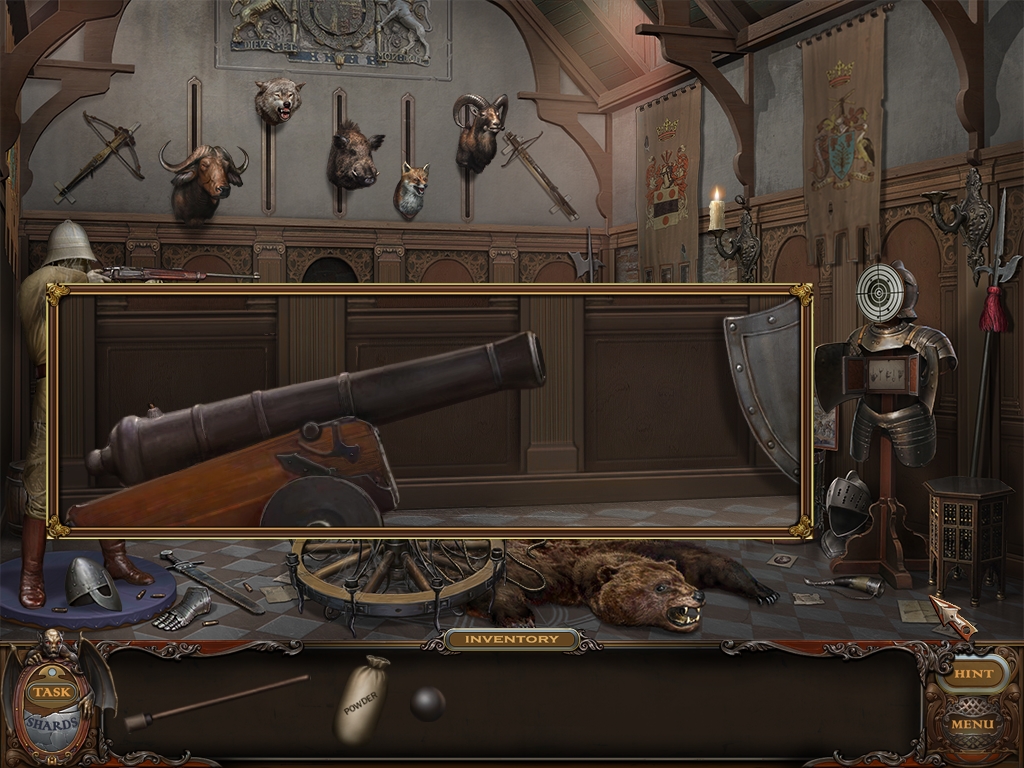
Place the POWDER into the cannon opening. Use the RAMROD to push the powder into the cannon. Insert the CANNONBALL.
Remove the lit CANDLE from the CANDLESTICK. Ignite the wick on the cannon.
The cannon will blow a hole in the wall, revealing a SHARD. Pick up the SHARD.
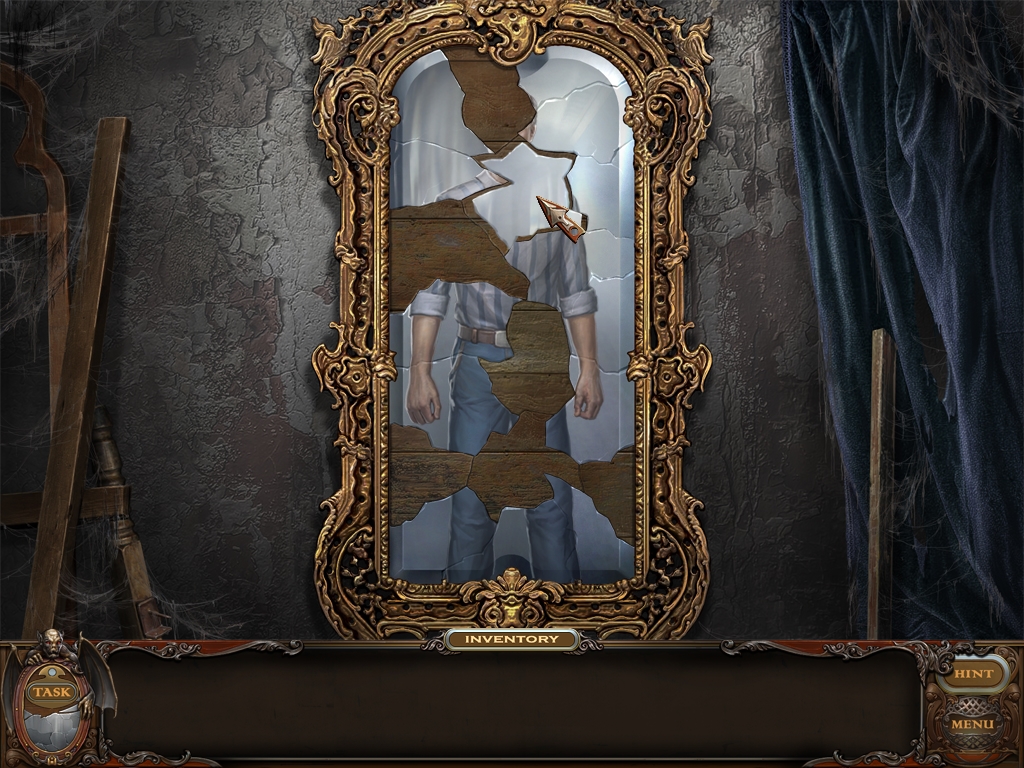
Place the SHARD into the appropriate space in the mirror.
Return to the Armory.
Click on the shield to initiate a mini-game.
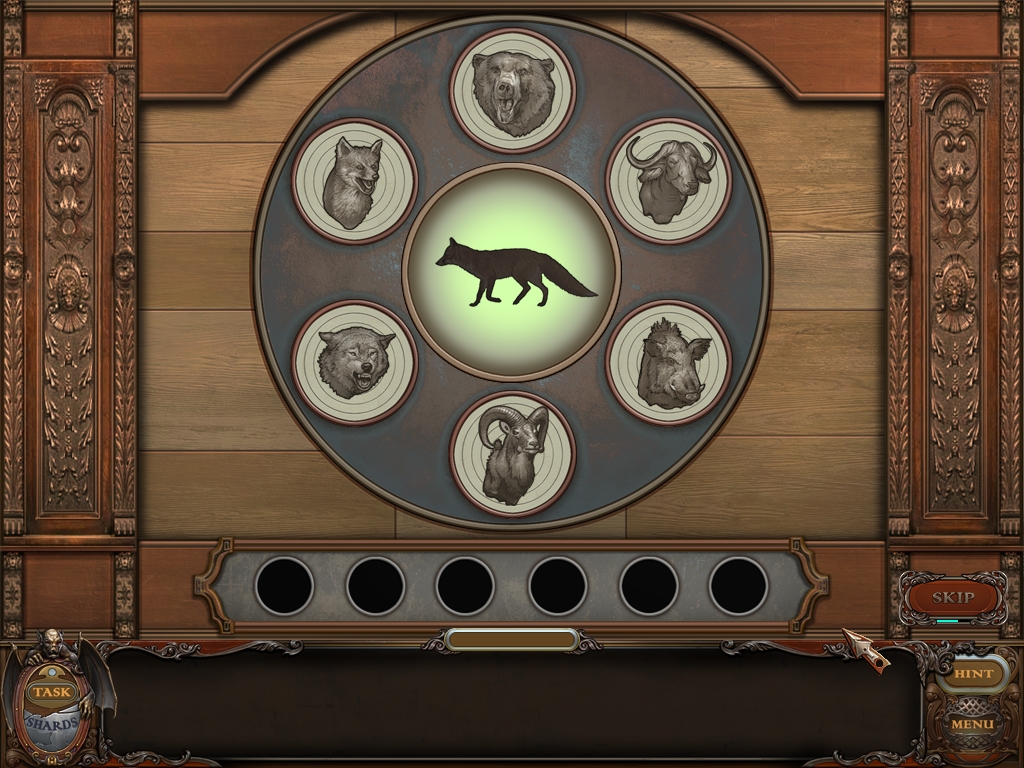
The shield displays an animal in the center. Click on the matching trophy head as each appears. This game has several random solution variations. Not all animal heads will be used in each game play and some may be used more than once.

Click on the shield. Left click and hold to brush the dust off the shield.
You progress is reported in a percentage at the top of the screen.
When completed, enter the Observatory.
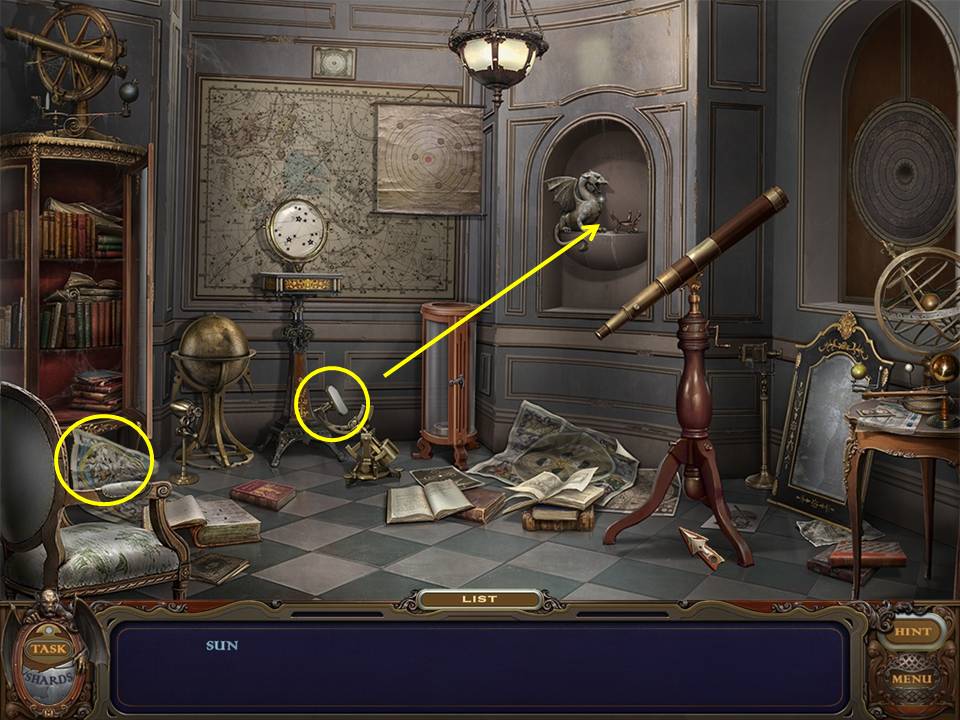
Move the map on the floor just above the chair to find the SUN.
Zoom into the light reflector.
Click on the reflector until the beam of light hits the dragon. The dragon will emit fire.
Insert the SUN in to the stand next to the dragon. When the SUN glows, remove it from the fire.
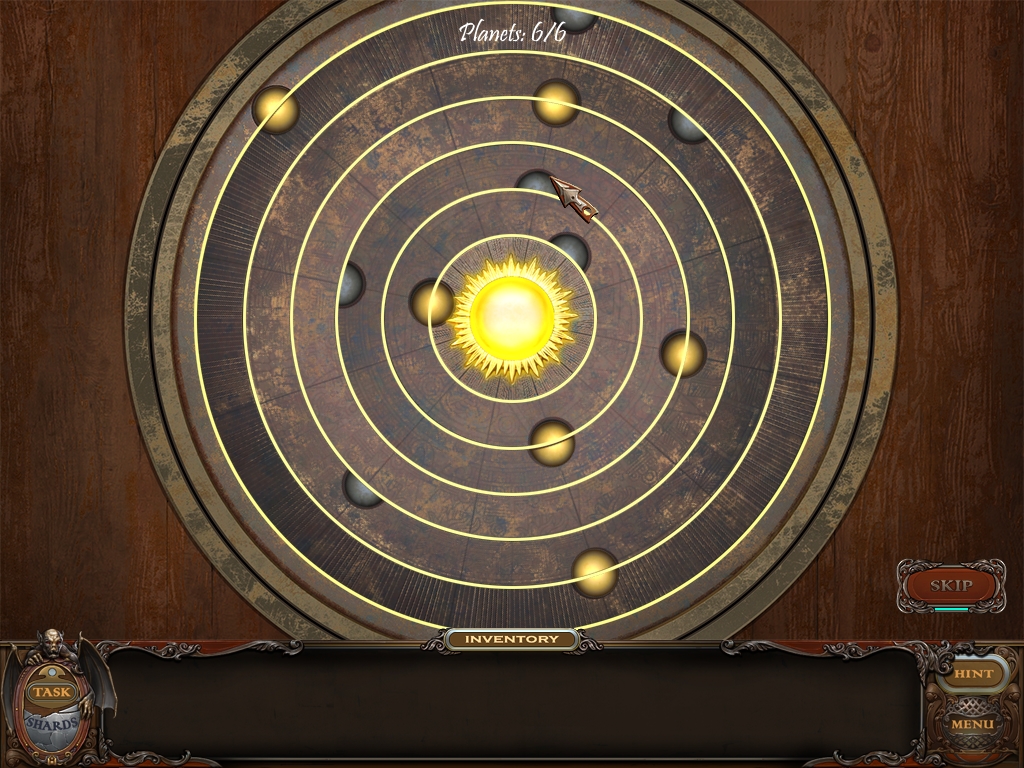
Zoom into the round puzzle on the right.
Insert the SUN in the center of the puzzle.
Click to rotate the rings until 6 planets glow gold.
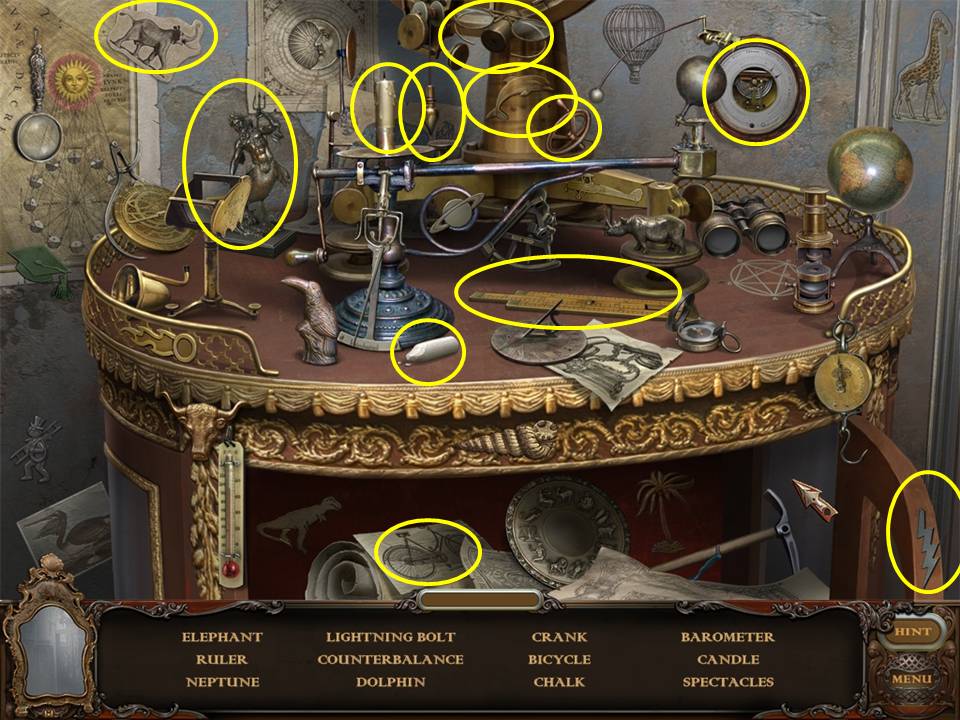
Play the Hidden Object Area.
Find all the listed items.
Find and receive the CRANK.
Return to the Observatory
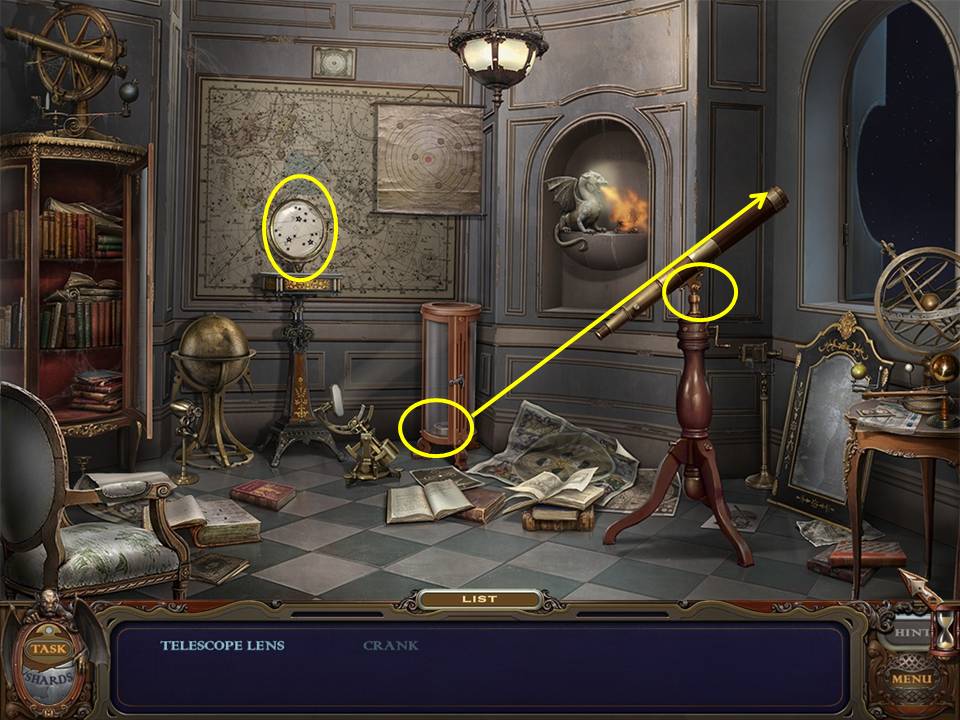
Zoom into the glass case positioned against the back wall.
Click on the latch and then the door to open the case.
Pick up the LENS.
Zoom into the telescope.
Place the LENS on the end and the CRANK in the center.
Zoom into the chart magnifier on the wall map.
Look through the telescope.
Click to move the telescope's view to one that matches the star chart from the chart magnifier.

Play the Hidden Object Area.
Find the items listed.
Find and receive the ICE AXE.
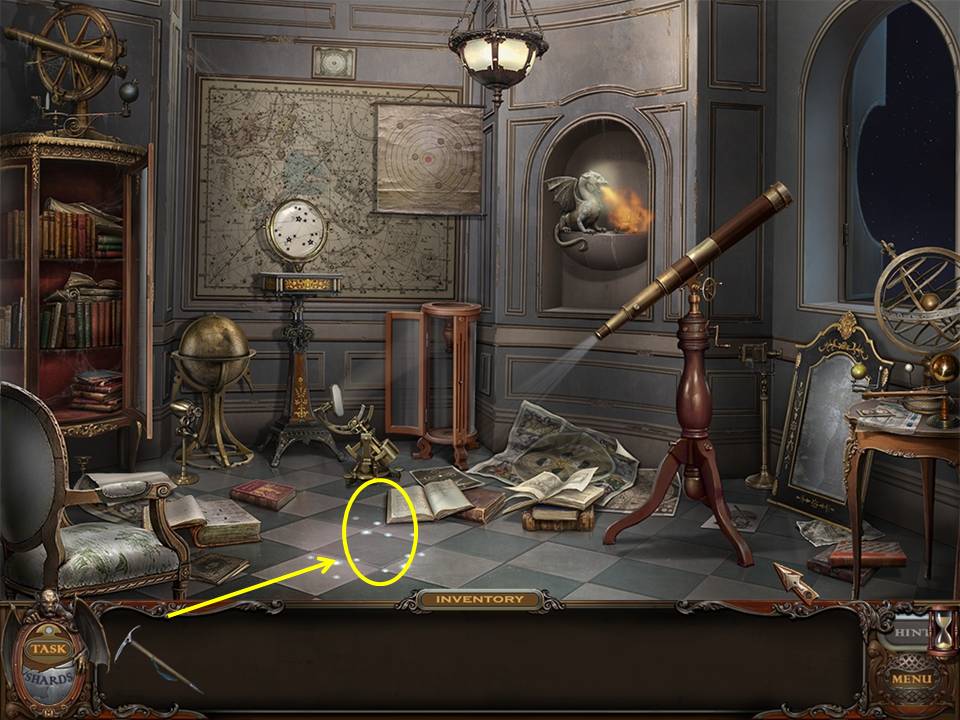
Use the ICE AXE on the tile highlighted by the telescope. A SHARD will be revealed. Take the SHARD.

Place the SHARD into the appropriate space in the mirror.
Return to the Observatory.

Click on the mirror. Left click and hold to brush the dust off the mirror and the frame.
You progress is reported in a percentage at the top of the mirror.
When completed, enter the Bedroom.
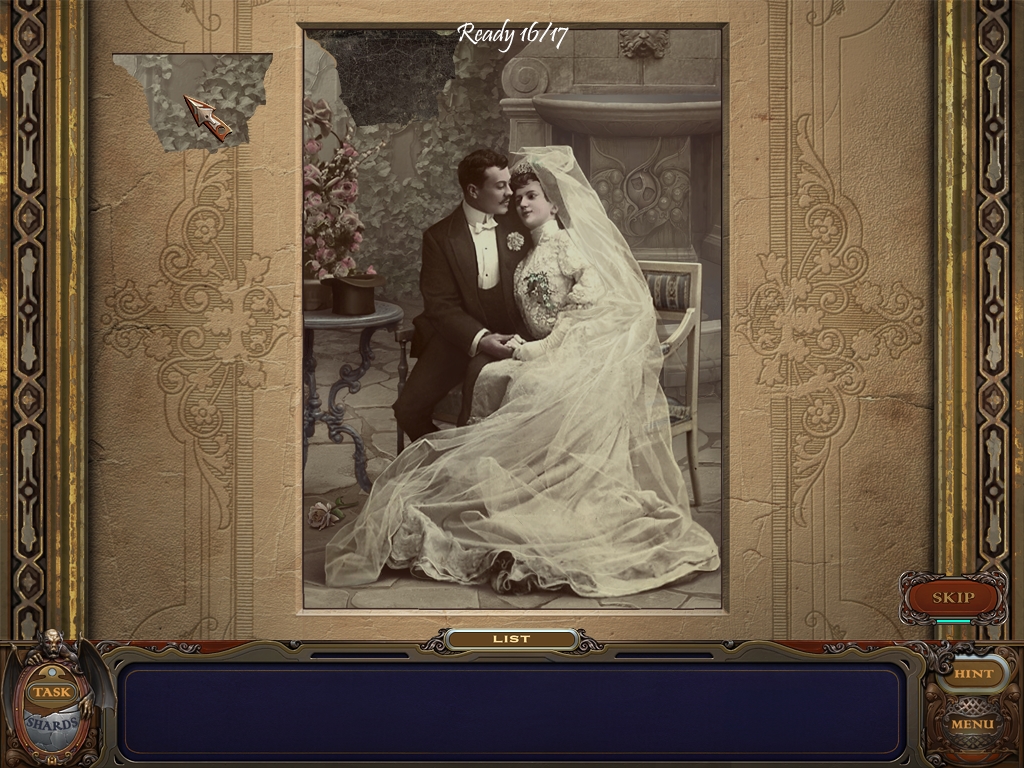
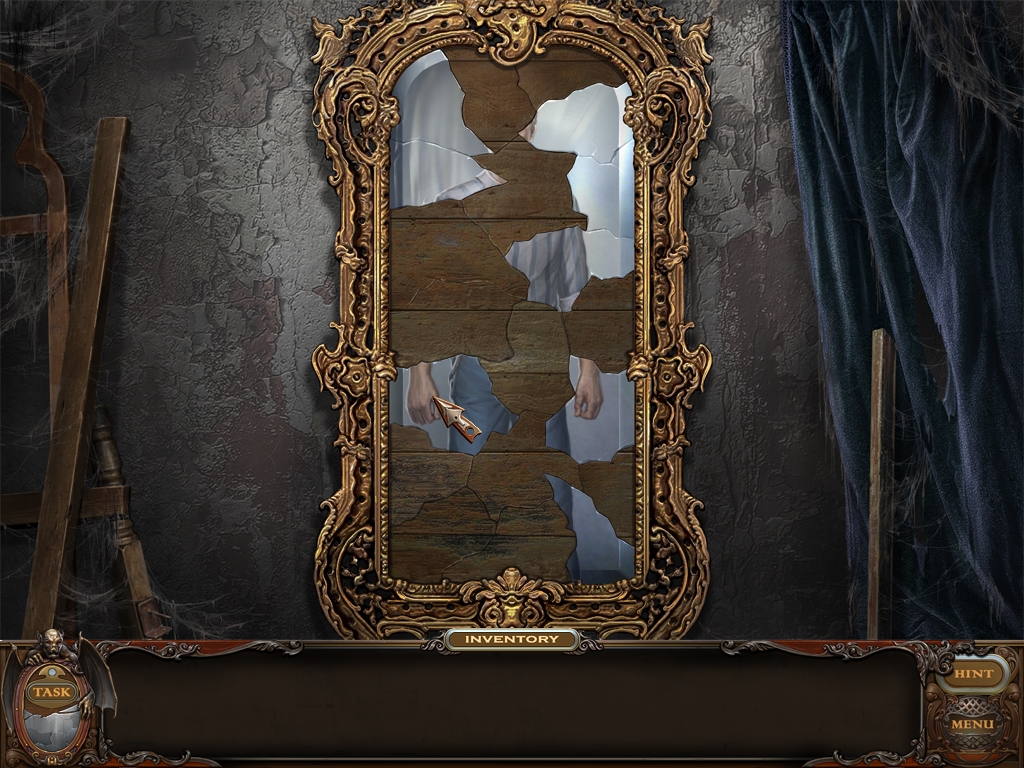
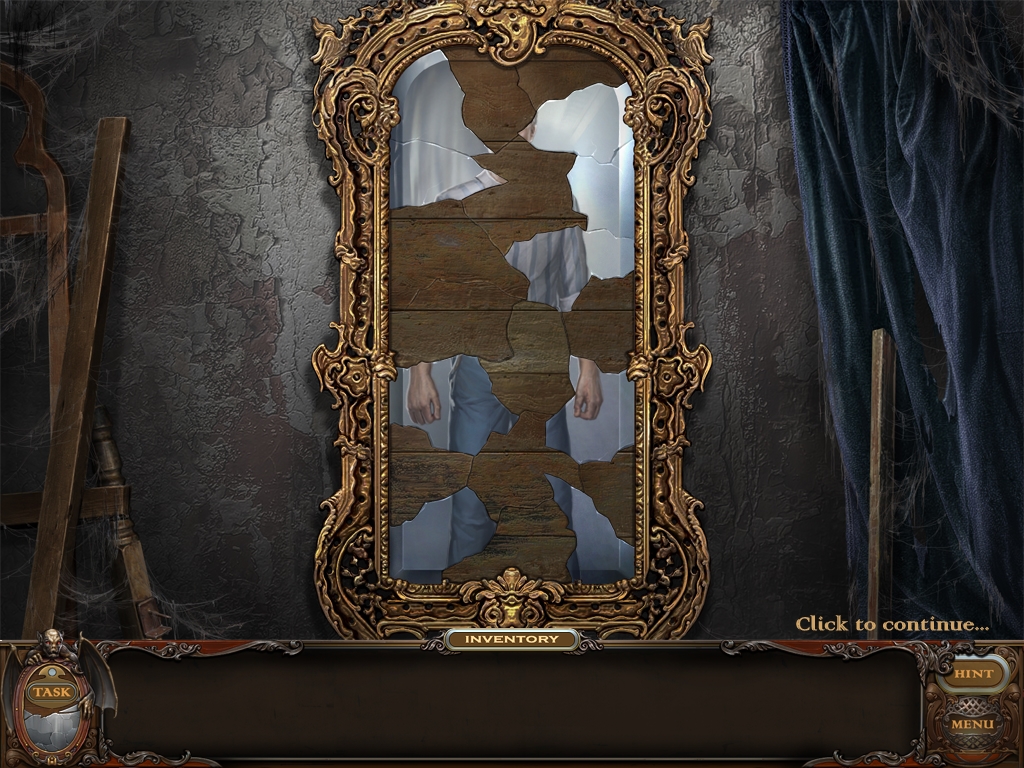
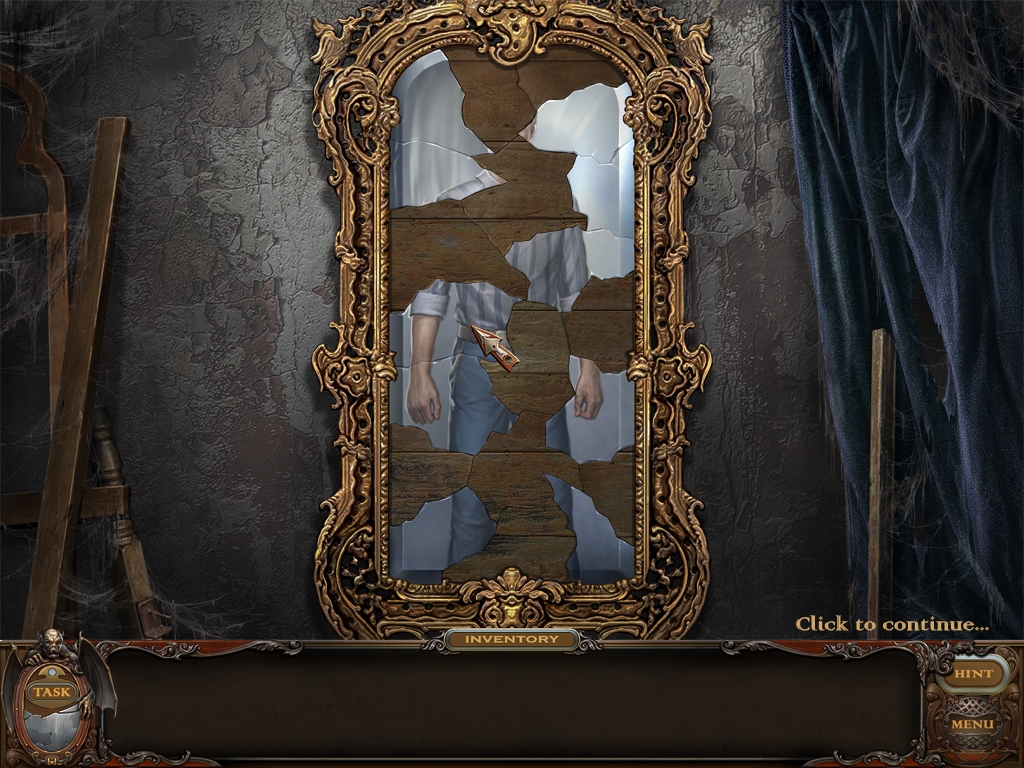
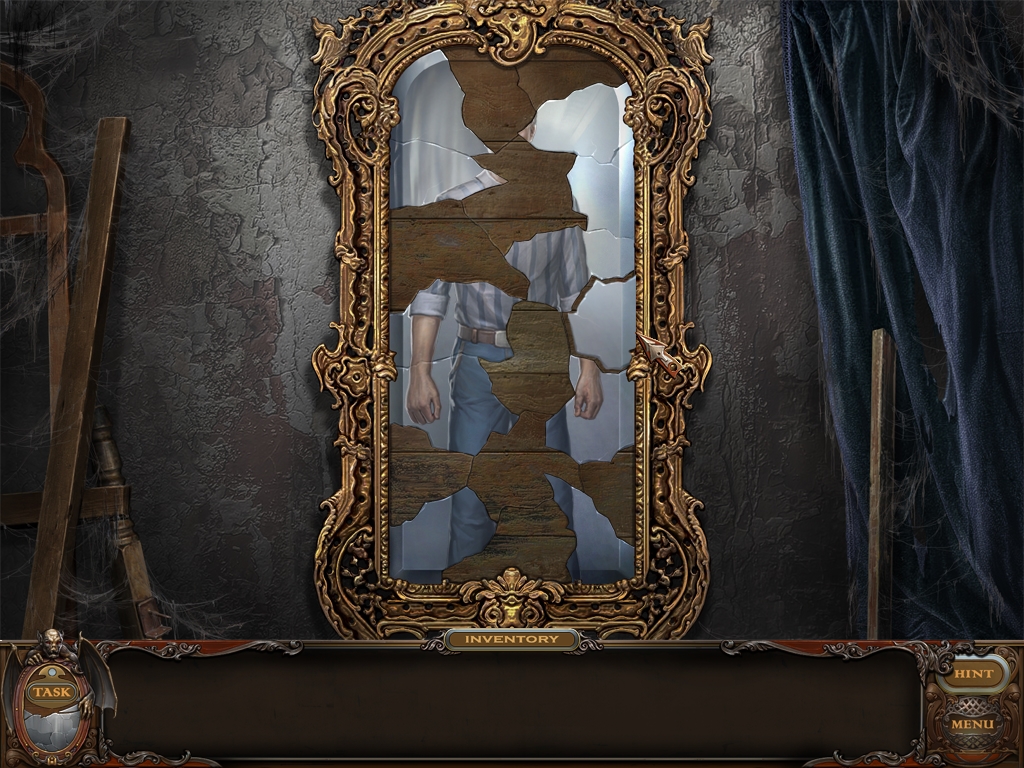
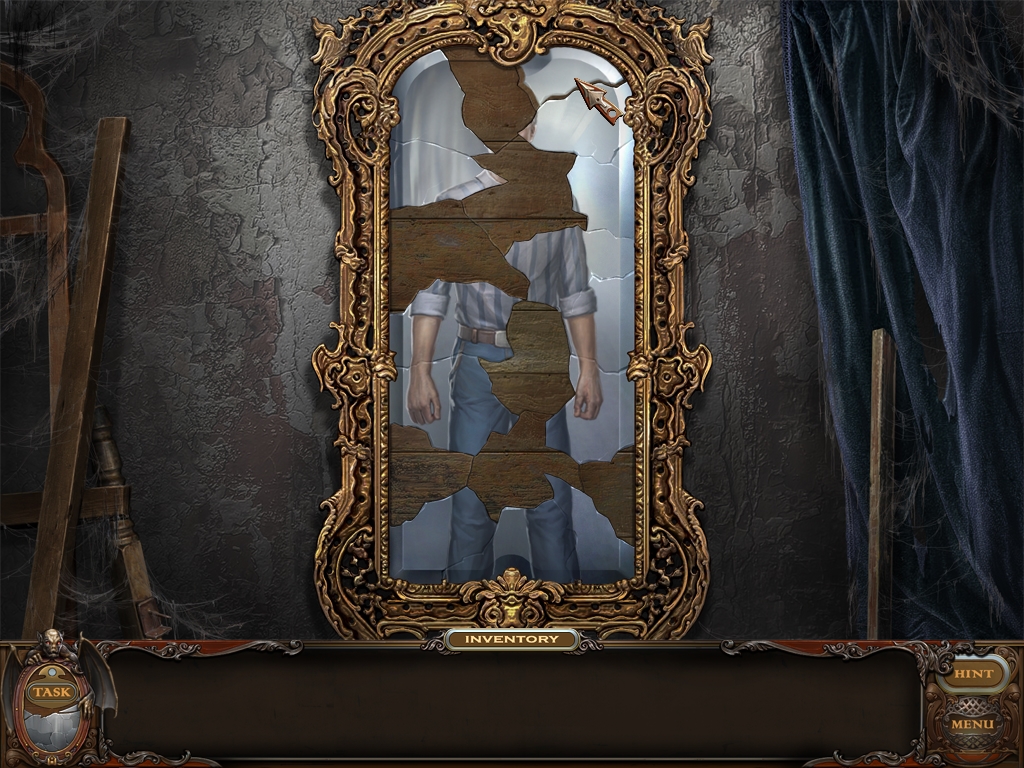
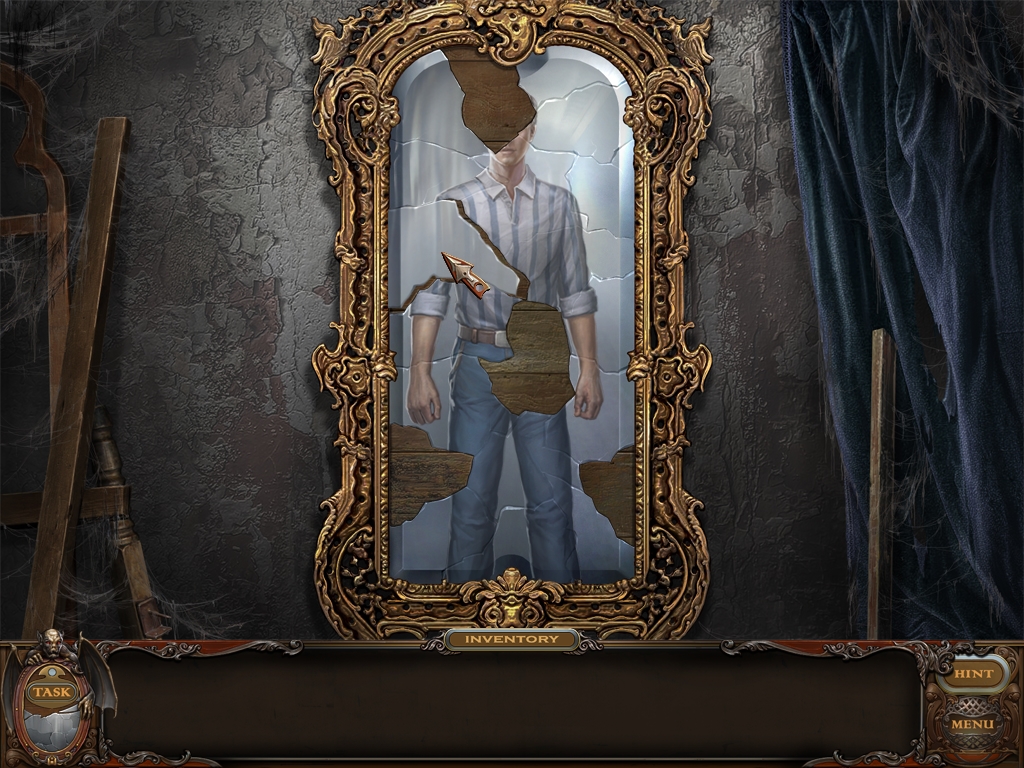
Click on the photo at the bottom far right corner of the screen.
Drag and drop the fragments to reassemble the photo.
Return to the Bedroom.
Click on the green chair to play a Hidden Object Area.
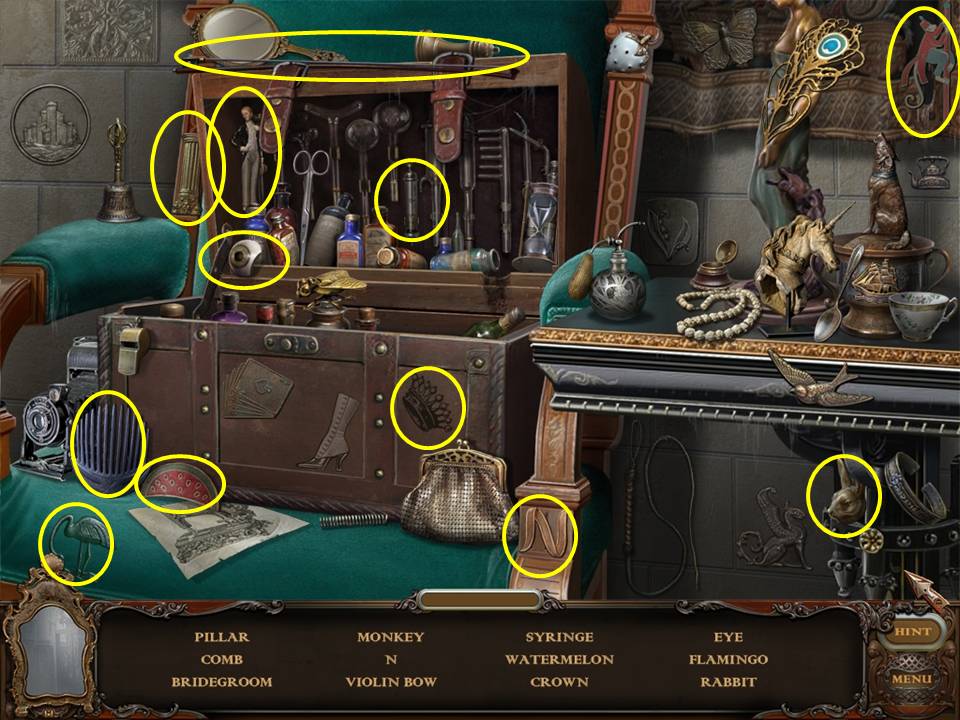
Find the objects listed.
Find and receive the BRIDEGROOM.
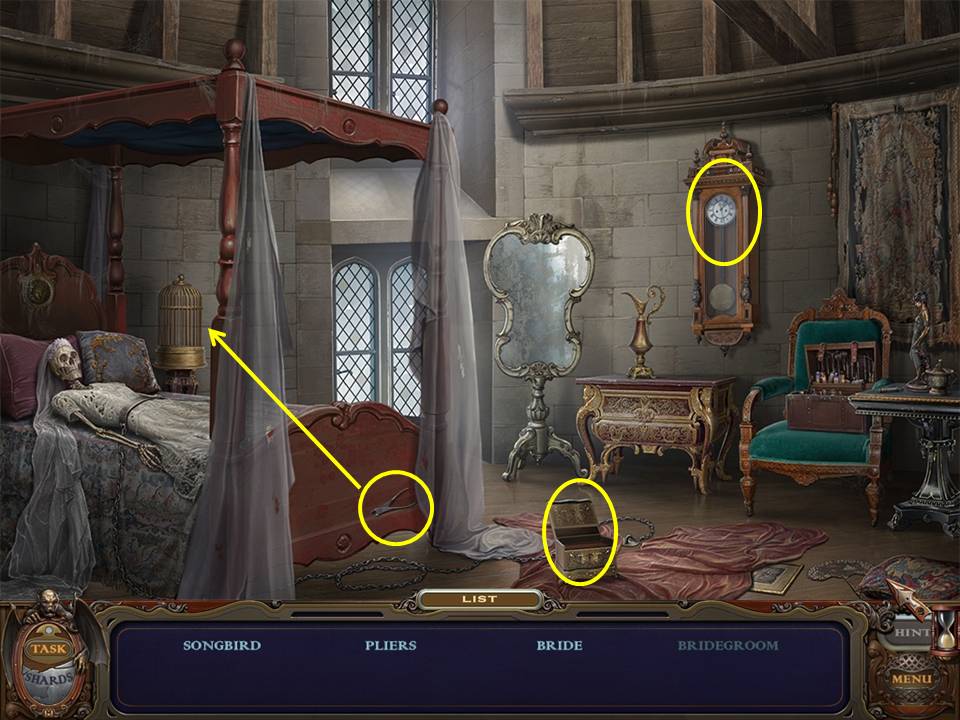
Pick up the PLIERS
Zoom into the bird cage.
Cut three bars with the PLIERS. Pick up the BIRD.
Zoom into the clock.
Pick up the BRIDE. Put the BIRD in her place.
Return to the Bedroom and zoom into the music box on the floor.
Place the BRIDE on the left and the BRIDEGROOM on the right.
Push the button. As the figures meet in the center, a flap will open, revealing a RING. Pick up the RING.
Return to the Bedroom and play the Hidden Object Area again.
Find the objects listed.
Find and receive the ACID.
Return to the Bedroom.
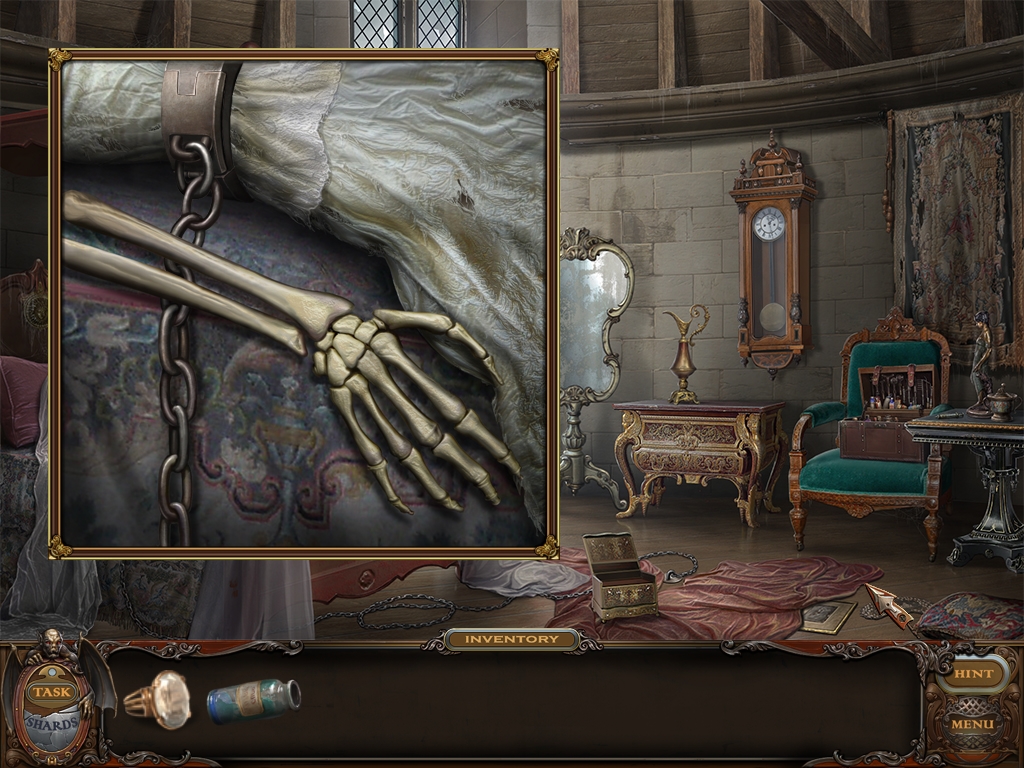
Zoom into the skeleton on the bed.
Pour the ACID on the chain.
Place the RING on the skeleton's finger.
Move the veil aside to reveal a SHARD. Take the SHARD.
Place the SHARD into the appropriate space in the mirror.
Return to the Bedroom.
Click on the mirror. Left click and hold to brush the dust off the mirror and the frame.
You progress is reported in a percentage at the top of the mirror.
When completed, enter the Sarcophagus.
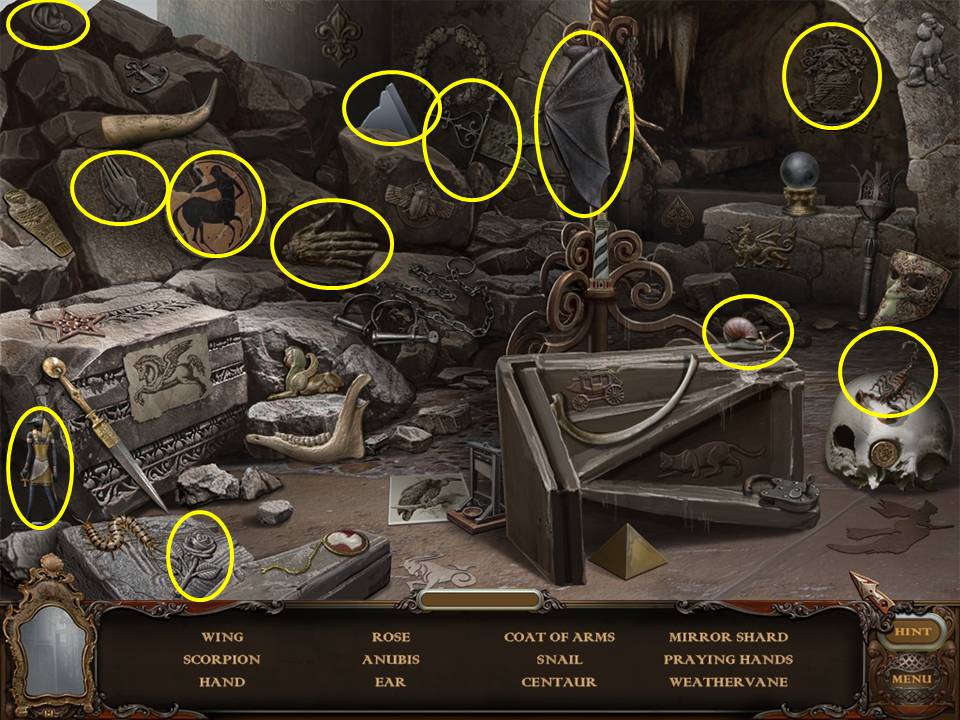
Play the Hidden Object Area.
Find the listed items.
Find and receive a SHARD.
Place the SHARD into the appropriate space in the mirror.
Return to the Sarcophagus.
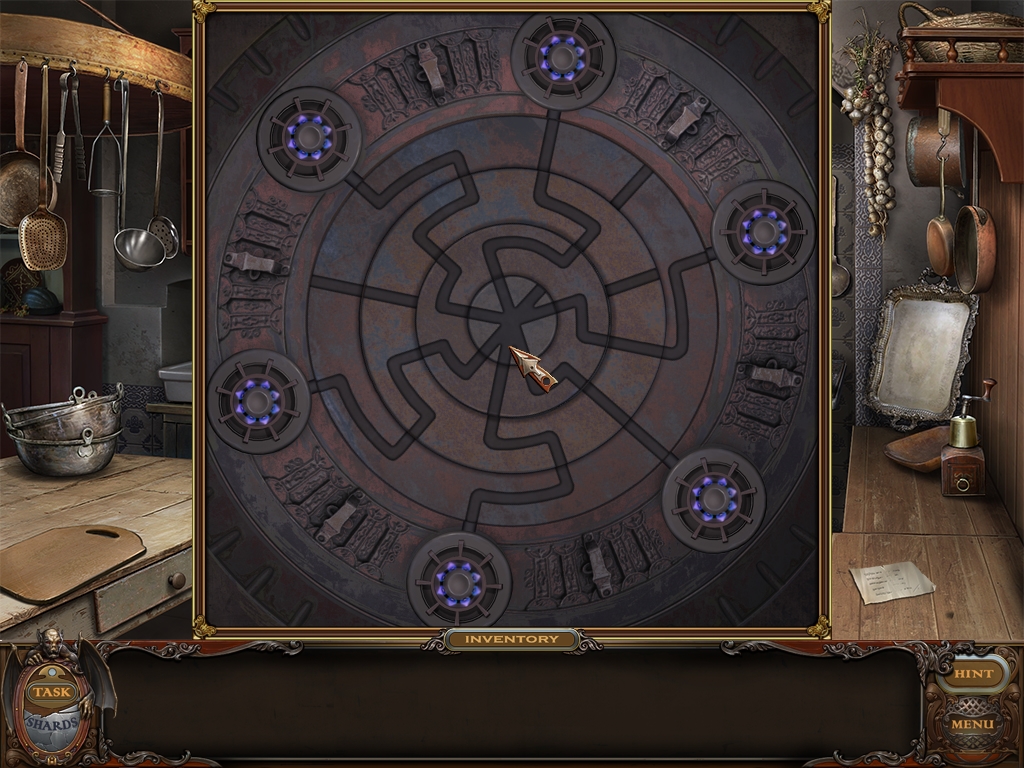
Click on the carved stone in the upper right corner.
Click on the circles to rotate them into place to show a completed design. A completed puzzle is shown in the screen shot. The best way to solve this puzzle is to focus on the stationary background design. As you rotate the circles, watch how the colors line up with the background.
Receive a SHARD upon completing the puzzle.
Place the SHARD into the appropriate space in the mirror.
Return to the Sarcophagus.
Play the Hidden Object Area again.
Find the listed items.
Find and receive a SHARD.
Place the SHARD into the appropriate space in the mirror.
You now have one SHARD remaining.
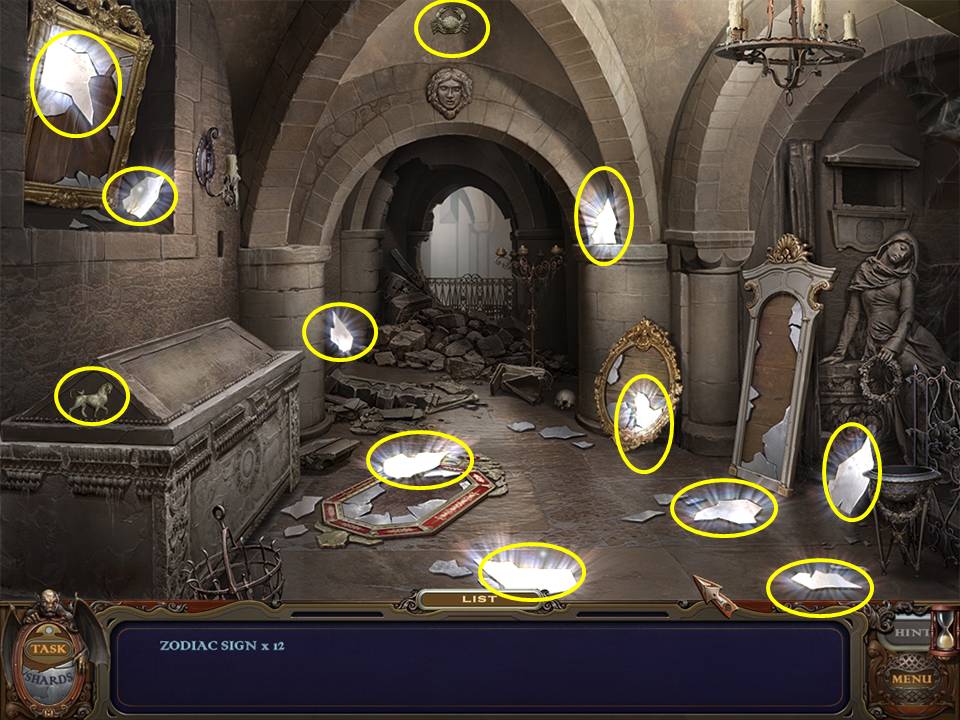
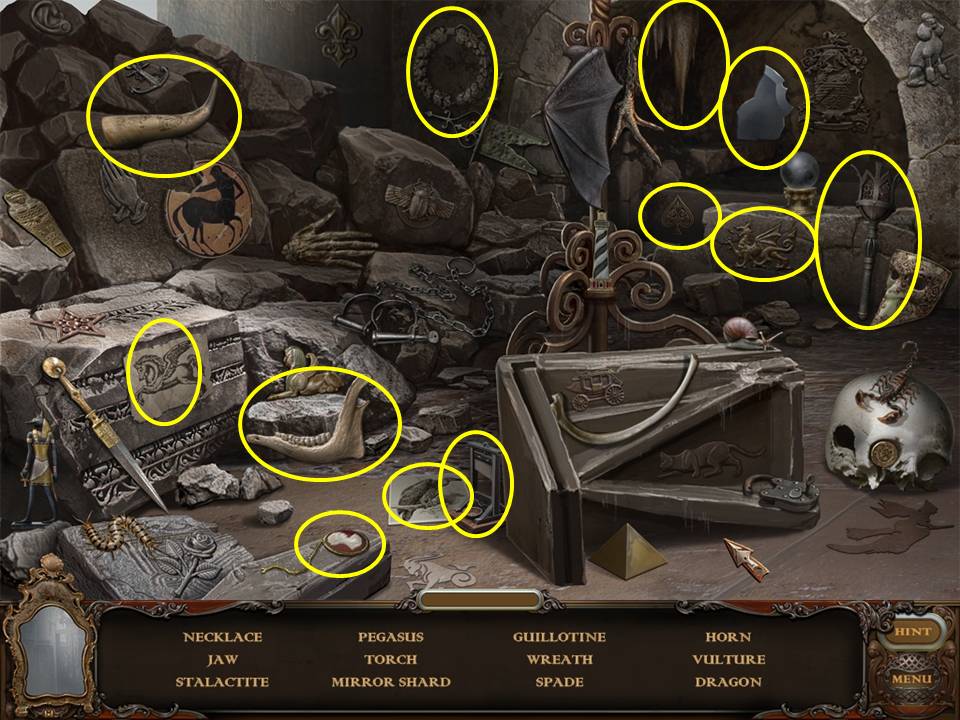
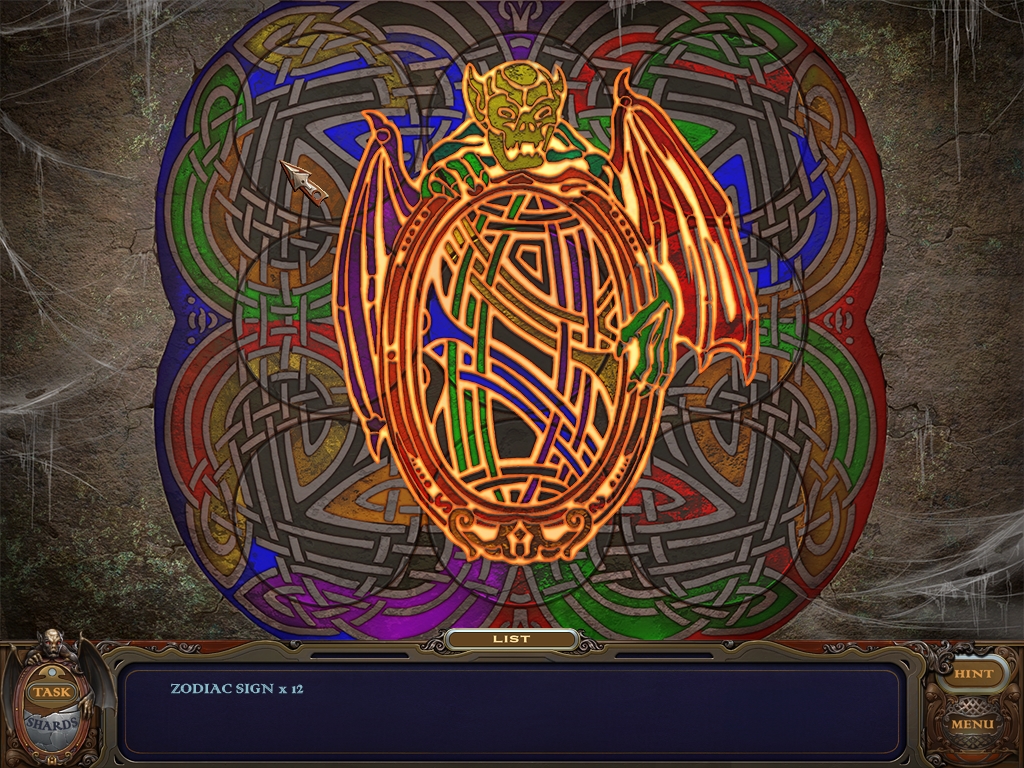
Return to the Sarcophagus to discover 10 glowing shards. Each will take you back to a Hidden Object Area where you will find the items listed as well as 10 of 12 ZODIAC SIGNS. Don't forget that the Sarcophagus area itself contains your first two ZODIAC SIGNS (Cancer and Leo). You may click on the shards and play the resulting Hidden Object Areas in any order you desire.
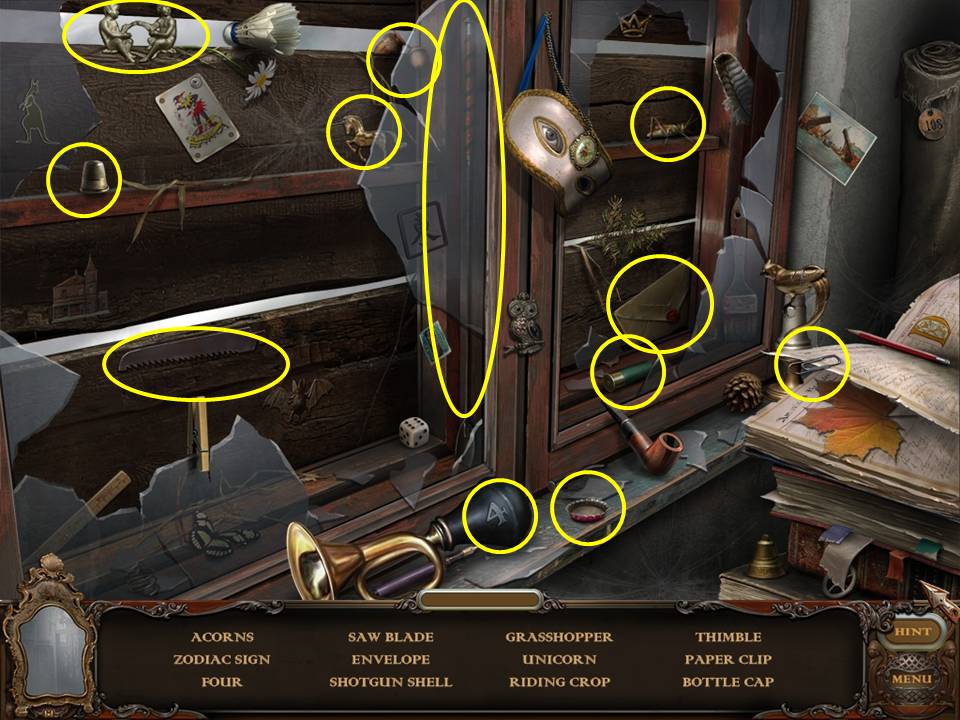
Find the items listed.
Find the Gemini twins.
Find the items listed.
Find the Taurus bull.
Find the items listed.
Find the Aries ram.
Find the items listed.
Find the Aquarius water bearer.
Find the items listed.
Find the Pisces fish.
Find the items listed.
Find the Virgo virgin.
Find the items listed.
Find the Capricorn goat.
Find the items listed.
Find the Sagittarius archer.
Find the items listed.
Find the Scorpio scorpion.
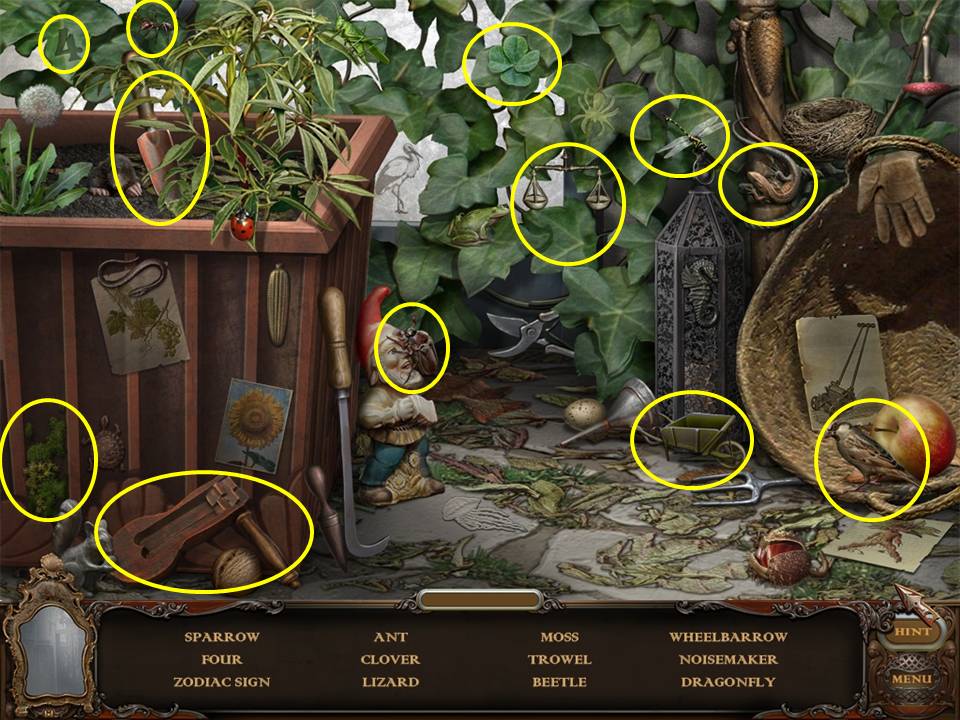
Find the items listed.
Find the Libra scales.
Return to the Sarcophagus. Click on the front.
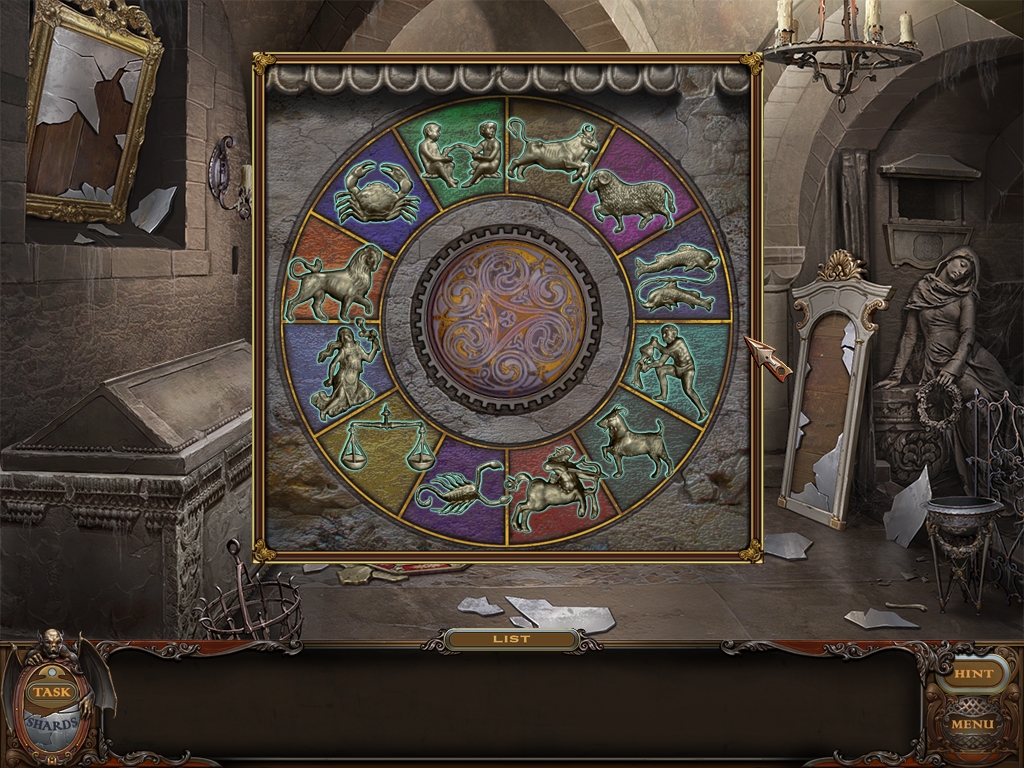
Place each ZODIAC SIGN into its appropriate space.
The Sarcophagus lid slides back, revealing the last SHARD. Receive the final SHARD.
Place the SHARD into the appropriate space in the mirror.
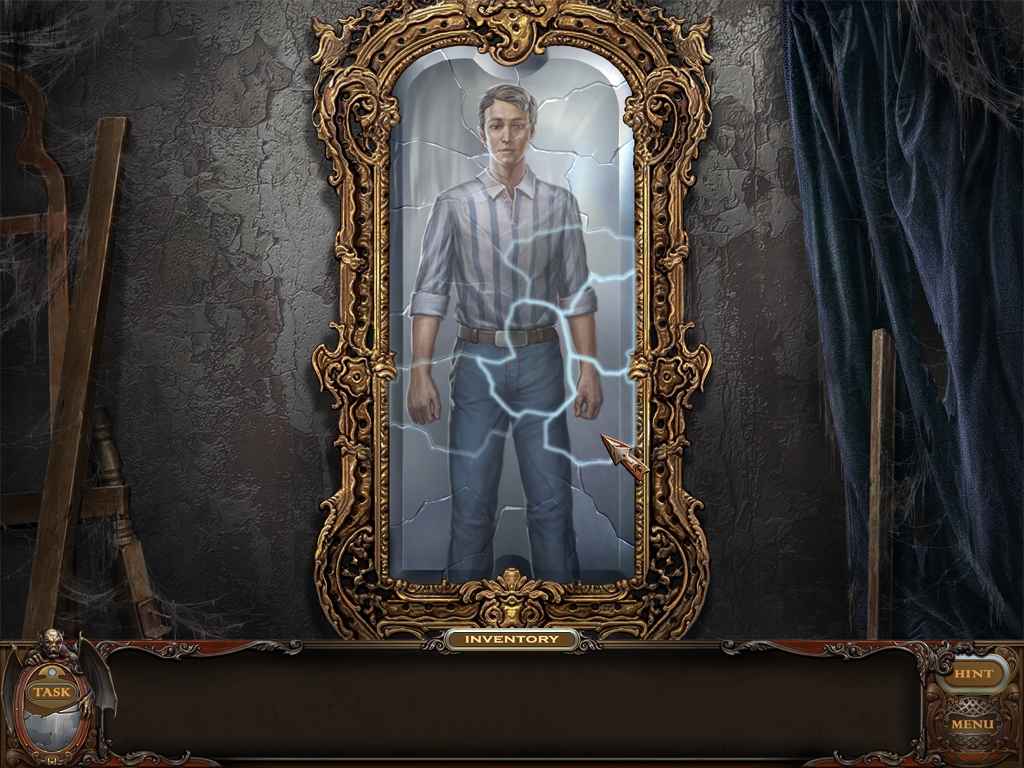
Congratulations!
Content(s) of this game guide may not be copied or
published on any other site without permission from Casual Game Guides.
©CasualGameGuides.com 2006 - 2021