


Introduction to the Totem Tribe Gold (Extended Edition) Walkthrough.
In this game you will explore interesting lands, build up an
army as needed, and battle unusual enemies, all the while looking for
hidden items. This game provides many, many hours of great
fun. Each level in the walkthrough provides you with detailed
instruction and complete maps. Find your level below and have
fun!
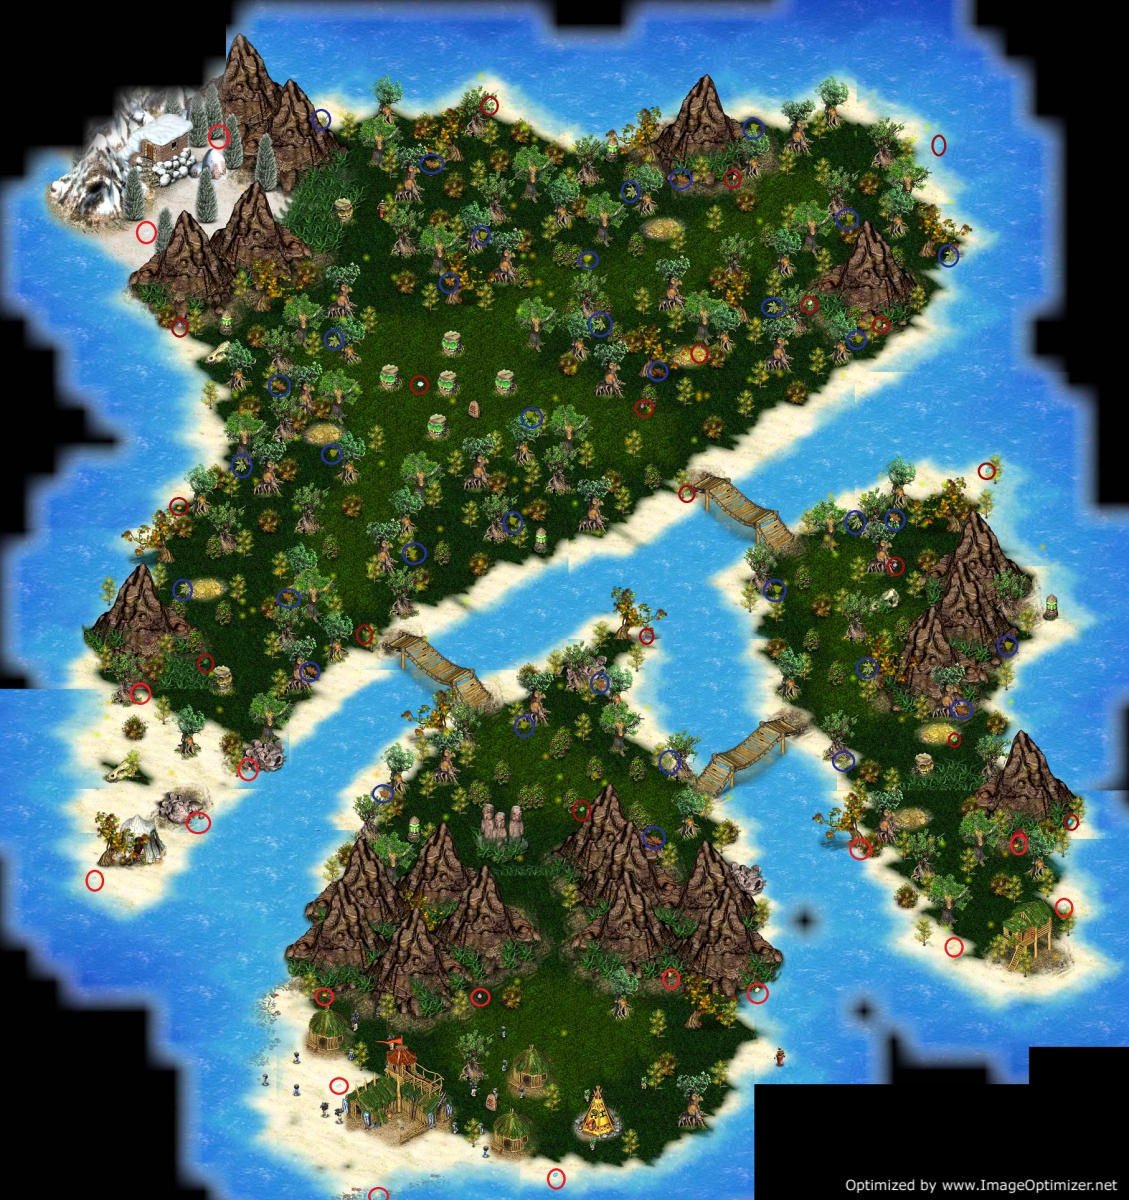
TETALA ISLAND - Chapter 1
TOP
MUSHROOM ISLAND - Chapter 2
TOP
DOLPHIN ISLAND -Chapter 3 .
TOP
MONKEY ISLAND - Chapter 4
TOP
LIANA ISLAND (interlude)
TOP
SEAGULL ISLAND - Chapter 5
TOP
RED ROCK ISLAND - Chapter 6
TOP
GREAT DESERT (interlude)
TOP
THE OASIS (interlude)
TOP
Abandoned City - You might want to wait to do this level until you have a stronger army; you don't need to do it until you need the last scarab and/or Gem of Power. Click here to get to its walkthrough.
WITCH ISLAND - Chapter 7
TOP
Hold off on Blueberry Island until you need feathers and need shark teeth
SKULL ISLAND - Chapter 8
TOP
FROZEN VALE ISLAND - Chapter 9
TOP
Return to Witch Island now to get an Antique Coin and the Sphere of Clarity.
ISLAND OF YETI - Chapter 10
TOP
RIMY ISLES (interlude)
TOP
CRADLE OF THE NORTH - Chapter 11
TOP
MIST ISLAND - Chapter 12
TOP
LONELY ICEBERG (interlude)
TOP
SCORCHED ISLAND - Chapter 13
TOP
VOLCANO ISLAND - Chapter 14
TOP
BEETLE ISLAND - Chapter 15
TOP
You should have all scarabs except one from Abandoned City (unless you have done it already)
ABANDONED CITY (interlude0
TOP
Return to Tetala Island
THE GAZING CANYON (interlude)
TOP
THE PYRAMID (interlude)
TOP
FIREFLY ISLAND (interlude)
TOP
SHARK ARCHIPELAGO - Chapter 16
TOP
GHOST ISLAND (interlude)
TOP
ISLAND OF WORSHIP - Chapter 17
TOP
Return to Lonely Iceberg
TOP
Return to Skull Island
THE PYRAMID--Part II
TOP
You should have 3 rosaries, white oil, and black oil. If you don't have the white oil, go back to Blueberry Island; if you need the black, go back to Ghost Island.
Return to the Great Desert
THE RUINS OF DREAM SHORE - Chapter 18
TOP
Return to Firefly Island
TOP
Before you enter the comet, you will want to finish everything else off.
You will need to find ALL 101 gems to build the Rainbow Road and access the Guardian Moon.
If you are super keen on your score, at the end there is a score for percentage of the world explored. I'm not sure which counts more, a shorter length of time or a more complete exploration. I got lazy and went for a shorter length of time.
GUARDIAN MOON
TOP
INSIDE THE COMET - Chapter 20
THE TREASURES
1. Bracelet of the Hawk - Island of Yeti. All of your followers are trained 20% faster.
2. Crown of Defender - Scorched Island. Towers are built 25% faster.
3. Diadem of Courage - Dolphin Island. Your fighters deal 20% more damage.
4. Necklace of Spirits - Beetle Island. Shaman have 25% more health and slowly regenerate it.
5. Hunter's Lucky Stone - Red Rock Island. Your hunters move 10% faster and deal 10% more damage.
6. Tribal Amulet- Ruins of Dream Shore. Your cavemen move 20% faster.
7. Amulet of Wisdom - Mist Island. You do research 25% faster.
8. Pendant of Power - Cradle of the North. You have a 10% chance to use magic without losing the spell.
9. Pendant of Nature Force - Monkey Island. You have a 7% chance to complete building construction immediately.
10. Vial of Longevity - Ghost Island. All your people become 20% more healthy.
11. Sphere of Clarity - Witch Island. Your archers can shoot 10% farther.
12. Blessed Ring - Volcano Island. Witch doctors and shaman receive 15 armor points.
13. Magnifying Glass - Tetala Island and The Pyramid. This helps when looking for gems.
14. Healer's Globe - Frozen Vale Island. All of your witch doctors have 20% more health points and move 20% faster.
15. Harpoon - Lonely Iceberg. Your scouts get the ability to fight in water.
16. Aqualung - Shark Archipelago. Your scouts are able to swim.
17. Masking Cloak - Island of Worship. Enemies cannot spot your scouts.
18. Traveller's Boots - Skull Island. All of your people move 25% faster.
19. Relic of Prosperity - Guardian Moon. You get +1 inhabitant in every dwelling.
20. Heart of Bull - Seagull Island. All of your people regenerate 20 health points per second.
OTHER ITEMS
- Tetala Island - Chapter 1
- Mushroom Island - Chapter 2
- Dolphin Island - Chapter 3
- Monkey Island - Chapter 4
- Liana Island (interlude)
- Seagull Island - Chapter 5
- Red Rock Island - Chapter 6
- Great Desert (interlude)
- The Oasis (interlude)
- Witch Island - Chapter 7
- Skull Island - Chapter 8
- Frozen Vale Island - Chapter 9
- Island of Yeti - Chapter 10
- Rimy Isles (interlude)
- Cradle of the North - Chapter 11
- Mist Island - Chapter 12
- Lonely Iceberg (interlude)
- Scorched Island - Chapter 13
- Volcano Island - Chapter 14
- Beetle Island - Chapter 15
- Abandoned City (interlude)
- Return to The Great Desert
- Gazing Canyon (interlude)
- The Pyramid (interlude)
- Firefly Island (interlude)
- Return to the Pyramid
- Shark Archipelago - Chapter 16
- Ghost Island (interlude)
- Island of Worship - Chapter 17
- Return to Lonely Iceberg
- Blueberry Island (interlude)
- The Pyramid--Part II
- Return to The Great Desert, Abandoned City, and The Oasis
- Ruins of Dream Shore - Chapter 18
- Comet Crash Site - Chapter 19
- Guardian Moon (interlude)
- Inside the Comet - Chapter 20
- The levels in the walkthrough are listed in a suggested order. You need to do the chapters in order but the interludes can wait if desired. I tried to do them with the least amount of returning as possible. In addition, you will need to return to some island to pick up feathers, shark teeth, and gems.
- The walkthrough will not tell you to read the guide stones. I expect you to do so, okay? They'll give you hints, so use them!
- I will not be telling you to look for gems. However, each map has all the gems circled in red.
- These maps are kind of big and I didn't want to reduce them so much that you can't see them clearly. You might want to right click on the image as select Save Picture As to save it onto your computer. Then you can open it and look at it a little bit more easily.
- Don't worry too much if part of your tribe dies while fighting unless the enemy is attacking your to your village. You will regenerate. If you fail, just pull back and build more buildings.
- DO worry about your defenses if the enemy comes into the village to attack Aruku and Guro. If they die, you will have to start the level over and you don't want that as you spent a lot of time building already, right?
- You can restart a level as long as you haven't finished the primary goal. Exit out of the level and when you select Play, select No for "Do you want to continue your saved game?"
- There is no limit to building except your patience and the fact that it has to be done one at a time. I usually build everything (except the Sky Hall) and many, many, many Shaman Tents when they become available.
- The Magnifying Glass is very handy to find gems. If a gem is on the screen, you will receive a large circle area to look within. It takes time to recharge though. Start using it to find the last gems on islands you are returning to for other items.
- I'm not going to give you details regarding each building. You don't need it. Just build everything. The walkthrough below will give you any specifics you might need (if there are any).
- Suggested building order is Huts (total of 2 to 3), Scout Lodge, Barracks, Workshop, Archery Range, Arrow Towers (if needed). This will get you the defenses you need. Then you can build as desired.
- Remember that some buildings require others to be built before they are available. The build menu will tell you the prerequisites for each building, so if the building is gray and not green, read the description!
- Finally, be patient! Building can be slow at
times. This is a great game to play while watching TV!
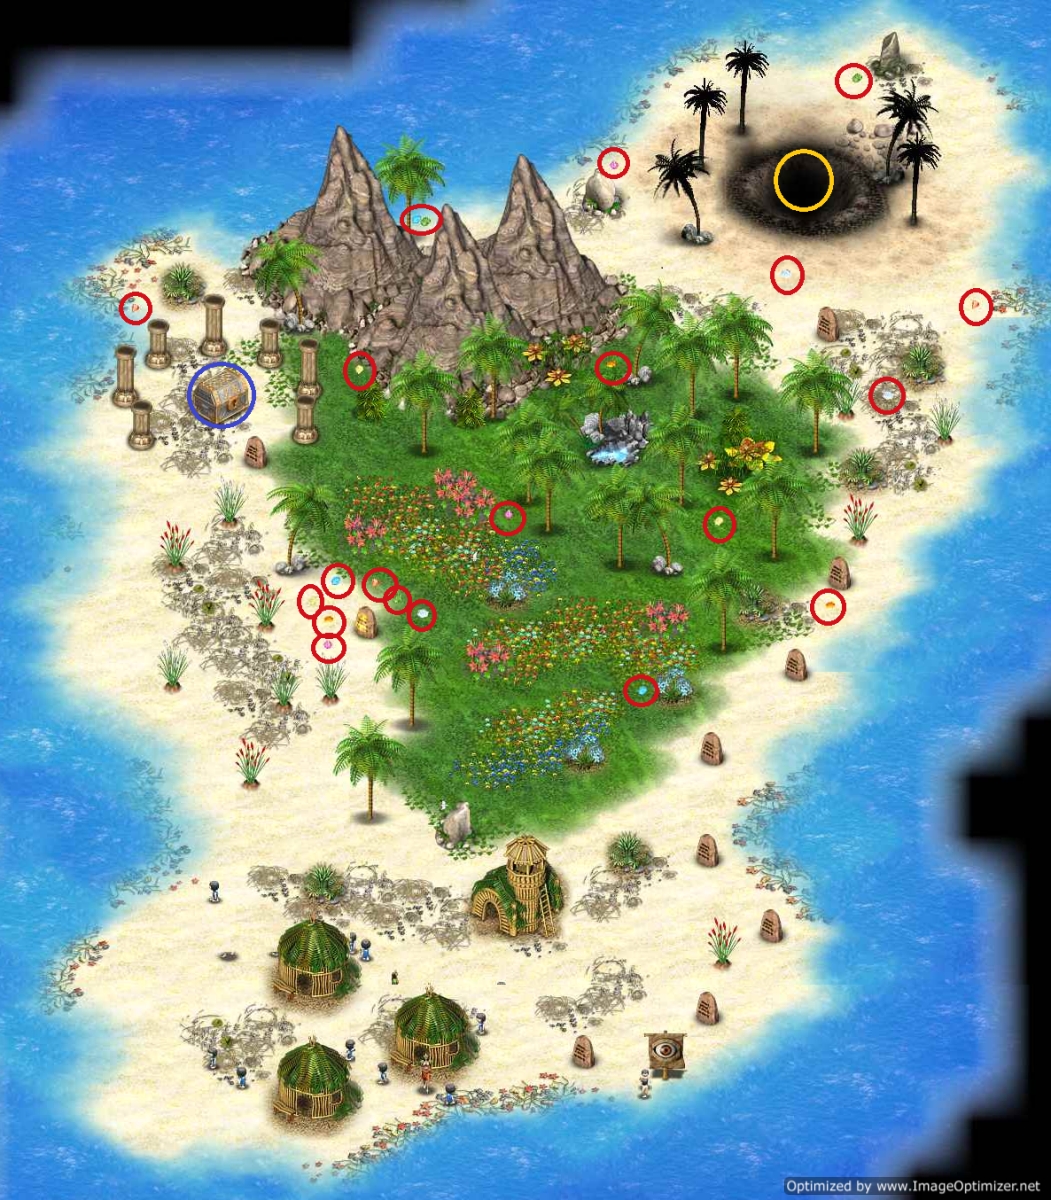
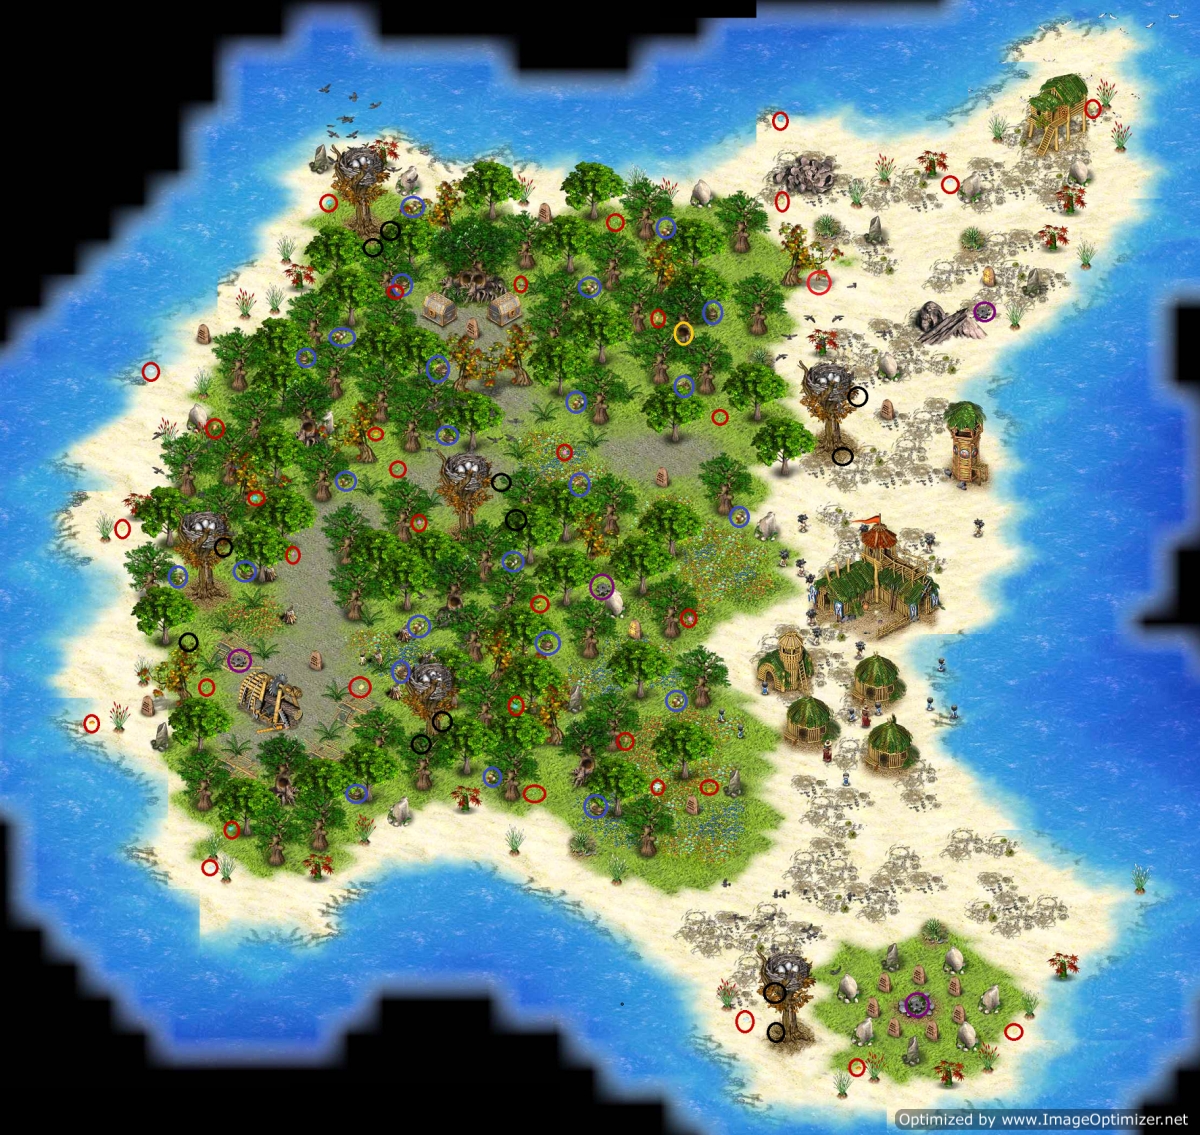
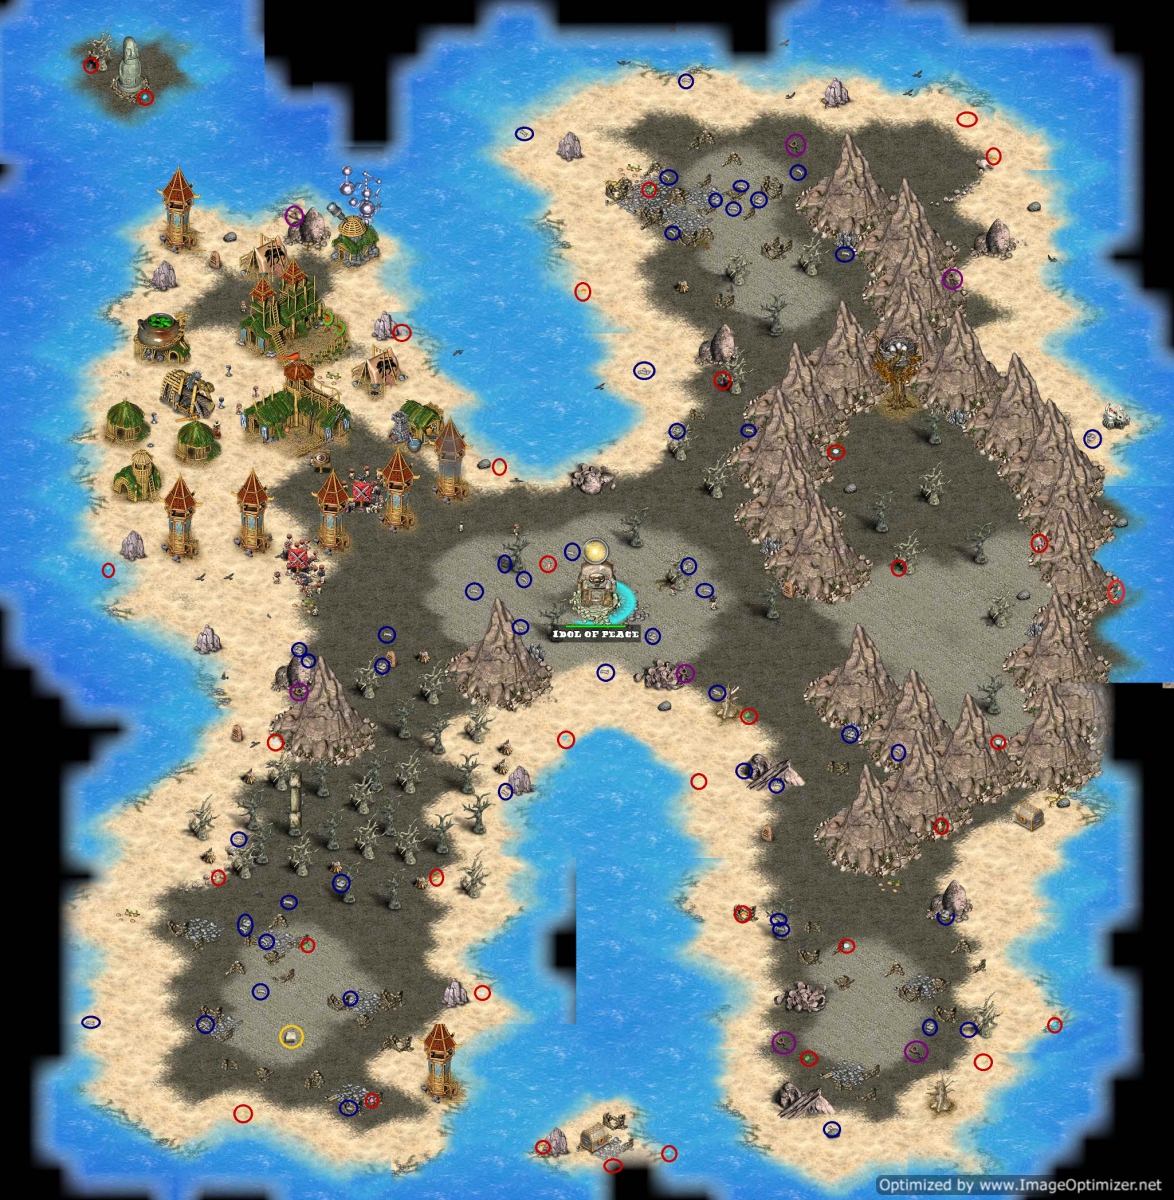
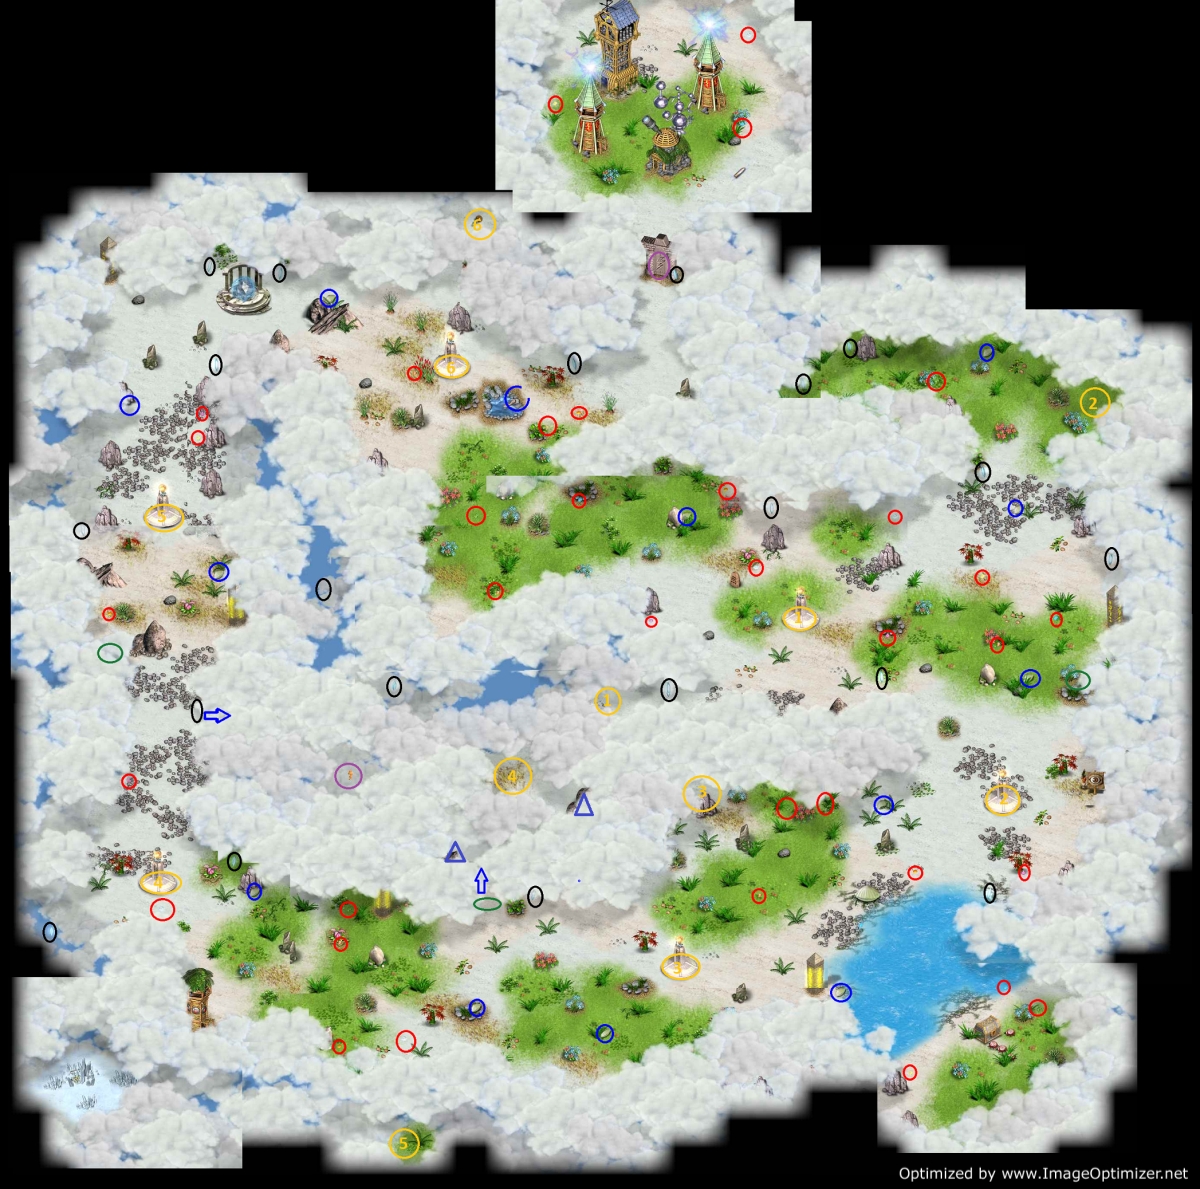
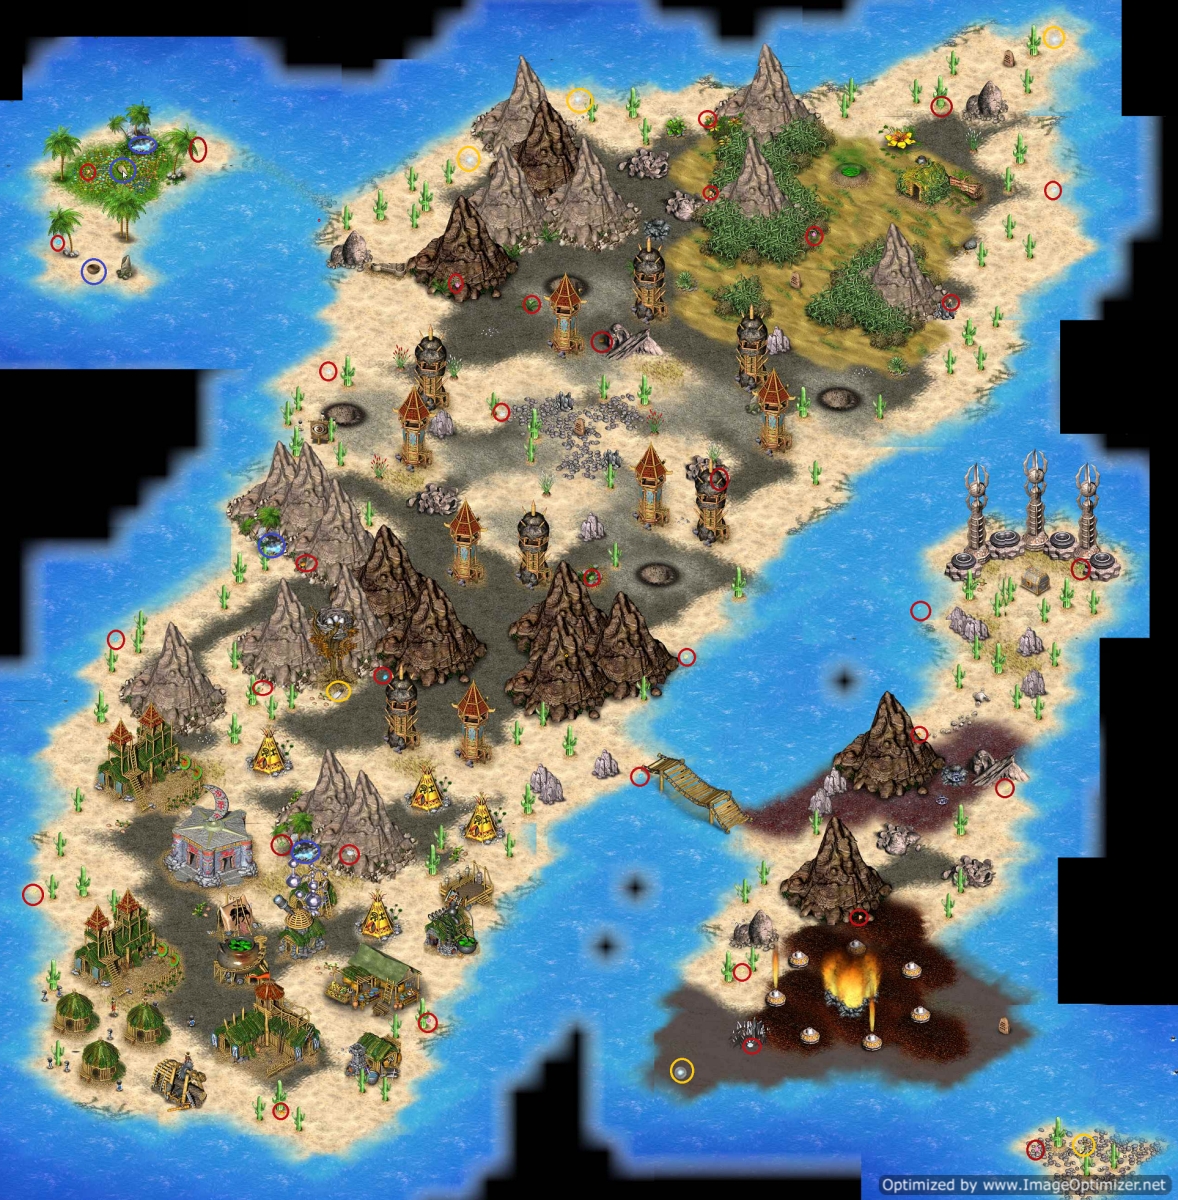
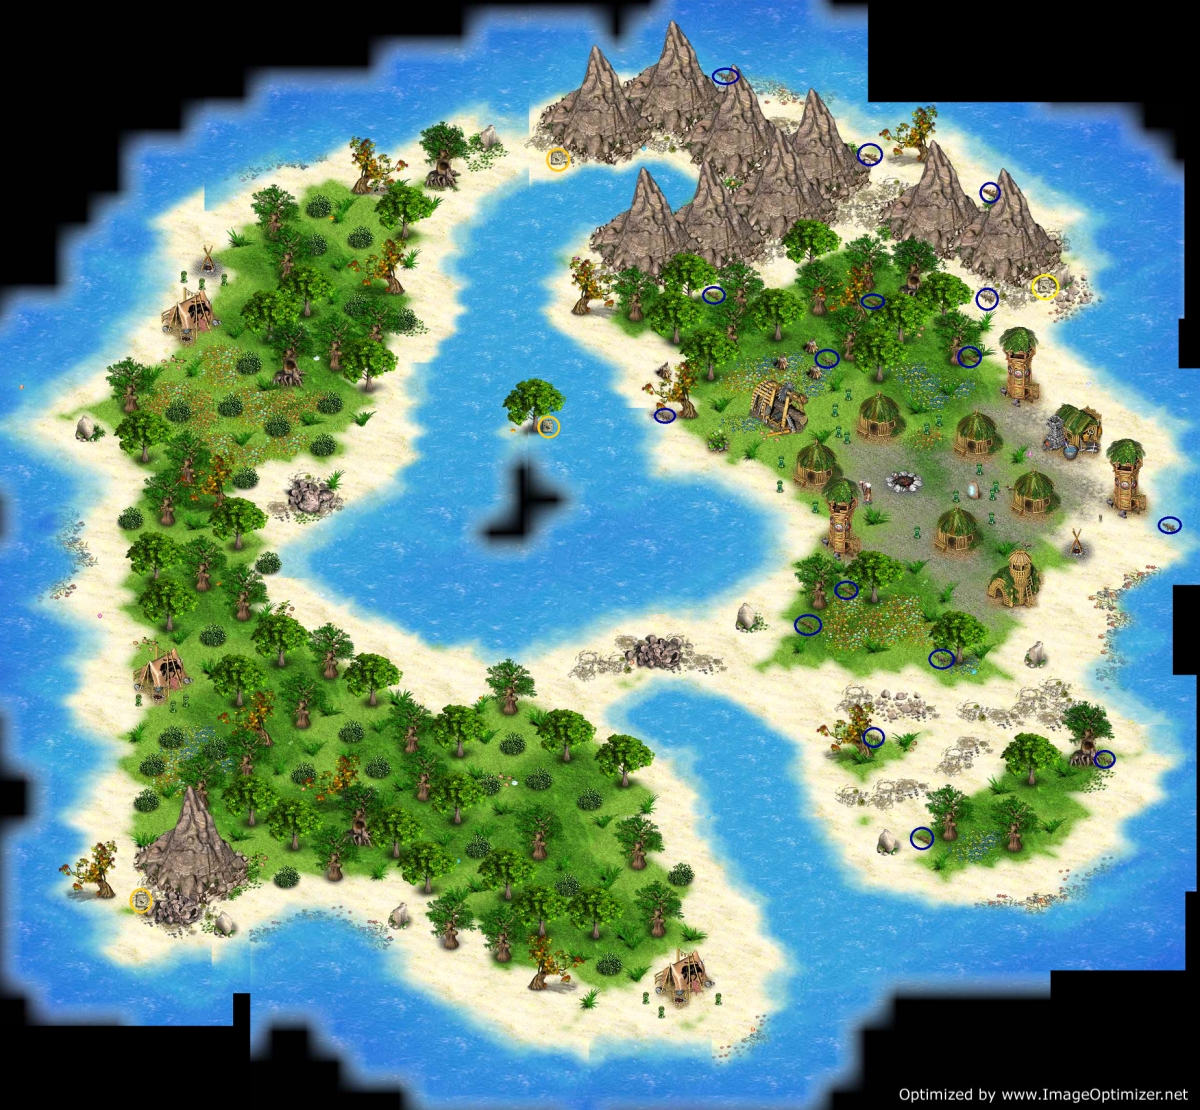
TETALA ISLAND - Chapter 1
- Build 3 huts.
- Build a scout lodge.
- To find the Tear of Heaven, select the eye icon that is generated after a scout lodge is erected; this will give you an exploration flag to place on the island. Go northwest until you see a purple crystal.
- Click on the crystal to pick it up. (yellow circle)
- Return to Tetala Island when you have collected all 7 Gems of Power to open the chest surrounded by the pillars.
- Place the Gems of Power on the columns surrounding the chest.
- Click on the chest and pick up a Magnifying Glass piece.
- Return to Tetala Island after getting the scuba gear and harpoon to get a shark tooth and collect additional gems off shore. The shark is in the northwest.
TOP
MUSHROOM ISLAND - Chapter 2
- Build Scout Lodge and Barracks.
- You do not need a second Barracks on this level; but if you want one, you should build it after you start heading south and let the new fighters catch up to you.
- Find 6 Big Stones
- Defend your settlement from the mushrooms by selecting the battle flag and heading your troops south to kill some mushrooms.
- Keep exploring.
- Place the 6 Big Stones on the Water Crossing.
- Send your fighters down over the crossing to destroy the Fungus Lair
- Meet Chieftain Guro, who will appear and be part of your
tribe after the
fighters have defeated the mushrooms. You will need to protect Guro and
Aruku for the rest of the game. If either die, you will need to start
that level over.
TOP
DOLPHIN ISLAND -Chapter 3 .
- Build 1 Scout Lodge. Send Scouts out to explore (you can also use your Fighters since there are no bad guys on this level)
- Build 2 more huts while exploring (only to speed things up later)
- Build 4 Towers by each of the 4 dolphin statues.
- Collect 8 Shells (black circles) throughout the island to open the chest with the Diadem of Courage.
- Solve the Dolphin Puzzle while waiting for the Towers to be built to get an Antique Coin.
- Solution to Dolphin Puzzle; as labelled on the map, press C, 2, 3, 1.
- Find the Dolphin Totem (yellow star); note this may be switched out with one of the shells.
- Return later when you have scuba gear to open the chest on the southern island for more gems.

TOP
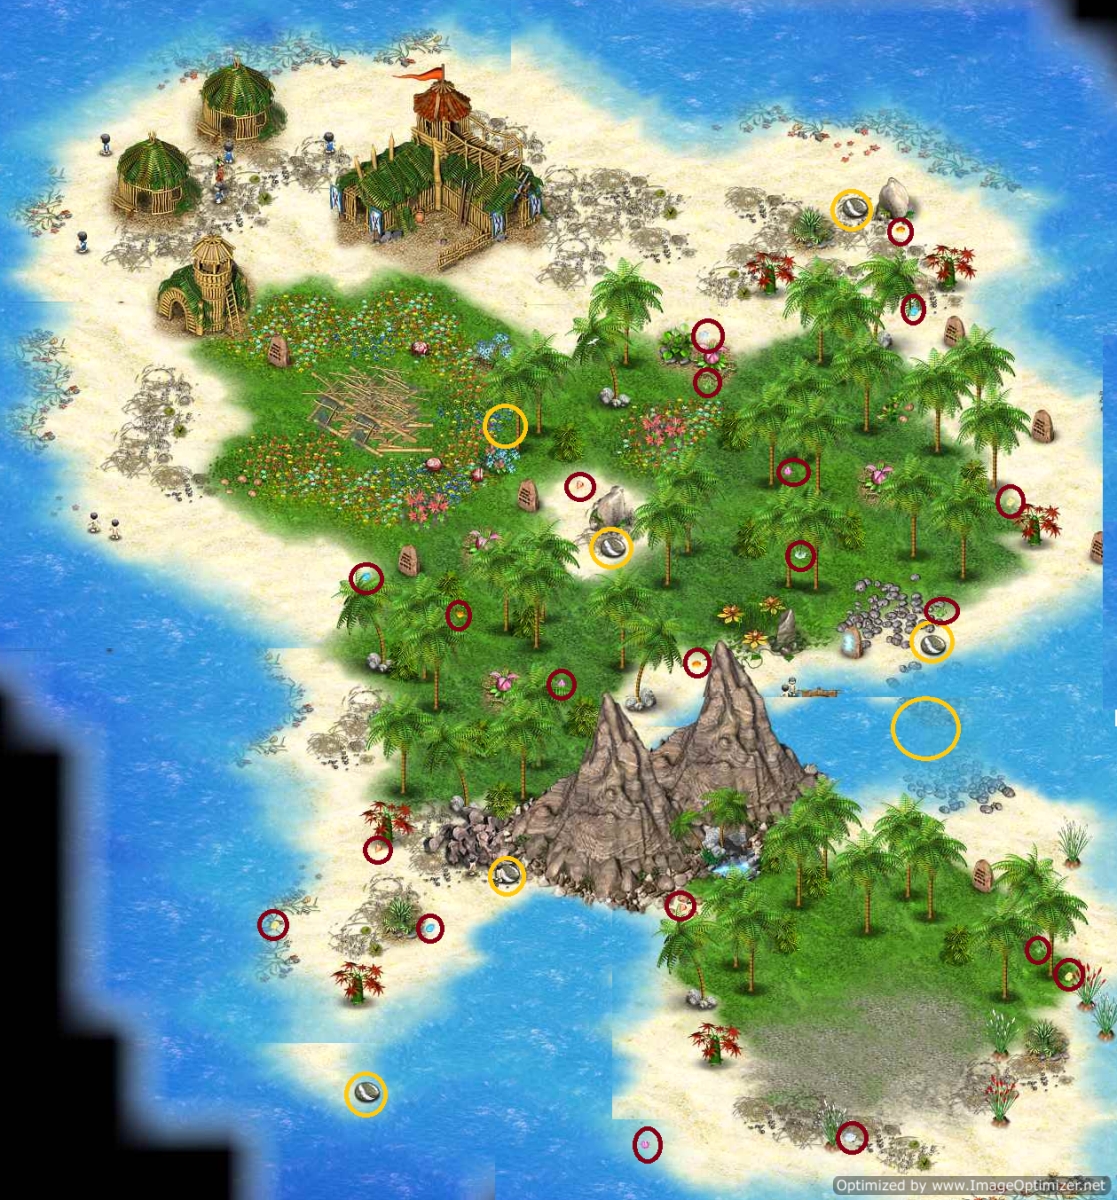
MONKEY ISLAND - Chapter 4
- Protect your village.
- Build Barracks first.
- Build a Tower to the south.
- Build Scout Lodge and then Hunter's Camp.
- Defend Yourself (you can win the first battle without building anything else but be sure to build a second Barracks to help with the two giant mushrooms (black circles).
- After defeating the giant mushrooms, pick up the Pendant of Nature Force, which gives you a 7% chance of immediate building.
- Explore the Island.
- Watch out for Thorn Flowers; they might kill your Scouts if you don't watch out.
- Put your fighters on the Thorn Flowers and then pick up their dropped Chestnuts.
- Find the Monkey Tribe Village by heading south with your army across the bridge once you have finished off the mushrooms; use your army because you will need them quickly.
- Defeat the Shade and the monsters for Monkey Tribe (see small black circle and monkey head)
- Click on the Towers and repair them to help with the fight while you are fighting.
- When finished you will get the Monkey Totem as a thanks.
- Pick up the Green Monkey head and give it to the chief. He will want to go to Liana Island (later)
- Head northwest up the coast with your army and fight off the Thorn Flowers as you encounter them.
- Send your Scouts exploring up the center of the island.; note the blue crystal. You will return once you have the Sphere of Clarity.
- Finish collecting the 9 Chestnuts to open the chest on the west coast.
- Build a Tower on the northeast coast of the island on top of the debris to find a Chestnut on a small island. Open the chest to get an Antique Coin.
- Return later with Scuba gear and the Sphere of Clarity to pick up more gems and get a feather.
- Click on the Blue Sphere to see the lake area and get some gems
- Get the feather from an island in the southwest and more gems on an island in the southeast
TOP
LIANA ISLAND (interlude)
- No building on this level; no fighting either!
- Head north up the beach and explore everywhere you can get to.
- Restore the Monkey Statue by collecting statue pieces (green circles).
- Collect Fireflies and Bananas as you go.
- You will need to feed 6 hungry monkeys through the level. You can either click on the monkeys walking around as you go to see if it is a hungry one and feed it a banana for a token. You can also wait until you get all the bananas because you are probably going to have to click on all the monkeys again finding that one last hungry monkey.
- You will find a dark area that requires you to find a light source (see yellow line); you will need 20 fireflies (purple circles)
- You will not be able to pass up the coast to get around this area (see double red lines)
- You will be able to find 15 fireflies on the main part of the island
- To get the other 5 fireflies, go to the southeast of the island and click on the tree (see purple rectangle) to knock it over.
- Pick up the monkey statute pieces (circled in green); some are in chests.
- Release 20 fireflies on the dark spot and keep exploring to the north.
- On the northeast coast there is an obelisk puzzle that requires all the images on one side to be the same and lighted up. Do them in the order listed on the image to prevent having to redo any of them. Receive a statue piece.
- Pick up 12 monkey statuettes (circled in blue)
- To get to the northern part of the island, go through the lighted tunnel in the northwest (see red arrows)
- Climb the palm tree on the northwest coast to discover and island with a statue piece.
- In the central northern section, there is another lighted tunnel hidden by a tree (see red arrows) that will take you to an island in the northeast. Plant your eye flag in the door and as soon as you move through it, plant it on the island; otherwise you will pop back and forth.
- Find a chest with the Orange Gem of Power in it. To return you can just plant your flag at the exit of the cave.
- Get the 6th monkey token; what a pain! Just keep looking and looking and …
- Place the 6 tokens on the northern-most chest (yellow circle) to get another statue piece
- Once you find 12 monkey statuettes, place them on the columns around the chest to get a statue piece
- When you have all 6 statue pieces, rebuild the statue. Start with the torso, arm, head, hands, and tail. You need to place them where they belong and not just in the general area of the statue.
- Now you need 24 bananas for an offering. See yellow boxes for where I found the bananas.
- All gems are visible without scuba gear.
TOP
SEAGULL ISLAND - Chapter 5
- Explore the island and build your camp. You decide if you want a third hut. Build a Scout Lodge and Barracks at least.
- The hints on the guide stones tell you where you can find the Gems of Power: Orange--Monkeys (Monkey Island), White--Birds (Seagull Island) Red--Stones and rocks (Red Rock Island), Yellow--Desert sands (The Great Desert) Blue--Oasis, Violet--Deserted city (Abandon City), Green--Dirt, goo, and swamp (Witch Island).
- Pick up gears as you see them (purple circles).
- Look into the hollows of the trees (after the guide stone tells you to) for the gem of power (this turns out to be random and thus it may not be where the yellow circle is).
- Fix the Workshop by finding 5 gears; the hermit will give you one of the gears.
- Build an Archery (not on image) and do the research available on the Workshop. You do not need to build a workshop; just use the one already there.
- Collect acorns and walnuts to open the two chests (blue circles for both) for the Heart of Bull and an Antique Coin
- Bring your archers to the crows' nests and return the pebbles to the hermit (the pebbles are random for where they fall; but there are two per tree).
- Give the hermit 12 pebbles and get the Seagull Totem.
- All gems are available on the island.
TOP
RED ROCK ISLAND - Chapter 6
- Your first goal is to build a total of 10 Huts, but don't finish them off until you are prepared for battle.
- Check for gems before building so that you don't block any.
- So, wait to build the 10th hut; build all the buildings you have available plus towers (including one on the beach near the guide stone--see image).
- Place 2 to 3 towers to the north and south of your village.
- Explore with your Scouts until the first attack.
- Finish your 10th Hut.
- Upgrade your towers to Arrow Towers after the first attack. You will have 2 more attacks.
- Explore as you can.
- Find 8 Cactus Flowers (purple) for the Idol as quickly as possible and charge the idol.
- Use the Meteor Shower on the ice mound (yellow circle).
- Send your army up to the northeast to get the bad guys and their lair.
- Pick up the Scarab and Hunter's Lucky Stone.
- Solve the slide puzzle in the southwest for the Gem of Power.
- Press on the tiles as numbered on the map: 4, 7, 8, 9, 6, 3, 2, 1, 4, 7, 8, 9, 6, 3, 2, 1, 4, 7, 8, 9,6, 3, 2, 1, 4,7, 8, 9, 6, 5.
- You will need to return once you have scuba gear and a harpoon to get gems on the islands and get a shark tooth.
- The shark is in the east along with an island with gems.
- There is another island in the northwest with a gem.

TOP
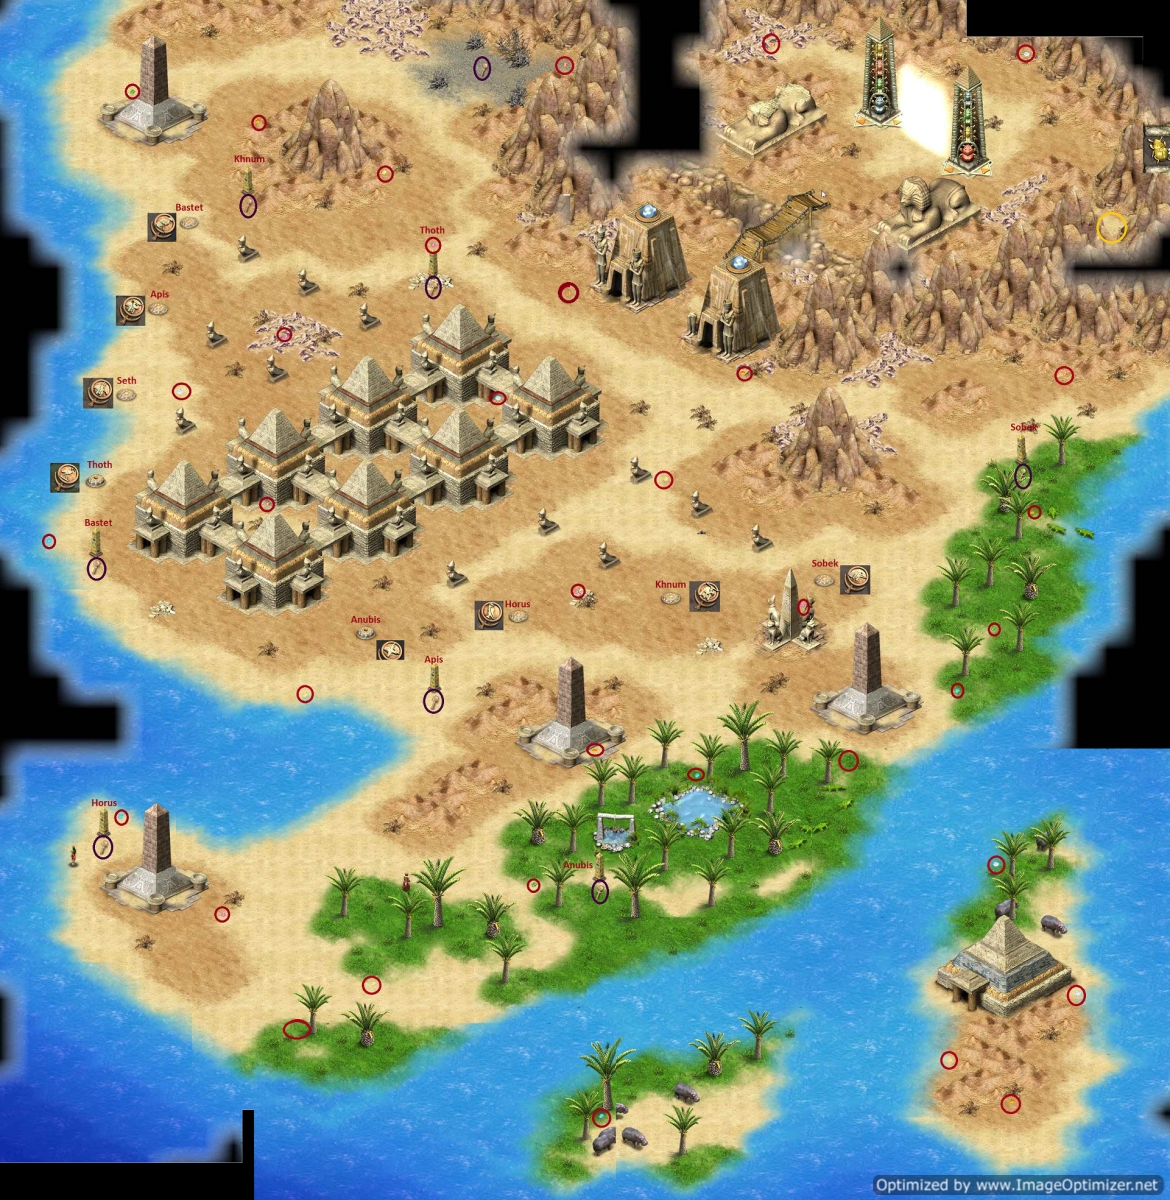
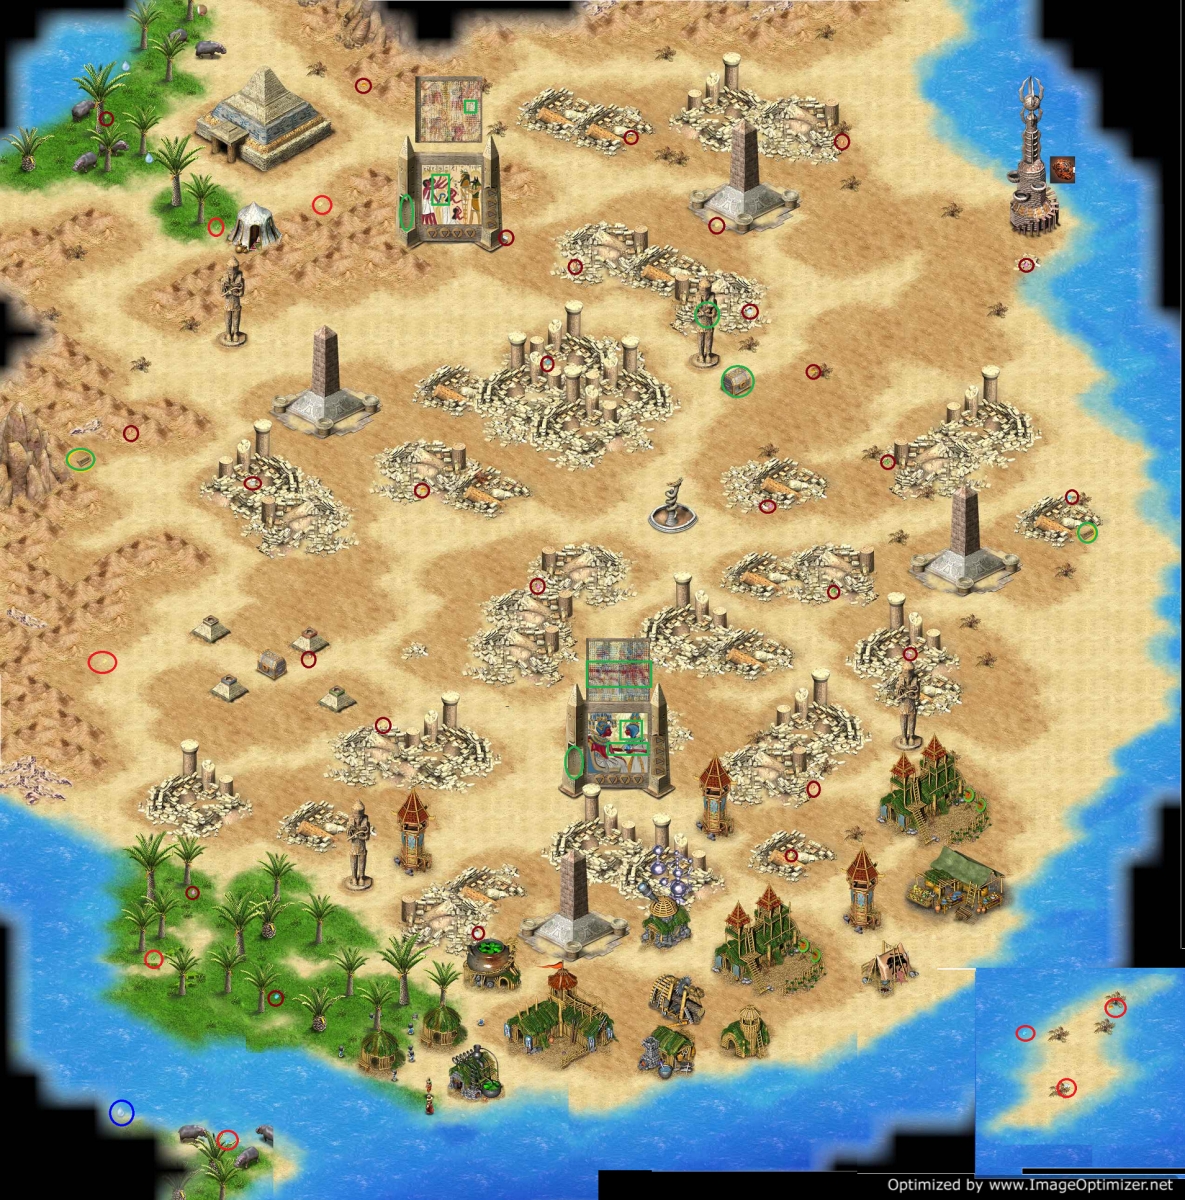
GREAT DESERT (interlude)
- No building on this level.
- Explore the Desert. Send Scouts in one direction and the army in the other.
- Click on all 7 obelisks and 7 staffs will appear.
- Use your army to open the Skull Chest to get the 8th staff.
- Use the clues on the obelisks to place the staffs in the proper holes. The staffs don't have names attached to them but you can guess by the images on the staffs (or just look at the map!)
- If you place the staff in the wrong hole, the staffs will be dispersed randomly around the desert.
- To get more holes to show, you need to solve the light puzzle as you go. The lights from the staff need to go up to the top of the building. Needless to say these become more complex the further out they go. You need to click on the small statues in between to move the light balls. Move the lowest light ball next to the staff first and then work your way up to the largest.
- Solving the puzzle causes the gate to open.
- Pick up the scarab.
- Explore behind the gate.
- Note the scarab puzzle; you need a total of 8 scarabs, which are available on Red Rock Island, Great Desert, Oasis, Abandoned City, Skull Island, Mist Island, Volcano Island, and Beetle Island.
- Explore the mountains just east of the eastern sphinx to find the yellow gem of power (yellow circle)
- You will need to return multiple times to this level. The walkthrough is written so that you return only twice; once to solve the scarab puzzle, and another to use the rosary to get an amulet piece and to find gems once you have scuba gear.
- First return to The Great Desert
- Place the Scarabs in the puzzle in the north between the 2 sphinxes.
- Each Scarab becomes a different color.
- The left arrow for each device swaps the bottom two scarabs.
- The right arrows moves each scarab up.
- You need to match the colors on the scarabs to the colors on the buildings; the only problem is that the color closest to the coast will be at the top. Yellow, red, green, blue for the left and blue, green, yellow, red for the right.
- Once solved, a new area will open up, Gazing Canyon
- Second Return to The Great Desert
- Find the 4 obelisks that have 3 cups on them. Their location approximately matches the location on the rosary you now have.
- You want to copy the bead pattern on the rosary onto the obelisk cups using the black and white oils.
- When you do this properly for all 4 obelisks, your view will be switched to a temple, which will light up.
- Click on the Temple and you will receive an amulet piece.
- Swim to get the gems from the 2 islands in the southeast to finish up.
TOP
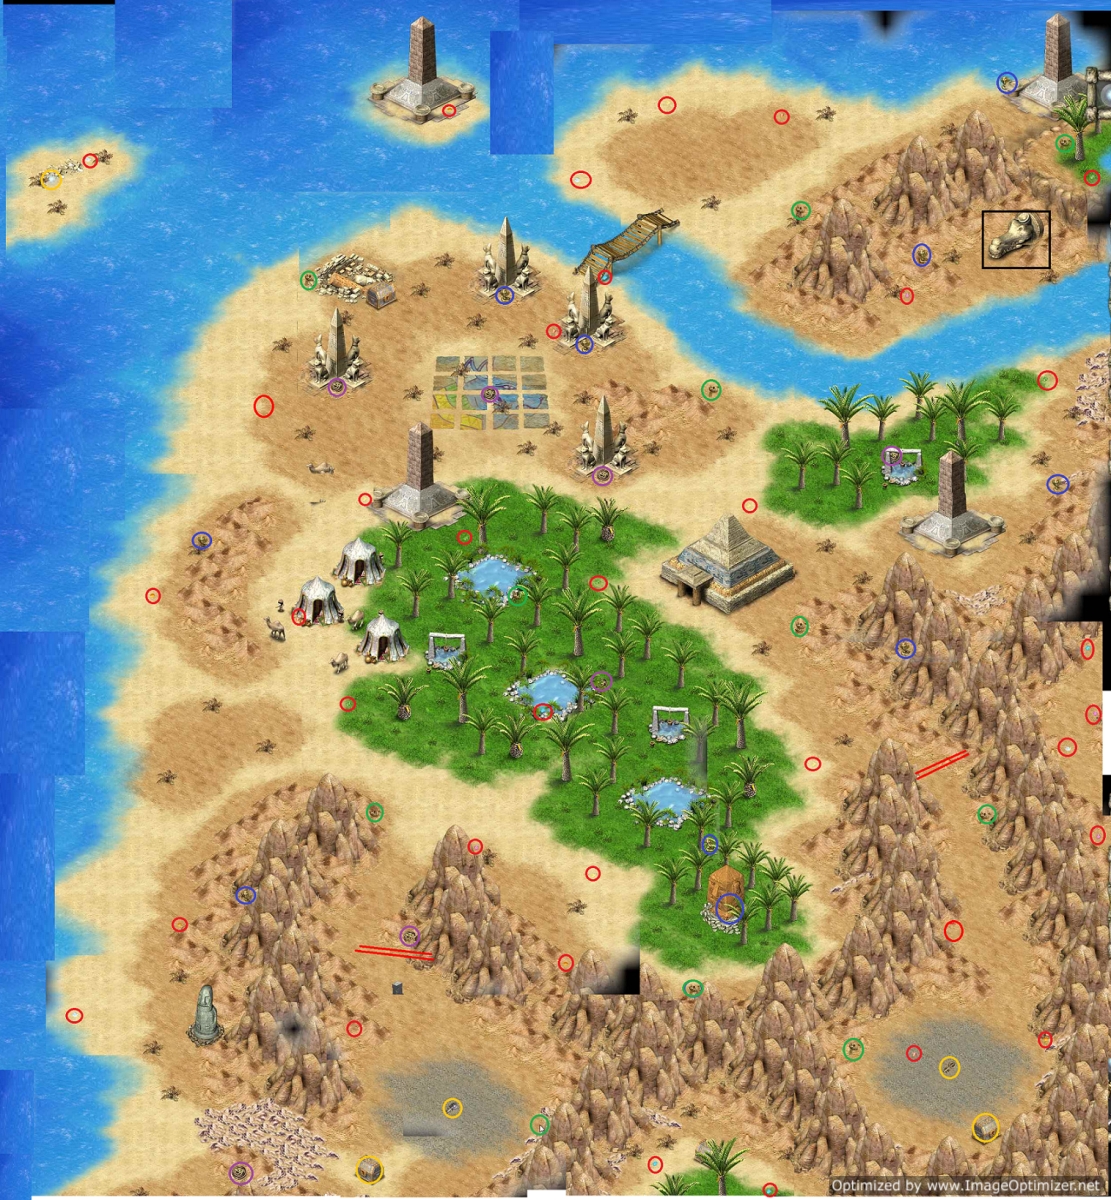
THE OASIS (interlude)
- Explore the area; do not head up the canyons in the south (red lines)
- Pick up the 7 Eye of Horus symbols (purple), 7 Cobra figurines (blue), and 11 Ostrich figurines (green)
- Solve the water puzzle; basically you will need to pick up the large jug from your inventory, fill it at the well, pour it into the small jug by the tent, and dump one or the other out at the well until finished.
- Water jug puzzle solution steps: Fill large, pour into small, empty small, empty large into small (you will now have 3 water in the small). Fill large, pour into small, dump out small, pour 5 of the 6 water left in the large, and dump out small. Pour 1 water left in large jug into small. Fill large jug and pour into small jug. You now have 4 water left in the large jug.
- Give the water to the tent area. You will receive an energy sphere.
- Solve rotating square picture to match the image.
- Make your way across the bridge and to the right where the large crocodile thing is
- You should now have 9 cobra figurines. If you don't, find them.
- Use the Cobras to charge the idol (blue circle) to get the Thunderstorm.
- After getting the storm ability, sneak up the western canyon and get the 7th Eye of Horus to get Clairvoyance, which will clear away the black. Zap any bad guys that show up below the cloud.
- Use Clairvoyance to clear away the black and then use the Thunderstorm to kill off the bad guys and their lairs.
- The key to the eastern chest is in the western canyon and vice versa. Open them to get the two pieces of copper key.
- Use Clairvoyance to remove the black in the north and pick up another energy sphere.
- Place the energy spheres on top of the crocodile-thingy in the north (black box) and then inside the mouth. Then place the key parts in the mouth to forge a whole key (don't forget this method for later in the game!)
- Use the key on the remaining chest (near the puzzle) to get a scarab.
- Use the 11 Ostrich figurines to open the chest in the south after using the Clairvoyance spell to get the Gem of Power.
- You will need to return for the amulet puzzle.
- Obtain the amulet piece.
- Once you have 3 pieces you can repair it in the same fashion that you did for the copper key in the crocodile mouth.
TOP
Abandoned City - You might want to wait to do this level until you have a stronger army; you don't need to do it until you need the last scarab and/or Gem of Power. Click here to get to its walkthrough.
WITCH ISLAND - Chapter 7
- Start exploring; everyone is sick on the island and you can't start building your army yet.
- The Witch you encounter wants 10 Roots to learn the Secrets of Healing. These roots are randomly placed and thus the circles on the image are not accurate. My second time through I couldn't find the last root for the life on me. I quit the level and came back and it was then at a place I had looked already; so give that a shot if it happens to you before restarting the level.
- A Gem of Power is buried in the green mud according to a guide stone. Just click on the green mud holes; this is a random location also.
- Give the roots to the witch and the build a Witch Doctor Shack (6 per shack).
- Once your village is healed, start building up your army by building Barracks, Workshop, Archery Range, Scout Lodge, and Hunter's Camp.
- Send your army to attack the Shade.
- Return to the island once you have fire power in your towers to remove the block of ice to get an Antique Coin and Sphere of Clarity.
- You will also need to return here for a feather after visiting Firefly Island.
- Return to Witch Island once you get Fire Towers. You will need to build a Smithy, Wiseman's House, and then a Laboratory. Research Fire Towers.
- Open the wooden chests in the new area for gems and an Antique Coin.
- Solve the Singing Stones. This is a press the stones in the proper order and if you don't you have to start over puzzle. The proper order to press the stones is on the map.
- Pick up the Sphere of Clarity.
TOP
Hold off on Blueberry Island until you need feathers and need shark teeth
SKULL ISLAND - Chapter 8
- Quickly build Barracks, Workshop, Archery Range, and then build 5 Arrow Towers in a line to protect your village. Build the center one first.
- Keep an eye on Aruku and Guro; you don't want them to die.
- After your defenses are built, go ahead and build one of everything you have (why not?).
- Research at the Workshop and Smithy.
- Send your army to the enemy in the south.
- Build a second barracks and archery range.
- After destroying the enemy tower in the south, pick up the Tower Designs and give them to the Wiseman
- Go ahead and do the research available at the Wiseman’s House.
- The key just to the southwest of the village in the image and the bones around it are random, along with the bones around the enemy camps. The second time I played, the key was down by the south camp.
- Pick up bones and give 20 to the Idol of Peace and charge it up. Keep using the Requiem spell as it charges.
- Build a tower to the north as the guide stone suggests. Build it as close to the shore as possible and you will see an idol on an island.
- After destroying the third enemy camp, you will get an onslaught from the mountains. Return to the village to help out.
- Then go to the mountains to discover a shade. Just wait at the entrance to the little valley and they will come to you.
- While waiting and fighting, build a couple arrow towers (just in case).
- The Requiem will not work on the shades. Use Purification if you have given the Idol of Purity its bones.
- While your army is doing all this fighting, send your scouts to explore the island, picking up stuff as they go.
- After defeating the Shade, send your army up north and around the coast to the southeast.
- Defeat the Bone Chest to get a scarab.
- Build a Tower on the southern shore where you see the debris (see image).
- Use 7 Rusty Keys on the chest to get an Antique Coin.
- The keys may not be in the exact places as noted on the image but they will be easy to find if they are not in the same spot as the image.
- Use the last 25 bones on the chest to get Traveller’s Boots (note that the bones around the enemy camps are random, but the harder to find ones away from the camp are not random)
- There is one gem on the east coast that may require scuba gear to get to.
- Return to Skull Island later.
- Collect a feather
- Swim to the last gem in the east if you couldn't get it from the land.
TOP
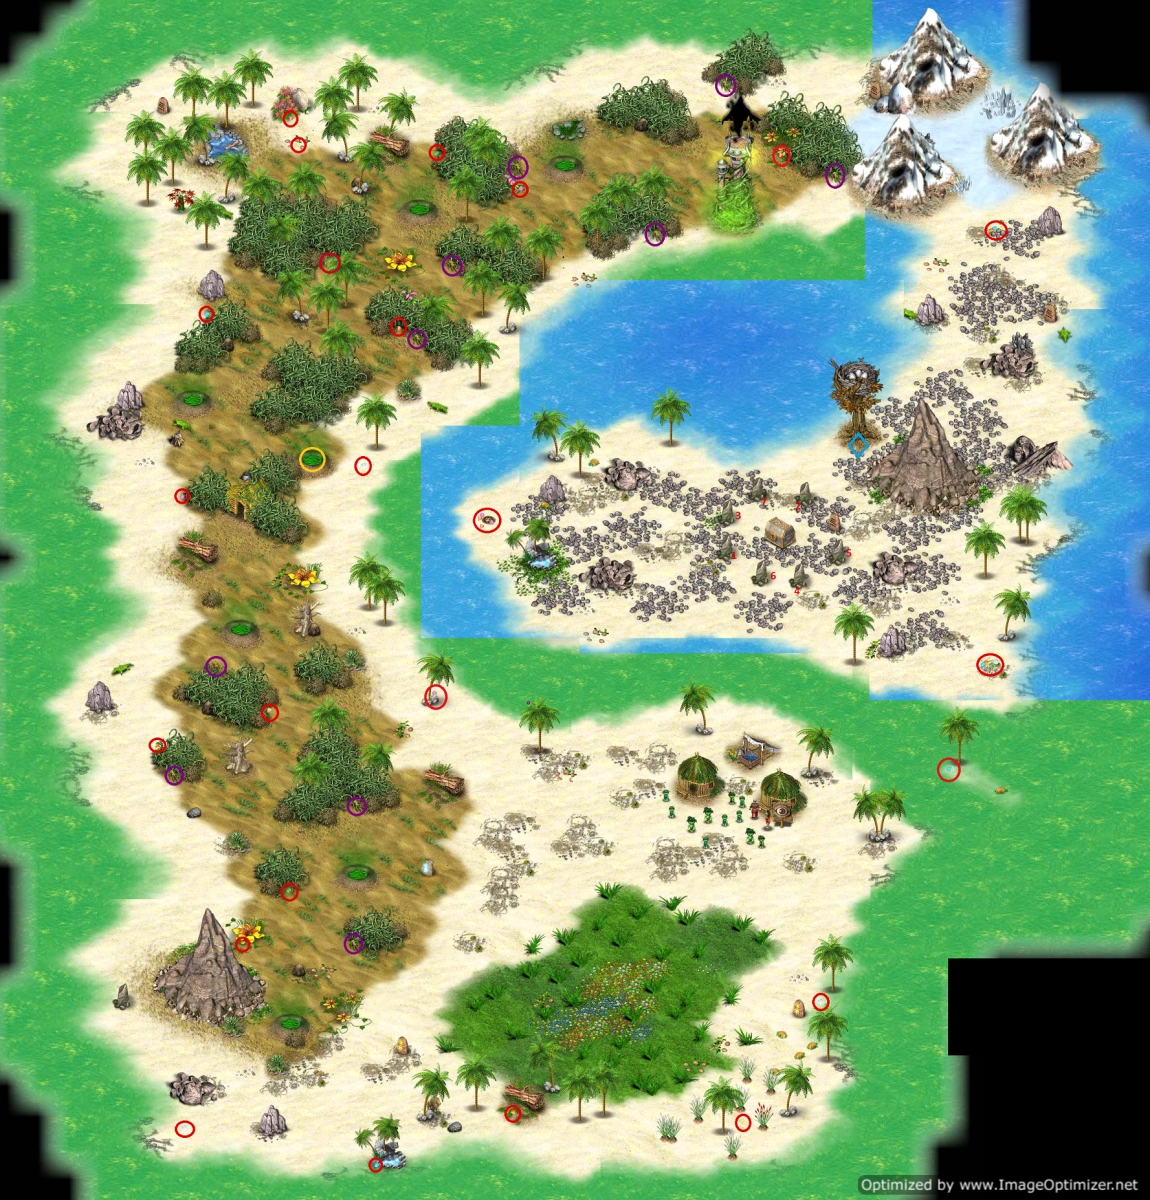
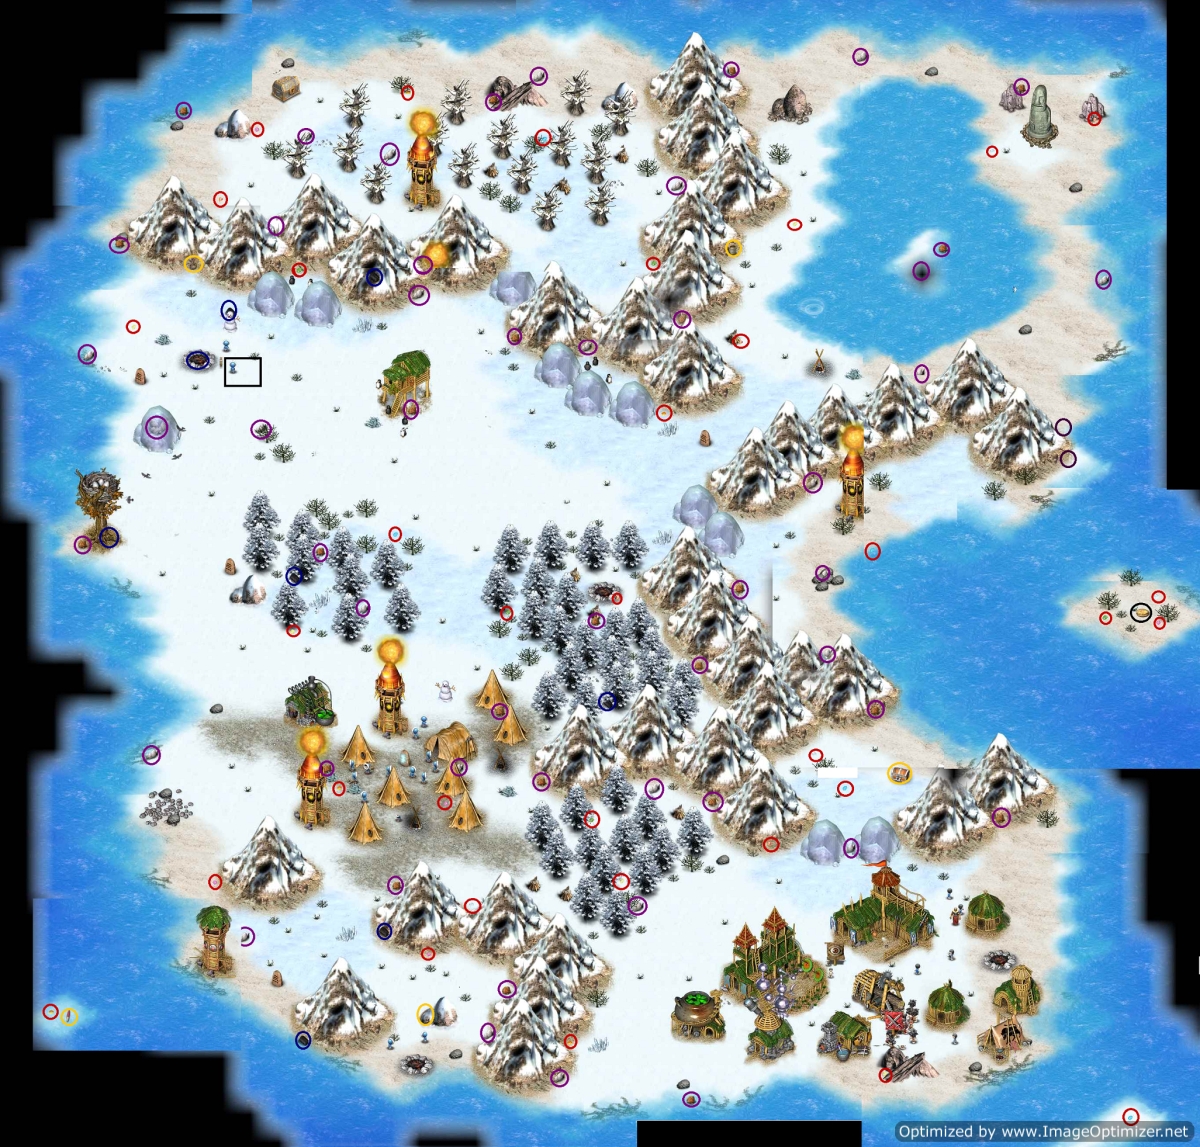
FROZEN VALE ISLAND - Chapter 9
- Build Scout Lodge and start exploring while building Barracks, Workshop, and Archery Range.
- You won't need to build the Smithy or Wiseman’s House before you can get the Fire Towers because you can research Fire Towers in the Laboratory near the tribal camp. You will probably want them eventually though.
- Also, build Towers (and don’t upgrade them) in front of the ice blocks.
- Find the Polar Bear Tribe and get the request for 8 pieces of coal (yet again, it turns out to be random places after I circled them for you!)
- A guide stone tells you that the black birds stole the black rock, so when you come across the birds flying around a nest, send your army.
- Note the rubble on the shore near that guide stone in the southwest; perhaps a tower is in order? Find a piece of the fishing rod (yellow circle).
- Pick up shells as you go (purple circles--note that yet again a few of the shells are randomly placed, darn)
- Another guide stone tells you that you should look for coal where a fire has burned, so click on the fire rings.
- After giving the coal to the chieftain, you will be able to research Fire in the Laboratory and then upgrade your towers to Fire Towers. Do so to break through the ice.
- There are lots of blocks of ice to melt. You can place some Towers to do double-duty but if you don't want to wait, build more towers.
- By melting the ice you will also free the Penguins. When you free all the penguins you will get the Healer’s Globe.
- You will need 25 Brown Shells to charge the Idol of Divination to get Clairvoyance.
- There are some shells on a little island in the east in the lagoon near the idol. You can clear the black away by getting as close to it as possible.
- Use Clairvoyance to the east where there is an island with the Totem. Keep using it to find the hidden sandbars.
- Keep collecting White Shells and Fishing Rod pieces.
- Once you have the White Shells open the Chest in the northeast to get an Antique Coin.
- Once you have the Fishing Rod pieces, look for circles in the water as a good spot to fish. Just click the Fishing Rod on the water and you will get a Fish.
- Give the fish to the penguin man and he will give you a map to Lonely Iceberg.
- If you can find all the Gems you won't need to come back to this island.
TOP
Return to Witch Island now to get an Antique Coin and the Sphere of Clarity.
- You will need to build a Smithy, Wiseman's House, and then a Laboratory. Research Fire Towers.
- Open the wooden chests in the new area for gems and an Antique Coin.
- Solve the Singing Stones. This is a press the stones in the proper order and if you don't you have to start over puzzle. The proper order to press the stones is on the map.
- Pick up the Sphere of Clarity.
ISLAND OF YETI - Chapter 10
- Quickly build Barracks, Workshop, and Archery Range.
- Note where the enemy is coming from when it attacks your village.
- Build 2 Arrow Towers, one to the west and one to the southwest.
- Build every building you have and do all available research.
- Start exploring and battling the enemy, and destroy the lair to the west.
- Build a second Archery Range.
- Once that first lair is destroyed, send the army to the southern lair while your scouts explore to the west.
- Catch 4 Wandering Lights and light the fires around the silver chest to get the Bracelet of the Hawk.
- Pick up Amber pieces as you go; you will need 12 pieces to fire up the Idol.
- Build a Fire Tower to melt the ice blocks to the southwest.
- After destroying the ice blocks, destroy the 3 lairs to the west.
- Get the 12 Amber as quickly as possible as it will help you battle.
- There is an amber on an island to the north of your village.
- Build an Arrow Tower and a Fire Tower outside the next set of ice blocks. You can already see the bad guys moving around down there.
- When you melt the ice, move your army down and use Battle Fury whenever you can get it.
- After destroying 4 lairs, you will have to battle a BIG Yeti. You will now have the last Totem.
- Keep exploring and pick up the map of Rimy Isles. You will need to go there to get the last Antique Coin.
- Once you have 7 Antique Coins, return to get the Marketplace.
- Return to Island of Yeti get Feathers (after Firefly Island) and when you have scuba gear to get the last gems.
- Collect a feather
- Swim to some gems in the southeast.
TOP
RIMY ISLES (interlude)
- You can't build here and will use your army to explore.
- Head north and pick up pine cones and fir cones (purple)
- When you get to Walrus Village you will be given some planks to fix a bridge and the missions to find the tools to repair some buildings and to rescue the prisoners.
- Return to your starting point and repair the bridge there.
- When you kill the little yetis, they will drop keys and thawing potions.
- You can use the potions on those pretty little silver trees and then pick the berries.
- Pick up the ax to fix the Workshop (blue circles). Do the research available there.
- There are some more bridge pieces on the southwest corner of the island.
- Work your way north and keep killing yetis and destroying lairs.
- Pick up the hammer and repair the Smithy and do the research.
- Don't worry about your army dying; they will get replaced in the village.
- Use 8 fir cones to open the chest in the south to get more bridge pieces.
- Give the Idol of Flame 5 berries (from using the thawing potion on the silver trees) and get Meteor Shower.
- Use the meteors on the ice glacier blocking the way in the south.
- Pick up the last pine cone and open the chest where you just were to get an Antique Coin.
- Pick up the last bridge pieces at the southeast tip of the island.
- Work your way north and use the keys on the locks of the prison.
- Return to Island of Yeti to get the Marketplace and move on.
- Return to Rimy Isles when you have scuba gear to get more gems.
- Swim to the last gems in the east; see the bridge? You can't use it but that's the island you need to get to.
TOP
CRADLE OF THE NORTH - Chapter 11
- Build one of everything.
- You won't be attacked until you place the totems so start exploring.
- Plan ahead while building because you really need a second Archery Range.
- Pick up the silver Ice Crystals (blue circles).
- The Shaman wants you to kill the sharks; you can do so with an Arrow Towers by building one just south of the shaman's hut so that you can see onto the island. You can also kill the sharks with Archers.
- Do research for everything but start with the Wiseman's House and research building.
- Build a Fire Tower to melt the ice and go north.
- Make sure you leave room for a second tower, which you will need for later.
- Build a bunch of Shaman Tents, unless you can fit in another Archery Range.
- Also build a few more Archery Towers on the path down from the pass to the village (around the altar there)
- Give 25 crystals to the Idol of Protection and another 25 crystals to the Idol of Storm before you start messing with the totems.
- You will need to build a tower in the north to the west of the black area right on the edge so that you can see the altar up there.
- Before placing the Totems, repair all of your buildings, move your army close to the first Fire Tower, and build an Arrow Tower next to the Fire Tower in the pass.
- Don't forget to take your Scouts to find the Altar in the east. There is a little sandbar down to it from where the penguins are hanging out.
- Keep going south to another little island where you will find the Pendant of Power.
- Read the guide stones to try to figure out where the totems should be placed.
- Monkey is smart, try hard to find it. It will go in the hidden spot in the north
- Dolphin lives in water. The dolphin will go in the water in the west
- Bigger water creatures require more water. The whale will go in the water in the east.
- Ice will not scare polar bear. The polar bear will go on the one that is surrounded by ice crystals.
- Lizard lives among rocks. The lizard will go on the altar surrounded by small rocks on the ground.
- The seagull will go on the altar with seagulls flying around it.
- You can also look at the map to see which totem goes where.
- You don't want to make a mistake because it will cause an earthquake and a lot of damage to all of your buildings, which you will need to repair.
- When you activate the Seal you are going to have a huge fight on your hands.
- Make sure your army is on the path down from the pass and not caught up in the ice field around the Polar Bear Altar.
- Be sure to keep repairing your towers as they become damaged as the Shades will stay on them rather than come down to the village.
- Keep recharging your Idols, while remembering that you can only do one thing at a time and I personally think repairing the towers is more useful.
- Return to Cradle of the North when you have scuba gear for more gems and once you need a feather.
- Collect a feather
- Swim to find gems, in the chest in the east and an island to the west.

TOP
MIST ISLAND - Chapter 12
- You will need to find Spheres of Light to power up the lights so you can get through the mist. These are hard to find.
- First sphere is southeast of where you start. If you walk along the southern edge, you will kind of see it. If you plant your flag there, you will work your way to it to clear away the black. See yellow circles on the map. They are numbered along with the lights so that you can get a feel for where they go.
- Pick up Celestial Crystals (black circles) and Shells (blue circles) as you go.
- You won't be able to work your way north from your starting point right away.
- Keep moving east and then go north to pick up the 2nd Light Sphere and head south to find the 2nd light.
- Head west to find the 3rd light sphere and light.
- Click on the large shell to find out that you need 14 small shells for a reward.
- You will need to work your way onto a little path to the north to get the 4th Light Sphere. It is a bit to the east of the 3rd Obelisk. You can see a little rock outcrop and some lightning (blue arrow on the map). Plant your flag on the rock (blue triangle) and you can see a path to the right and another rock (sort of) and you might even be able to see the light sphere. Plant your flag on the next rock to move to the right.
- As you work your way north from the 4th light, there will be another secret path that will show you a rune of lightning. It is just south of the next rock on the main path, just next to a Crystal. See blue arrow on the map. You will not walk out to it but just expose the rune.
- At the far northwest, click on the blue globe to use the Sphere of Clarity to show you a chest in the southwest. This is where you will use the Celestial Crystals. This chest contains another Scarab.
- Give the big shell 14 small shells and you will get a pearl to give to the person in the tower. You can now find the Amulet of Wisdom. At the far north, you will find a gate that needs the lightning rune. Place the rune you should have found earlier (purple circle) to keep going north.
- You will get a mission to pick up 4 Thunderbolts from where the lightning strikes. It is doing so right there, so wait to pick one up. If you can't find the other three, they are circled in green on the map. You will get new buildings, Sky Hall and Thunder Tower.
TOP
LONELY ICEBERG (interlude)
- You need the Frost Tower for the Chapter 13,so do this one now if you haven't done so earlier.
- Start exploring with your army and Aruku and Guro. There are bad guys so keep those two behind your army as you don't want to die.
- When you get to the village, the Alchemist wants you to make the Twilight Mixture. There are 8 ingredients you need to collect plus instructions on the guide stones.
- Work your way north. The ice blockages need have a missing piece found to remove them. They are hard to see and each shard is unique to an ice blockage. They are circled in blue on the map with a letter to match it to the ice blockage.
- Once you have the 8 ingredients you will need to mix them in the Laboratory. The guide stone hints are:
- Aurum + Quicksilver = Amalgam.
- Midnight Salts + _________ = New Moon Elixir.
- __________ + Salamander Dust = Phoenix Oil.
- Magnesium + Permanganate = Salamander Dust.
- Ammonium + Alkali = Restoration Liquid.
- Vitriol + Charcoal = Midnight Salts.
- You can make an intelligent guess for the blanks, but it doesn't matter if you mess up. If they don't mix together, you will just get the ingredients back.
- Once you have the New Moon Elixir (which needed the Restoration Liquid) and the Phoenix Oil (which needed Amalgam), mix the two together for the Twilight Mixture.
- Give the Twilight Mixture to the Wiseman to get Frost Towers.
- You will need to Return to Lonely Iceberg once you have the scuba gear and the invisibility cloak (to get the harpoon, shark tooth, and gems).
TOP
SCORCHED ISLAND - Chapter 13
- Not only do you have a lot of fighting to do away from your village but you actually have two "lairs" on either end of your village that require defensive building. The good news is that we know when it will happen and you have plenty of time. They won't attack until you defeat the Wolf Tribe the first time.
- Start building one of everything. Make sure you leave room for 3 towers around each lair.
- Send your army exploring, but don't explore up the eastern-most path at all or the middle path past the firewall until you are ready to fight! (see double red lines)
- You will discover a chest in the southeast that requires you to build a Fire, Frost, and Thunder Tower. Do that before you build more than the first 3 towers so they will build faster.
- I built my Frost Tower up at the flame wall on the middle path.
- Build a Fire and Thunder Tower to defend from the lairs.
- Pick up the Crown of the Defender when you've built all three and now you can build towers faster.
- After building the Wiseman's House, research Building Tools
- When you explore up the west coast, you will find that you need 11 Wolverine Claws to open a chest and one Ice Crystal to fire up the Idol.
- Once you have your army ready, head into the area of Eversnow Peak (see yellow arrow on the map). If you get there accidentally, no worries, just wait until your army is ready to send it to defeat the Red Dragons on the west coast.
- Send your army to defeat the Red Flying Dragons.
- Receive an Ice Crystal to give to the idol to get the Snow Tempest.
- Build a total of 3 Towers for each lair. I made all of them Fire Towers except the one Thunder Tower already.
- When you have your defenses built up, start the army up the eastern path.
- You can use the Snow Tempest a few times before your army starts to battle. You should be able to see the edge of the first Fire Tower.
- Now head up the eastern path; hopefully you will have destroyed all of the enemy Towers.
- Once you defeat the enemy, you will have to hurry back to the village to help defend it.
- It appears to me that the western lair takes longer to defeat so use the Snow Tempest on that one.
- Head back up the east coast to battle some more.
- Pick up the Rune of Fire (yellow circles).
- Build a Frost Tower at the firewall on the eastern coast.
- Send your scouts through and collect a claw and gems from the chest.
- The Shaman will attack your village with a meteor shower.
- Wait to place the Rune of Fire until you have repaired all of your buildings.
- Battle for a third time and use the Snow Tempest.
- Build another Frost Tower to get through the double fire wall on the northwest section of the valley.
- Go up to the chest to get the last claw and some more gems.
- Give the Wolverine Claws to the chest on the west coast to get the map to Firefly Island.
- Don't forget to pick up the Shaman Mask left after you finally defeat the Wolf Tribe.
- Return to Scorched Island later with scuba gear to get a
feather and gems.
- Collect a feather by swimming to the east
- Swim to find gems to the west
TOP
VOLCANO ISLAND - Chapter 14
- You will be attacked some from the south, so build Barracks, Workshop, and Archery Range.
- Build 4-5 Arrow Towers in a line to the south near a row of bushes.
- Once you have protected yourself, build one of everything except the Sky Hall. Fit in a second Archery Range and make as many Shaman Tents as you can fit in.
- When you have fit everything behind the towers, take your army and defeat the skeletons and the two pyramids.
- Work your way south with your army.
- Fill in the area between where the pyramids were with Shaman Huts.
- Build an arrow tower northwest of the village.
- The Battle Master at the Training Grounds wants proof of victory and thus wants 3 Rusty Swords; the first one is at the pyramids you just destroyed. (orange circles)
- When you get to the first Fire Wall, build a Frost Tower after you defeat the flying eyeballs just to the south.
- Find the Shaman who wants Scroll Fragments to teach you a new skill.
- There is a second fire wall you can't destroy because there is no room to build a tower.
- Further south is an Idol that wants 8 obsidian pieces; you should have found some of these already. Obsidian pieces are circled in blue.
- Work your way down the the southwest tip of the island and then east for more battles.
- Pick up the Scroll Fragment. (white circles)
- You will come across another fire wall; build a Frost Tower and then explore to find a chest to get 3 obsidian pieces.
- A Hermit wants 6 Lava Stones; these are in the lava pools and you can find them by clicking on the steam vent (see yellow circles)
- Find another Scroll Fragment on the southeast corner of the island.
- Now be careful; you don't want to go very far north at all--just to the next two pyramids to destroy them.
- Do not go near the red sparkles. Look at the map; don't cross the double red line.
- By this time you should have found 8 obsidian to fire up the Idol of Purity
- You will also find another Idol wanting 8 obsidian pieces.
- Work your way back the way you came.
- While doing all this start filling the northern coast with towers. Leave one unupgraded by the fire wall until your army has arrived and then make it a Frost Tower.
- After defeating the skeletons in the valley, work your way around the northeast end of the island and find another Idol that wants 8 obsidian pieces.
- Work your way down south to the next pyramid.
- Keep building those arrow towers.
- When you get the 3rd sword, give them to the Battle Master and train.
- Work your way east to the coast and pick up the last piece of the Scroll; give it to the Shaman.
- You will now have the ability to get through that last Fire Wall with your Shamans, so return to the village and then down to that wall near the Shaman's Hall.
- You should also have the Lava Stones collected ;give them to the Hermit and he will fix the Sphere of Clarity.
- Use it and you can see the center of the island where there is a bunch of stuff to pick up.
- Move past the now dead Fire Wall and destroy the last 2 pyramids.
- Pick up the Blessed Ring, Scarab, and Obsidian pieces.
- Return back through village, up to the northeast end of the island, and then work south. Why are you doing this? Because the enemy comes up the coast and you don't want to have to chase them.
- When you get down to the cave from the norteast, you will need to kill off the skeletons.
- You will then get a giant Shade and a bunch of little shades (and I mean a bunch!). Your army will probably be decimated.
- Because you can only charge one idol at a time I just kept charging the Idol of Flame for the meteor shower and then switched to the Battle Fury when you bring the army down to battle the shades again. One batch will come up to the northeast corner. Once you defeat them, charge up all the idols again before you head down into the shade's valley to battles.
TOP
BEETLE ISLAND - Chapter 15
- Build up the village with all that you have (except Sky Hall).
- Try to leave room for a second Archery Range. Fill in with lots of Shaman Tents.
- Don't go through the pass to the north and you won't get attacked.
- Take your scout off to the east while you are building up.
- Pick up Energy Sphere below the Flame Puzzle.
- Flame Puzzle - The start of this is random. Clicking on one flame will change the two flames that are directly opposite (with two unchanged flames in between on both sides). When all flames are lit you will get the Rune of Earth.
- 6 flames lit - Click on a light next to the unlit one, then click on one of the two lit flames next to each other, to get 2 lit with 1 unlit in between
- 2 lit with 1 unlit in between - Click on the unlit flame in between the 2 lit flames and then on one of the two newly lit flames, to get 2 lit with 2 unlit in between
- 2 lit with 2 unlit in between - Click on either flame to get to 1 lit
- 1 lit - Click on the two unlit flames on either side of the lit one to light them all.
- You can use the Shamans in your army to break through the flame wall on the eastern island while waiting on the buildings to complete.
- You will want one Arrow Tower and one Mud Tower at the entrance to the pass and another set on the other side. Then you will want both at each of the 4 beetle holes.
- When you beat the Beetles, you will get the Totem.
- Use your Shamans to break through the fire wall and pick up Energy Sphere.
- Head up the northeast path. You will be asked for some fruit and given a seed to plant and also find another Energy Sphere
- Use the Rune of Earth (see flame puzzle) to get through northwest gate.
- Pick up another Energy Sphere.
- Go west across the sandbar to little island.
- Plant the seed just south of the fountain.
- Pick up the bowl to the south and fill it up in the fountain and pour it on the seedling. Find the other two fountains and repeat.
- Pick three fruit and give it to the witch.
- You will now be able to build an Herb Garden.
- Place the 4 spheres on the device at the north end of the eastern island.
- You will receive a scarab.
- Return later to get a feather and with scuba gear to get
more gems.
- Collect a feather
- Swim to the southeast for a gem and the Necklace of Health
TOP
You should have all scarabs except one from Abandoned City (unless you have done it already)
ABANDONED CITY (interlude0
- You will be attacked quickly, so build a Barracks first, then 2 Towers (to the northwest and northeast), and then a Workshop and Archery Range.
- Upgrade the 2 Towers to Arrow Towers.
- Build everything.
- If you have waited to play this level, you will have more to build and more strength. If you are not waiting, be sure to build an extra Archery Range. The map is my first time through the level as soon as it became available. The second time, I used 8 Shaman Tents and the Hall of Mysteries in addition to Barracks and an Archery Range.
- You'll be able to see where the enemies come from so build a couple more Arrow Towers. I built one between the first two Towers and the second time I needed one further up the east coast to protect my buildings.
- Once you have your army built, explore with the army.
- Pick up the items your enemies drop when they die as you go. You will be picking up 10 Hearts of Stones, 10 Demon Wings, 9 Lava Stones, and 23 Water Drops.
- A Nomad in a tent in the north will take the stones and wings for a Glyph of Air and Glyph of Earth.
- The Lighthouse on the northeast coast needs 9 Lava Stones; you will receive a Glyph of Fire.
- There is a fountain in the center that needs the water drops. However, you need one more to make 24. There is a drop on the island in the southwest. You should be able to see the island, but if you can't see the water drop then build a tower.
- Deliver 24 water to the fountain and you will receive a Glyph of Water.
- On your exploration you will discover a locked chest surround by 4 pillars; place the glyphs to match the colors.
- You will receive the Scarab.
- There are also 2 wood chests that contain name plates (see green circles). Those go on the big screens with triangle buttons on it.
- This screen puzzle is difficult to solve. There are two and I would suggest doing the southern one first.
- Basically you have 4 semi-transparent images that need to match up to make a solid picture.
- Each image has its own horizontal and vertical arrow.
- The first goal is to get the 4 images lined up and then you need to get the final image framed properly.
- The map has the final image shown plus a few spots that are easier to use to line up.
- Unfortunately you can't really tell which button to use so if you move the wrong one, you'll need to move them all.
- On the first one, I found the horizontal red line the easiest to line up using the down arrows. You can actually see the line move down as you press the button.
- Once those are all lined up, use the right arrows to line up a head. Again, you can actually see the head that is not lined up moving as you press the button.
- If you go out of focus, then press the other buttons once to match up and try to remember which ones were the ones that were already lined up.
- Once you have a solid image, you need to press each down button once and then again until the image is correct on the bottom and then repeat for the right.
- The second picture is a bit harder to do and I used the blue crook and the arms above. Good luck, and be patient!
- See the map; the final image is in the screen and the image in progress is above to see what I'm talking about.
- The devices will give you a Crook and a Flail. The statue behind the last locked chest needs those. Receive the last Gem of Power.
- You will need to return later with scuba gear for gems and the rosaries for an amulet piece
- Obtain the amulet piece in the same fashion as the Great Desert.
- Swim to an island in the southeast for gems.
TOP
Return to Tetala Island
- Place the Gems of Power on the columns surrounding the chest.
- Click on the chest and pick up a Magnifying Glass piece.
- Place the Scarabs in the puzzle in the north between the 2 sphinxes.
- Each Scarab becomes a different color.
- The left arrow for each device swaps the bottom two scarabs.
- The right arrows moves each scarab up.
- You need to match the colors on the scarabs to the colors on the buildings; the only problem is that the color closest to the coast will be at the top. Yellow, red, green, blue for the left and blue, green, yellow, red for the right.
- Once solved, a new area will open up.
THE GAZING CANYON (interlude)
- You can do this level now or after you get the Temple to build. The map here is with the Temple. Second time through I tried it without and all you need to do is build a LOT more Shaman Tents.
- When you come through the gate, immediately build a hut and plant your scout and army flags (you don't want them to wander)
- Build the Barracks, Workshop, and Archery Range.
- Then build 2 to 3 Arrow Towers to the south (on the way from the flying eye nests), another 1 to 2 Arrow Towers to protect from the nest in the west, and another 2 to 3 to protect from the north where the pass is. Do them one at a time in each area until you can get a feel for where the eyes are coming from.
- Start building everything except the Sky Hall. I ended up with 17!!! Shaman Tents by the time I fought the boss.
- When you have everything researched and have a few Shaman Tests, head south to battle the first two nests.
- Check to make sure that you are hitting the nests from your location because you have to be positioned correctly, if you don't have a Temple. See black boxes.
- Tackle the nest in the west next; that way you can start safely exploring.
- You will need to pick up 7 blue stars and 7 yellow stars (blue circles) for 2 locked chests, which hold the Seals of the Magi.
- Keep building those Shaman Tents while fighting and exploring.
- When you go after the nest in the north, stay up there because there is another nest there that you can't see.
- Find the black balls that match the holes in the north. Place those and you will get a ramp to the last nest.
- Once you are done with the nests, move the army to the 4 holes near the pyramid.
- You can build a few towers there but I'm not sure you really need them if you move your army forward for the boss battle.
- Keep building Shaman Tents and exploring.
- When you are ready, move the army between the 4 black devices, place the 4 black balls in their matching, and move your army up the ramp to find that weird thing. I didn't have any problems (well, who would, with 17 Shaman Tents?)
- You will not have to come back here if you found all the gems the first time through.
- You will need a tower at the edge of the canyon near the
western nest to find a gem (see the map)
TOP
THE PYRAMID (interlude)
- In addition to wandering everywhere, you need to click on any unlit lights, wall blocks that are out of place, and turn down the horns of bull statues. All of these are circled on the map, if you can't find them.
- If you find that you have come to a literal dead end, look around for these things to push or pull and/or check the map.
- In addition, there are two floor puzzles. The first one requires that you plant your flag on one and when it is pressed down, pick up one of the characters and dropping it on the floor piece.
- In the last room, there are several floor pieces to step on in a pretty easy sequence. I started off towards the right. You may have to step from one floor piece to another diagonally from corner to corner. Fortunately it was easy enough that I accidentally did it without taking good notes, so it shouldn't be a problem.
- When the chest opens, you will receive the final piece of the Magnifying Glass.
- You will return after you get an Ankh to place on the wall from Firefly Island (if you've been there already, you just need to return and possibly click on the tent in the southwest)
TOP
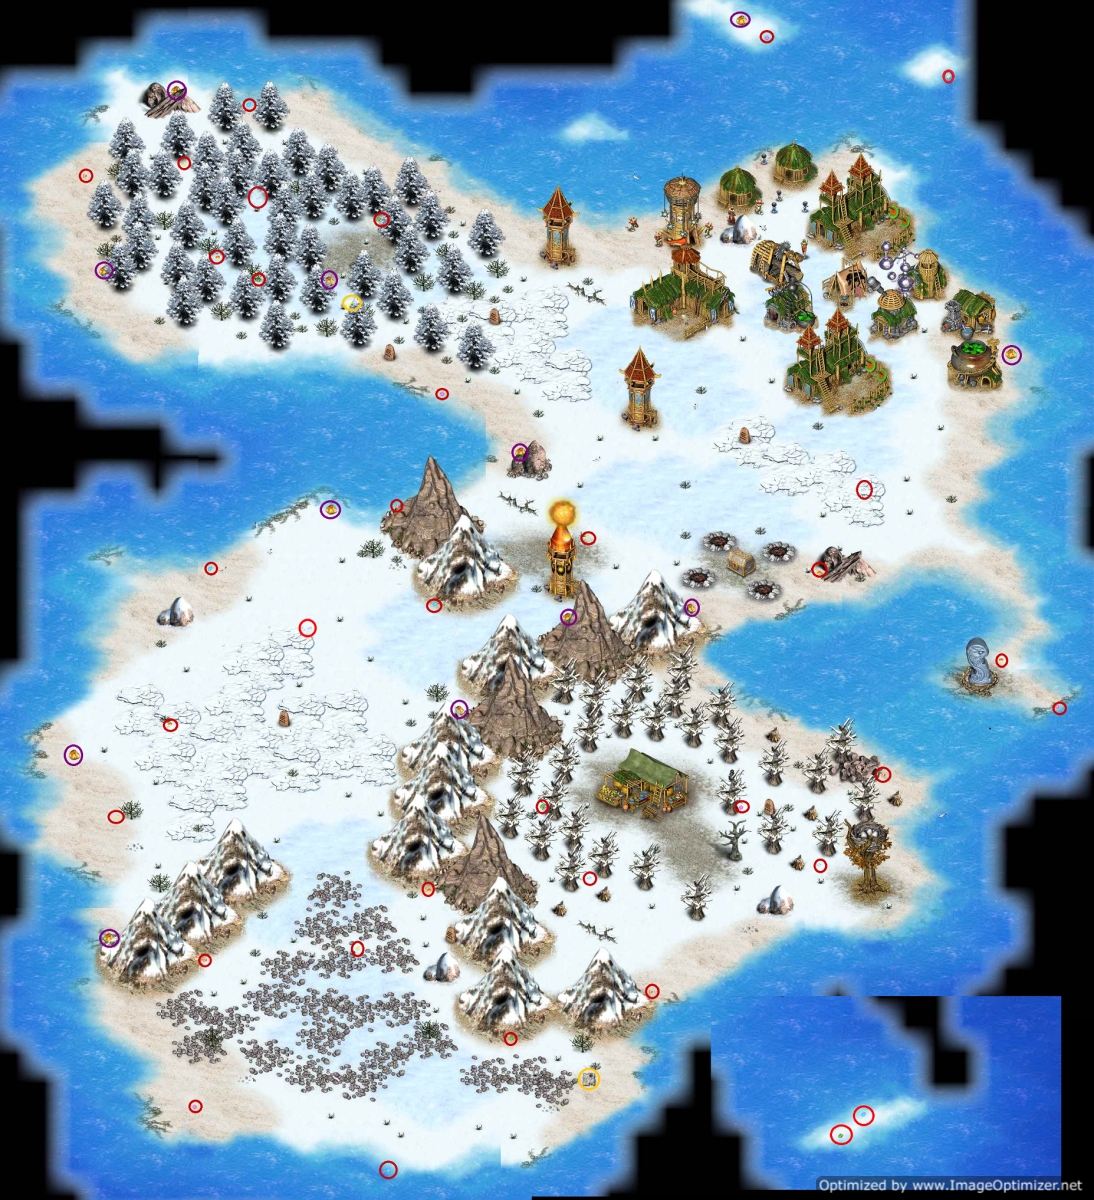
FIREFLY ISLAND (interlude)
- Start exploring. Pick up leaves as you go.
- Check out the small owl totem lights.
- The owl glade has 5 owl statues with colored lights that change when you click on the owl. You need to find all the hints.
- Northern owl is neither red nor yellow.
- Western owl is not red and not blue.
- Yellow owl is not western nor eastern.
- Green is not western, blue is not central.
- Middle is not yellow or red.
- So western owl is not red, blue, yellow, or green; it's purple
- The central is not blue, red, or yellow; so it's green
- The north owl is not red or yellow; so it's blue
- The eastern owl is not yellow; so it's red
- South is yellow
- As you search the islands for 3 types of leaves (blue leaves), you will find 3 new owl statues. Each one wants 12 of a certain leaf to clear the way.
- The northwest hut occupant wants 6 shark teeth.
- The southwest occupant wants an amulet and will give you the Ankh needed in the pyramid (but only if you've been to the pyramid first).
- The southeast occupants wants 8 feathers.
- You will return to Firefly Island when you have collected the shark teeth, feathers, and amulet.
- You need rosaries from the Pyramid to get the amulet a
- To get the Shark Teeth, you need to have the Scuba Gear (Shark Archipelago) and a Harpoon (Lonely Iceberg). The Shark Teeth are on Tetala Island, Shark Archipelago, Lonely Iceberg, Red Rock Island, Ruins of Dream Shore, and Blueberry Island
- Some of the feathers need scuba gear to get to. The Feathers are on Beetle Island, Monkey Island, Witch Island, Blueberry Island, Skull Island, Island of Yeti, Scorched Island, and Cradle of the North. All the feathers are under the nests.
- Return to Firefly Island when you have collected everything.
- Once you have the Amulet, 6 shark teeth, and 8 feathers, return to Firefly Island.
- Give the shark teeth to the shack in the northwest and receive a necklace.
- Give the feathers to the shack in the southwest and receive a headdress. Place all three item on the three person statue in the center south.
- You will now be allowed access to the Wolverine Village.
- You will receive the Wolverine Symbol, which will give you an additional person per building.
TOP
SHARK ARCHIPELAGO - Chapter 16
- You have just a scout and no building. Start exploring and you'll discover you are on a very small island, called Purple Island.
- Pick up turtle shells (blue circles) and skulls (purple circles) as you go.
- There is a tile turning puzzle at the south end of the island. See map for final image needed. Pick up a purple crystal.
- You will find a valve handle above the fountain in the south.
- Place the purple crystal in the gold device inside the circle of stones.
- When you are finished exploring, walk into the circle of stone and click on the device to travel to another island, Dirty Island.
- You need to get rid of the pulsating dirt blobs, by clicking on them twice.
- You will automatically get a yellow crystal when you get the last one.
- At the bottom of the island, there is a pattern of flowers that you will probably need.
- At the top of island, there is a puzzle. You need to get the balls down to the column directly below the starting.
- When you press the button, the heaviest ball moves; so you need to get the lightest ball to the ending point first, then the middle (white) one, and then the heavy (red) one.
- Press the buttons in this order: Left, right, bottom, left, right, bottom.
- Pick up the Energy Sphere.
- Place the yellow crystal in the bottom gold device, step into the circle, and press the center device.
- You will now travel to Yellow Island; keep picking up turtle shells and skulls.
- Find the second valve on Yellow Island (black circle).
- Find the red and white lights and match it to the flowers.
- Pick up the blue crystal.
- Return to the main island and use the blue crystal by placing it in the gold device, walk into the circle, and click on the center device.
- On the blue island, place the two valves and the Energy Sphere to empty the lagoon.
- Pick up the Aqualung (scuba gear) from the chest and now you can swim; but watch out for sharks.
- Go back to the main island and start swimming north and counter-clockwise. If you look at the main map you can see that there are sharks swimming around the center.
- Note that if you do die from a shark, then you will come back to life on the Yellow Island.
- In the northwest corner you will find a chest that needs 9 skulls. It holds the map to Ghost Island.
- In the southwest corner, you will find an Energy Sphere.
- When you get to the guide stone that says Do Not Feed the Sharks, take the shortest route up to the closest island (yellow)
- See the tower? Go to the yellow flower and swim over to that island. Hopefully you can clear the black before you get killed and find out that you need to give the Tower's occupants 24 green shells. They will kill off the the sharks down in the southeast.
- While they're doing that, you should try (and keep trying) to swim over to the center island.
- The sharks move around it in two groups, so just do your best to time it so that you get over there between groups; if you die, just plant your flag back at the scout lodge on yellow island until you come back. I didn't try this; but picking up your swimmer might help.
- Once you get over to the central island, pick up the stuff and see that you need 32 blue shells to open the chest. It holds the totem.
- Just plant your flag on the scout lodge and come back to life over there.
- Swim over to the southeast island once the sharks over there are gone.
- Put the energy sphere at the base of the lighthouse.
- Turn the light so that it lines up with the one to the west and turn that one to line up with one in the north, then east, south, west, and then south.
- Open the chest with the Rune of Water.
- Return to the main island and place the rune on the gate.
- Open the chest and pick up the Shaman's Mask.
- You will need to return later after you get a harpoon from Lonely Iceberg.
- Fight the Great White to the north of the central island. You'll need to kill the other sharks first.
TOP
GHOST ISLAND (interlude)
- You can play after you get the Temple from the Island of Worship (as the map shows) or before with lots of Shaman Tents. I did it both ways and they are about equal.
- Build up your army.
- Send your scouts to explore the waters. You will find 3 Foxy Stones in chests.
- Head south to battle the ghosts there as you have a bottleneck going around the end of the range and a place to gang up on the bad guys if your army dies.
- There are 3 bone chests (yellow circles), each of which have a big skeleton to beat.
- When beaten each skeleton will drop a third of the crown.
- Once you beat the 3 skeletons in the south, send your army to the other area.
- Give the ghost king his crown and you will have less enemies attack.
- Beat the 3 skeletons, get the crown, and give it to the other side.
- Both kings will drop a foxy stone.
- Place the 5 stones on the fox statues to dispel the dark.
- The chest just north of the village will open with the Vial of Longevity
- There is another locked chest on the southern coast; give it a Seal of the Magi and you will collect the black oil.
TOP
ISLAND OF WORSHIP - Chapter 17
- Do not click on the Temple directly to the north as that will start a battle.
- Build up your army with lots of shamans.
- Explore with your scouts and pick up the fruit
- Don't forget that you can swim now.
- Solve the 4 column puzzle. It's just like a Sudoku puzzle. Only one of each icon on each obelisk and only one of each in each row. You will receive the Scroll of Thundermagic
- Click on the pyramid when you are ready to battle.
- You will be attacked 3 times and of course each time worse. The first time will be fairly weak enemies.
- After feeding the 3rd idol, you will have flying eyes attack you. Be sure you are ready for that.
- Also take a break and repair and charge your idols before feeding the 5th idol.
- Idol of Divination is in the southeast (you don't need this one for the battle), so don't waste time charging it up yet.
- Idol of Storm is in the northeast
- Idol of Purity is in the south west
- Idol of Frost is in the northwest
- In the north you have to choose between Idol of War on the left and Idol of Protection on the right.
- When you defeat the False Aruku, you will get the totem.
- Now charge the Idol of Divination and use Clairvoyance in the south.
- Click on the button in the east valley (white circle).
- Send your scouts down to the chest and get the Masking Cloak (now they don't have to worry about being spotted by the enemy)
- Have them swim around to the other side and press the same button again. You will receive the last Shaman's Mask and can now build a Temple.
- If you haven't noticed already, the 3 pyramids in the north tell you that there is nothing in there. Do you believe them? Keep clicking on the right one and you will get several gems. Only one of them will give you gems and both times I played it was the right one.
TOP
Return to Lonely Iceberg
- Return after you get the Masking Cloak on Worship Island
- Click on the Scout Lodge; they want the Cloak.
- Click on it again and you will now control the scouts.
- Swim onto the island in the bay.
- Regular sharks can't see scouts unless it's a Great White.
- Pick up the harpoon, which is in the chest.
- Regular sharks are easy to kill so go ahead and do so.
- Explore all the way around the island, avoiding the northwest, to get gems.
- When done head to the northwest to kill the Great White Shark to get a shark tooth.
- Killing Great Whites is hard to do. Luckily you will come back to life if you die.
- Pick up one scout and place him down away from the other scout. As soon as the other scout uses the harpoon, pick that one up and pull him away. If you are lucky, you can do this several times, pulling one and then the other away, until you kill the shark. If you are able get your scouts placed on an island, that will help.
- I have found that one scout can't kill the shark.
- The shark is in the northwest.
- All the gems are on the main island.
- Click on the Blue Sphere to see the lake area and get some gems
- Get the feather from an island in the southwest and more gems on an island in the southeast
- The shark is in the east along with an island with gems.
- There is another island in the northwest with a gem.
- Get the feather
- You can do everything all at once now or if you have already been here once, then you'll just be getting the shark tooth, white oil, and off shore gems
- Explore
- Find missing pages (4) (yellow circles)
- Pick up 16 wood (blue circles)
- Put the wood on the fire and put the cauldron on the fire.
- Pick 8 brown mushrooms (no red), and 6 each of red, blue, purple, green, and yellow berries. They are all on the west side of the island and are not marked on the map because they are easy to find. They will also grow back so if you lose some from either picking red mushrooms or making a recipe mistake, you will be able to get more.
- The pages you picked up tell you the recipe (or part of it)
- The recipe is: 1 red, 3 purple, 1 _____, __ green, 3 _____, 2 _____, 3 yellow, 2 red, 2 blue, 3 green, 8 mushrooms, 1 yellow, 1 purple, 1 green, 2 yellow, 3 blue.
- If you count the number of each color you have quantities for, it is very easy to figure out what goes in the blank
- For green, you already have 4 so it will be 2 green
- For red, you already have 3, so it will be red for the blank 3 spot,
- For purple, you already have 4 purples, so it will be purple for the blank 2 spot,
- For yellow, you already have 6, so there's no more.
- For blue, you already have 5 blue, so for the blank 1 spot it will be blue
- Final recipe is: 1 red, 3 purple, 1 blue, 2 green, 3 red, 2 purple, 3 yellow, 2 red, 2 blue, 3 green, 8 mushrooms, 1 yellow, 1 purple, 1 green, 2 yellow, 3 blue.
- The feather is on an island in the southeast.
- The white oil is in a chest in the southwest .
- The shark is in between.
- There are gems on both islands
TOP
Return to Skull Island
- Collect a feather
- Swim to the last gem in the east if you couldn't get it from the land.
- Return to collect a feather
- Swim to some gems in the southeast.
- Swim to the last gems in the east; see the bridge? You can't use it but that's the island you need to get to.
- Collect a feather
- Swim to find gems, in the chest in the east and an island to the west.
- Collect a feather by swimming to the east
- Swim to find gems to the west
- Collect a feather
- Swim to the southeast for a gem and the Necklace of Health
- Fight the Great White to the north of the central island. You'll need to kill the other sharks first.
THE PYRAMID--Part II
- Return after you have the Ankh from Firefly Island anytime.
- Return to the last puzzle room and place the Ankh in the wall painting's empty hand.
- You will only have to return to this room once and only to go into an adjoining room. Do not waste your time looking around the halls you have already been to unless you are looking for gems.
- Pick up white and black balls as you go
- Turn on unlit lights, press on bricks
- Note the paintings that have empty hands.
- Open chests as you go to pick up Ankhs and Pattern Tablets
- You will come across another floor puzzle where the first panel is in pink and the second one is further right on the gray floor.
- You will have to close the map to be able to see both sections.
- Just pick up one of the people and drop it on the pink floor section.
- Once you have 6 Ankhs, you can enter the last room by placing the Ankhs in the paintings with the empty hands (see orange circles).
- You should also have collected 17 white beads, 17 black beads, and 3 pattern tablets. The last two beads will be in the final room..
- You will find 3 locked chests which tell you to use the Sacred Summator.
- Read the 3 obelisks. These are showing you a math problem.
- The first bead plus the second bead equals the third bead.
- White beads are worth 0 and black beads are worth 1.
- If you are a math person, you will be able to figure out that this is binary math.
- If you are not, you might want to google it or just trust me and read on.
- So you have: 0 + 0 = 0; 0 + 1 = 1; 1+ 0 =1; 1 + 1 = 10
- Basically the right most number counts your 1's, the next one counts 2's, then 4's, then 8's, 16's, etc.
- The good thing is that all you have to do is add them together and not figure out what the number really is.
- If you are not good with carrying your 10's when you add, you might just want to look at the solution.
- All you need to do is start from the right.
- If there are 2 whites, put a white in the solution.
- If there are 1 white and 1 black, put a black in the solution.
- If there are 2 blacks, you put a white in that solution and carry a black to the next column over.
- Click on the white beads and place them in the hole and then the black beads. 6 of each will go in.
- Then click on the pattern tablet and place it into the oblong hole.
- The machine will show you a 6 place addition problem. You just need to change the bottom row from white to black when necessary.
- Solutions: 101101; 110101; 110001
- Pick up the 3 Rosaries and you are finished.
TOP
You should have 3 rosaries, white oil, and black oil. If you don't have the white oil, go back to Blueberry Island; if you need the black, go back to Ghost Island.
Return to the Great Desert
- Find the 4 obelisks that have 3 cups on them. Their location approximately matches the location on the rosary you now have.
- You want to copy the bead pattern on the rosary onto the obelisk cups using the black and white oils.
- When you do this properly for all 4 obelisks, your view will be switched to a temple, which will light up.
- Click on the Temple and you will receive an amulet piece.
- Swim to get the gems from the 2 islands in the southeast to finish up.
- Obtain the amulet piece in the same fashion as the Great Desert.
- Swim to an island in the southeast for gems.
- Obtain the amulet piece.
- Once you have 3 pieces you can repair it in the same fashion that you did for the copper key in the crocodile mouth.
THE RUINS OF DREAM SHORE - Chapter 18
- Besides the other goals, you will be obtaining the 6th shark tooth.
- Build a Scout Lodge and start exploring. Remember that you have the invisibility cloak and scuba gear so go everywhere.
- There are portals on the ground with dots moving in for entrances and out for exits. Use these first to maximize your exploration speed.
- It's not really necessary to figure out where each one goes as once you have done it once you can just plant your flag where you want to go and you will eventually get there.
- While exploring, build up your army to the max.
- The enemy will never come to the village so you don't need to worry about defenses.
- As you come across the tall stones, click on them.
- Eventually you will find 9 stones and when you get them all vibrating, you will get access to a chest north of your village, which holds the Tribal Amulet.
- The access to the northwest section is through the center southern section.
- There are 4 sections with shades. Battle them when you are ready.
- After the last shade in each section perishes, it will drop a black sphere.
- When you have four of them, you need to place them in the holders surrounding the hole in the center. Be sure you are ready for a big battle before you do so.
- Upon finishing, you will receive the Crow Totem
- In addition, you will find the last shark tooth in the southwest without killing a shark.
TOP
Return to Firefly Island
- Once you have the Amulet, 6 shark teeth, and 8 feathers, return to Firefly Island.
- Give the shark teeth to the shack in the northwest and receive a necklace.
- Give the feathers to the shack in the southwest and receive a headdress. Place all three item on the three person statue in the center south.
- You will now be allowed access to the Wolverine Village.
- You will receive the Wolverine Symbol, which will give you an additional person per building.
- Start exploring. Pick up green, blue, and orange crystals to power the idols you will find.
- You will need to go to the very tip of the island behind the idols near the pile of rocks to get a crystal from a tree on the center eastern shore.
- You will need to destroy the crystal pedestals with the dark totems. It doesn't matter which one you use.
- Some pedestals will require you to solve a puzzle before you can destroy it.
- The puzzle with the balls in the west requires you to light up all of the small balls.
- This can be done with three clicks.
- The map shows which ones to press (in blue).
- There is a crossbow contraption in the center. You can use it at anytime on the large blue and orange crystals (and later a green one); however, you cannot break through the large crystal blocking the way.
- You use the top two buttons to turn the crossbow.
- You use the bottom two buttons to raise and lower the angle.
- Pressing on the crossbow itself will let an "arrow" loose.
- You need the hit the large crystal 3 times and it will explode and leave gems.
- Once you have all 9 green crystals, charge the idol that wants them and zap the large green crystal blocking your way.
- The next puzzle is a simple matching/concentration game.
- The next puzzle to the east is the traditional ovee the black balls to the right and the white balls to the left by jumping the over each other.
- If you mess up you can reset the puzzle with the center button.
- Click right black, left white, center white, right black, center black, left black, left white, center white, right white, right black, center black, left black, center white, right white, left black.
- You should now have enough blue crystals to charge that idol and break through the blue crystal blockage.
- There are some thorn flowers on your way west; zap them with one of the idol powers.
- The next pedestal does not have a puzzle
- Break through the orange crystal.
- You will notice a set of three crystals blocking the way north. Use each of the three powers to break through.
- The next and last puzzle is one where you have 3 tin coins and 3 copper coins. You need to get rid of them by throwing them in the water; however, you might need to get some more to get rid of them.
- Feed the left most water two tin coins and receive one copper coin back.
- Put one tin coin in the next water over and receive two tin coins back, twice, for a total of 4 tin coins.
- Put two copper coins in the next one over, twice, to get rid of all copper coins.
- Destroy the final pedestal.
- You now need to find the entrance to the comet. (head east in the north),
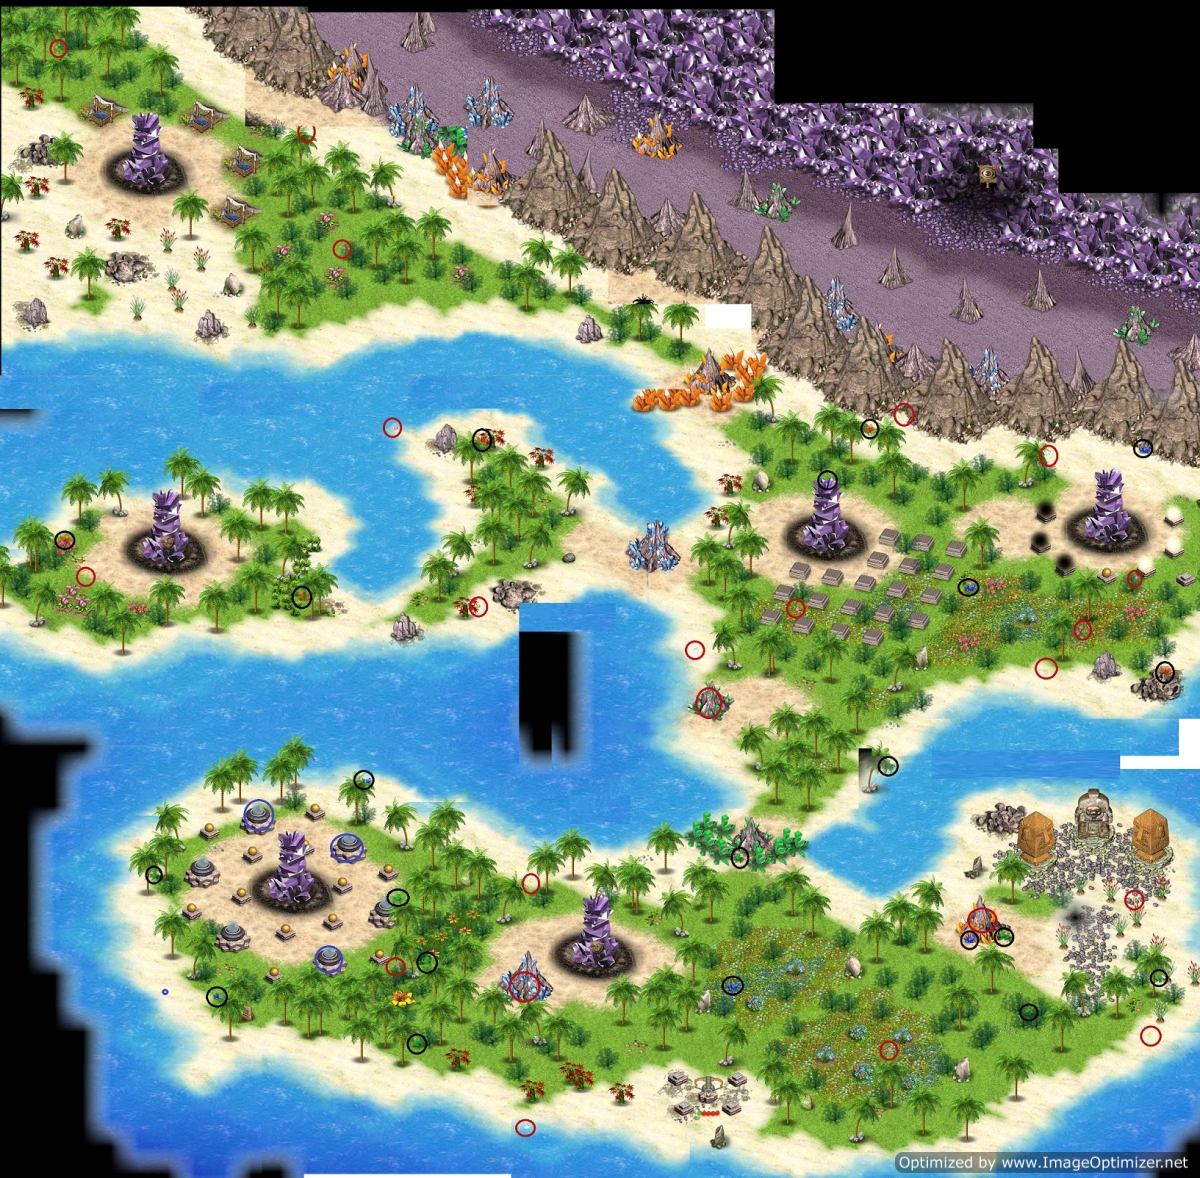
TOP
Before you enter the comet, you will want to finish everything else off.
You will need to find ALL 101 gems to build the Rainbow Road and access the Guardian Moon.
If you are super keen on your score, at the end there is a score for percentage of the world explored. I'm not sure which counts more, a shorter length of time or a more complete exploration. I got lazy and went for a shorter length of time.
GUARDIAN MOON
- You need to have collected all the gems to get access to this area. There are no gems to collect on this level.
- Go south to pick up an Energy Sphere and place it in a holder to the east of your starting point to light your way through the clouds. (purple circles)
- Pick up the lightning traps as you go; when you get to the device with 4 gold balls on it next to the face statue, place a lightning trap where the lightning is hitting the ground. You will notice that one of the gold balls lights up.
- You need to find another 3 lightning traps and 3 more lightning strikes.
- Just northwest of this you will find a puzzle with a 4 by 4 arrangement of balls.
- You need to light all 16 up.
- When you click on one ball, all the other balls in the same column and row will change also.
- You will need to click on an unlit ball and then on every other ball in the same row and column.
- Solving the puzzle will give you the Relic of Prosperity.
- You will find a Discharged Sphere just north of this puzzle.
- The next puzzle requires you to move "mini-me" from one end of the board to another without taking more than 3 steps before you encounter a red circle.
- Pick up an Energy Sphere when you finish.,
- Place the Discharged Sphere on the 4 ball contraption to charge it up.
- Make your way back up north to place the ball just east of the second to the top pool (the one with the train)
- You will find another discharged sphere in the center north just to the east of a sphere holder.
- Charge it up and place it in a holder.
- When you make your way to the water, place the Tear of Heaven into the water to receive a purified tear.
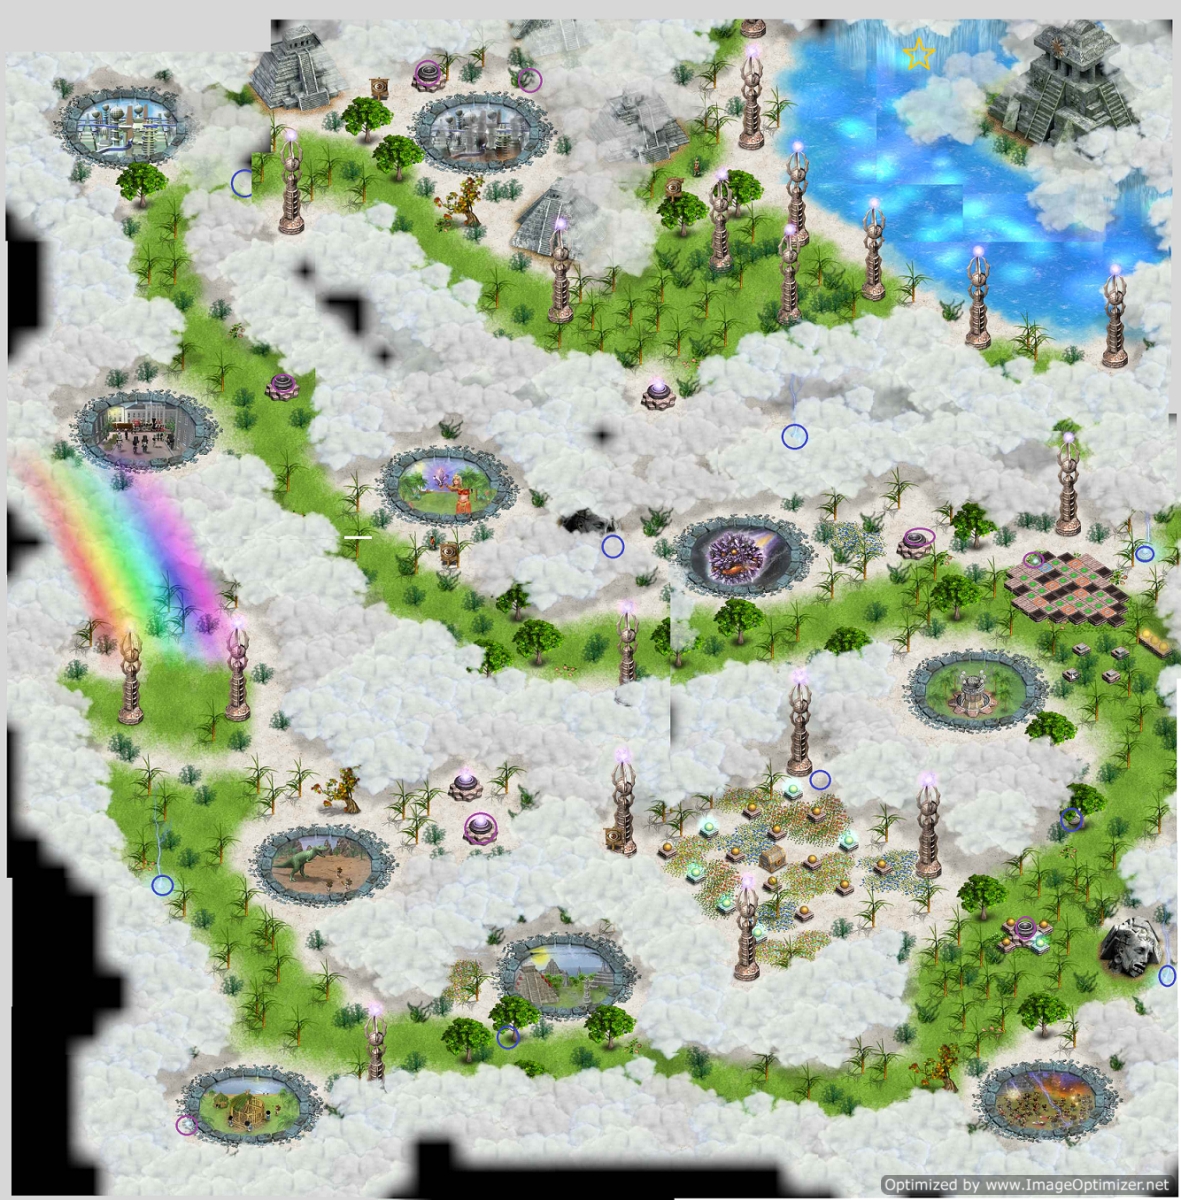
TOP
INSIDE THE COMET - Chapter 20
- Do not do this level until you are ready. You will not be able to come back and replay your game.
- There are no gems on this level.
- Remember you can restart this level and thus can also go back to play other levels, if you haven't finished the level.
- Lots and lots of fighting on this level.
- Start building and NOT EXPLORING.
- The available building area is the bottom left of the screen. It's a little larger than 1/4 of the area.
- Build 3 huts and 3 towers around the huts.
- Build barracks and upgrade the huts to guard huts.
- Build scout lodge, workshop, archery range, smithy, laboratory, shaman's hut, witch doctor's shack, and marketplace.
- This will take a bit of time so be patient, by the time I won the first battle I had 2 archery ranges, 2 temples, 2 witches shack, 14 shaman huts, 7 guard towers. (see map for this configuration)
- Up until beating the first boss, which is like a giant idol, you will be fighting the occasional bad guy in the northwest and southwest of the building area. They seem to come up out of the ground. Go ahead and build a guard tower in each of these areas. See black stars.
- I also built a lot of arrow towers along with the guard towers but I am not sure exactly how effective they were at defense. It seemed to me that a swarm of guards was the best way to get rid of the bad guys.
- Keep an eye on where the enemies are coming from and build some protection near by.
- Start exploring with your scouts while finishing up the building. Remember they have the masking cloak. You will find the boss in the northeast. You won't be able to get past the double yellow lines on the map.
- Charge up the temples; I used Battle Fury almost exclusively. As soon as one temple charged up, I would start the second temple, and then use spell.
- A lot of your army will die and you will find that you have a continual stream of replacements.
- When you notice that you just aren't getting much effect on reducing the health of the boss, pull back around the corner to let your regenerated army regroup. (see where the army is on the map for the regrouping location). Luckily, the health does not regenerate on the boss as you wait.
- After a long time fighting, you will eventually kill off the boss and another alien boss will show up. Regroup with your army. Make sure you have all the buildings repaired.
- Note where the new bad guys are coming from when they attack your village. They are now more in the central north and central south area. (see the red stars) Build more guard and arrow towers.
- Start exploring everywhere with the scouts. More areas will be available to you.
- You will notice the big toothed holes; you can "win" the game by feeding the holes your army but you want to win fair and square.
- As you explore you will find these silver obelisks. Destroy them as they seem to provide energy to the big alien.
- In the far northwest corner, there is an obelisk but there is a hole in the way. Plant your flag right against the wall beside the hole in the hopes that you can work your way past the hole. It may take a lot of tries.
- Once you have found and destroyed all 6 obelisks, start battling the new boss.
- Beating this boss is just a matter of persistence and time. Keep using Battle Fury.
- Keep an eye on your village. Repair damaged buildings and build more guard towers if needed.
- At the very end, you will need to use the Tear of Heaven on the big alien to destroy him.
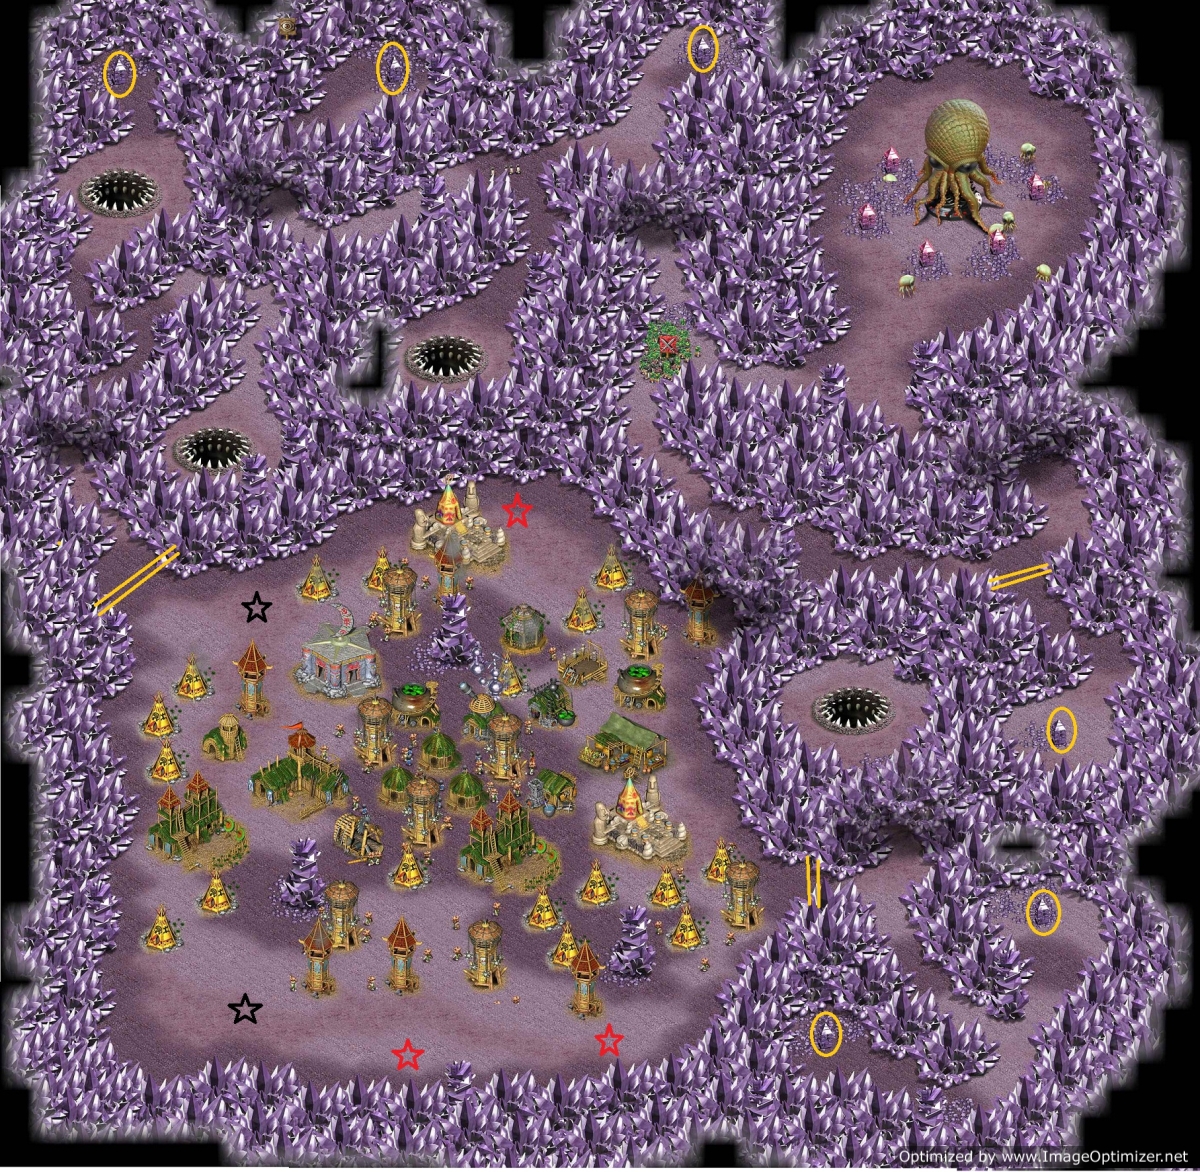
THE TREASURES
1. Bracelet of the Hawk - Island of Yeti. All of your followers are trained 20% faster.
2. Crown of Defender - Scorched Island. Towers are built 25% faster.
3. Diadem of Courage - Dolphin Island. Your fighters deal 20% more damage.
4. Necklace of Spirits - Beetle Island. Shaman have 25% more health and slowly regenerate it.
5. Hunter's Lucky Stone - Red Rock Island. Your hunters move 10% faster and deal 10% more damage.
6. Tribal Amulet- Ruins of Dream Shore. Your cavemen move 20% faster.
7. Amulet of Wisdom - Mist Island. You do research 25% faster.
8. Pendant of Power - Cradle of the North. You have a 10% chance to use magic without losing the spell.
9. Pendant of Nature Force - Monkey Island. You have a 7% chance to complete building construction immediately.
10. Vial of Longevity - Ghost Island. All your people become 20% more healthy.
11. Sphere of Clarity - Witch Island. Your archers can shoot 10% farther.
12. Blessed Ring - Volcano Island. Witch doctors and shaman receive 15 armor points.
13. Magnifying Glass - Tetala Island and The Pyramid. This helps when looking for gems.
14. Healer's Globe - Frozen Vale Island. All of your witch doctors have 20% more health points and move 20% faster.
15. Harpoon - Lonely Iceberg. Your scouts get the ability to fight in water.
16. Aqualung - Shark Archipelago. Your scouts are able to swim.
17. Masking Cloak - Island of Worship. Enemies cannot spot your scouts.
18. Traveller's Boots - Skull Island. All of your people move 25% faster.
19. Relic of Prosperity - Guardian Moon. You get +1 inhabitant in every dwelling.
20. Heart of Bull - Seagull Island. All of your people regenerate 20 health points per second.

OTHER ITEMS
- Seven Antique Coins - Monkey Island, Dolphin Island, Seagull Island, Skull Island, Witch Island, Frozen Vale Island, Rimy Isles.
- Seven Gems of Power Orange - Monkeys (Monkey Island), White--Birds (Seagull Island) Red--Stones and rocks (Red Rock Island), Yellow--Desert sands (The Great Desert) Blue--Oasis, Violet--Deserted city (Abandon City), Green--Dirt, goo, and swamp (Witch Island)
- Five Shaman Masks - Cradle of the North, Scorched Island, Volcano Island, Shark Archipelago, Island of Worship
- Eight Scarabs - Red Rock Island, Great Desert, Oasis, Abandoned City, Skull Island, Mist Island, Volcano Island, and Beetle Island.
- Four Maps - Frozen Vale Island, Island of Yeti, Scorched Island, Shark Archipelago
- Six Shark Teeth - Tetala Island, Shark Archipelago, Lonely Iceberg, Red Rock Island, Ruins of Dream Shore, Blueberry Island
- Eight Feathers - Beetle Island, Monkey Island, Witch Island, Blueberry Island, Skull Island, Island of Yeti, Scorched Island, Cradle of the North.
Content(s) of this game guide may not be copied or
published on any other site without permission from Casual Game Guides.
©CasualGameGuides.com 2006 - 2021